Tag Archives: Cloud
Trying out the Oracle Cloud Platform
OAC: Essbase – Incremental Loads / Automation
I recently detailed data load possibilities with the tools provided with Essbase under OAC here. Whilst all very usable, my thoughts turned to systems that I have worked on and how the loads currently work, which led to how you might perform incremental and / or automated loads for OAC Essbase.
A few background points:
- The OAC front end and EssCS command line tools contain a ‘clear’ option for data, but both are full data clears – there does not seem to be a partial or specifiable ‘clear’ available.
- The OAC front end and EssCS command line tools contain a ‘file upload’ function for (amongst other things) data, rules, and MAXL (msh) script files. Whilst the front-end operation has the ability to overwrite existing files, the EssCS Upload facility (which would be used when trying to script a load) seemingly does not – if an attempt is made to upload a file that already exists, an error is shown.
- The OAC ‘Job’ facility enables a data load to be conducted with a rules file; the EssCS Dataload function (which would be used when trying to script a load) seemingly does not.
- MAXL still exists in OAC, so it is possible to operate at Essbase ‘command level’
Whilst the tools that are in place all work well and are fine for migration or other manual / adhoc activity, I am not sure what the intended practice might be around some ‘real world’ use cases: a couple of things that spring to mind are
- Incremental loads
- Scheduled loads
- Large ASO loads (using buffers)
Incremental Loads
It is arguably possible to perform an incremental load in that
- A rules file can be crafted in on-prem and uploaded to OAC (along with a partial datafile)
- Loads appear to be conducted in overwrite mode, meaning changed and new records will be handled ok
It is possible that (eg) a ‘current month’ data file could be loaded and reloaded to form an incremental load of sorts. The problem here will come if data is deleted for a particular member combination in the source from one day to the next – with no partial clear (eg, of current month data) seemingly possible, there is no way of clearing redundant values (at least for an ASO cube…for a BSO load, the ‘Clear combinations’ functionality of the load rules file can be used…although that has not yet been tested on this version).
So in the case of an ASO cube, the only option using available tools would be to ensure that ‘contra’ records are added to the incremental load file. This is not ideal, as it is another process to follow in data preparation, and would also add unnecessary zeros to the cube. For these reasons, I would generally look to effect a partial clear of the ‘slice’ being loaded before proceeding with an incremental the load.
The only way I can see of achieving this under OAC would be to take advantage of the fact that MAXL is available and effect the clear using alter database clear data.
This means that the steps required might be
- Upload prepared incremental data file (either manually via OAC or via EssCS UploadFiles after having first deleted the existing file)
- Upload on-prem prepared rules file (either manually via OAC or via EssCS UploadFiles after having first deleted the existing file)
- Access the OAC server (eg via Putty), start MAXL, and run a command to clear the required slice / merge slices (if necessary)
- In OAC, create / run a job for the specified data file / rules file
I may have missed something, but I see no obvious way of being able to automate this process with the on-board facilities.
Automating the load process
Along with the points listed above, some other facts to be aware of:
- It is possible to manually transfer files to OAC using FTP
- It is possible to amend the cron scheduler for the oracle user in OAC
Even bearing in mind the above, I should caveat this section by saying getting ‘under the hood’ in this way is possibly not supported or recommended, and should only be undertaken at your own risk.
Having said that…
By taking advantage of the availability of FTP and cron, it should be possible to script a solution that can run unattended, for full and incremental loads. Furthermore, data clears (full or partial) can be included in the same process, as could parallel buffer loading for ASO or any other MAXL-controllable process (within the confines of this version of Essbase).
The OAC environment
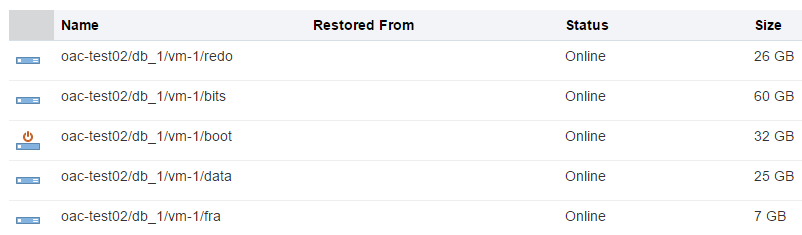
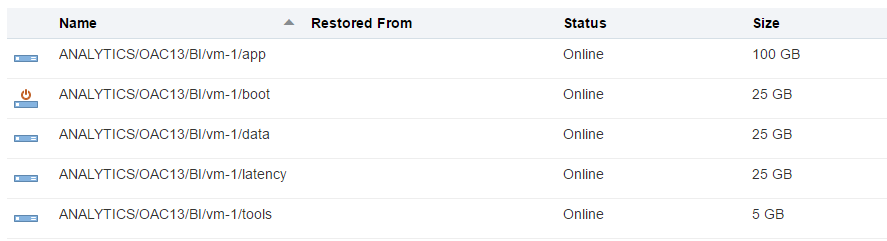
A quick look around discloses that the /u01/latency directory is roughly the equivalent of the ../user_projects/epmsystem1/EssbaseServer/essbaseserver1 (or equivalent) directory in an on-prem release in that it contains the /app ‘parent’ directory which in turn contains a subdirectory structure for all application and cube artefacts. Examining this directory for ASOSamp.Basic shows that the uploaded dataload.* files are here, along with all other files listed by the Files screen of OAC:
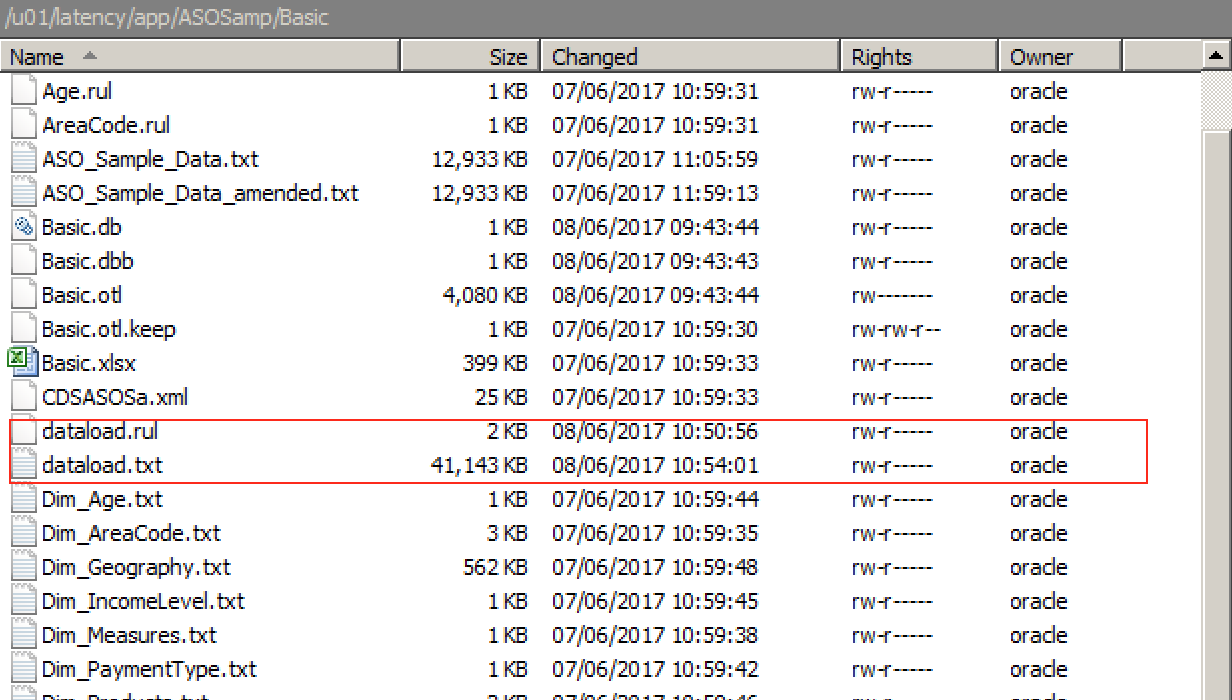
Note that remote connection is via the opc user, but this can be changed to oracle once connected (by using sudo su – oracle).
As oracle, these files can be manually deleted…doing so means they will no longer be found by the EssCS Listfiles command or the Files screen within OAC (once refreshed). If deleted manually, new versions of the files can be re-uploaded via either of the methods detailed above (whilst an overwrite option exists in the OAC Files facility, there seems to be no such option with the EssCS Upload feature…trying to upload a file that already exists results in an error.
All files are owned by the oracle user, with no access rights at all for the opc user that effects a remote connection via FTP.
Automation: Objectives
The objective of this exercise was to come up with a method that, unattended, would:
- Upload received files (data, rules) to OAC from a local source
- Put them in the correct OAC directory in a usable format
- Invoke a process that runs a pre-load process (eg a clear), a load, and (if necessary a post load process)
- Clear up after itself
Automation: The Process
The first job is to handle the upload of files to OAC. This could be achieved via a psftp script that uploads the entire contents of a nominated local directory:
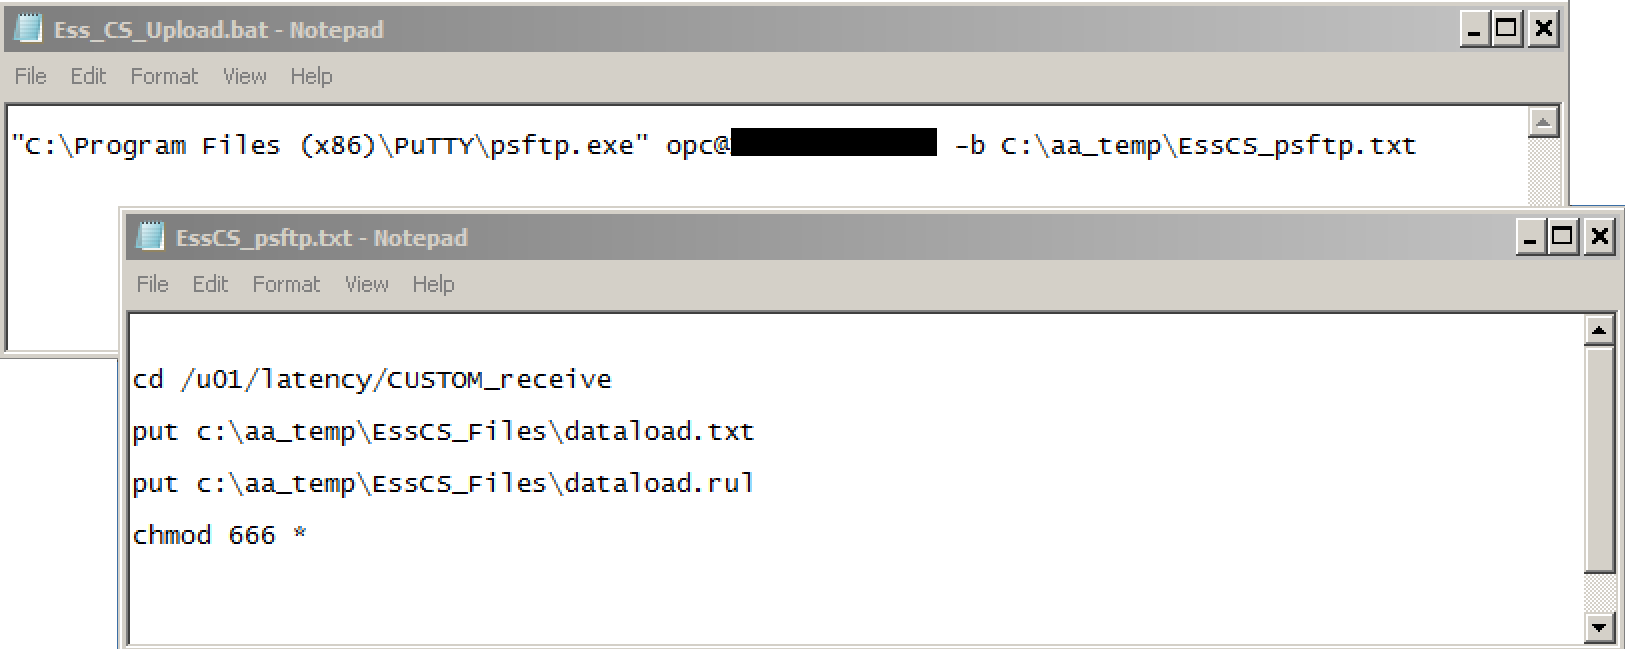
The EssCSUpload,bat script above (which can, of course be added to a local scheduler so that it runs unattended at appointed times) passes a pre-scripted file to psftp to connect and transfer the files. Note that the opc user is used for the connection, and the files are posted to a custom-created directory, CUSTOM_receive (under the existing /u01/latency). The transferred files are also given a global ‘rw’ attribute to assist with later processing
Now the files are in the OAC environment, control is taken up there.
A shell script (DealWithUploads) is added to the oracle home directory:
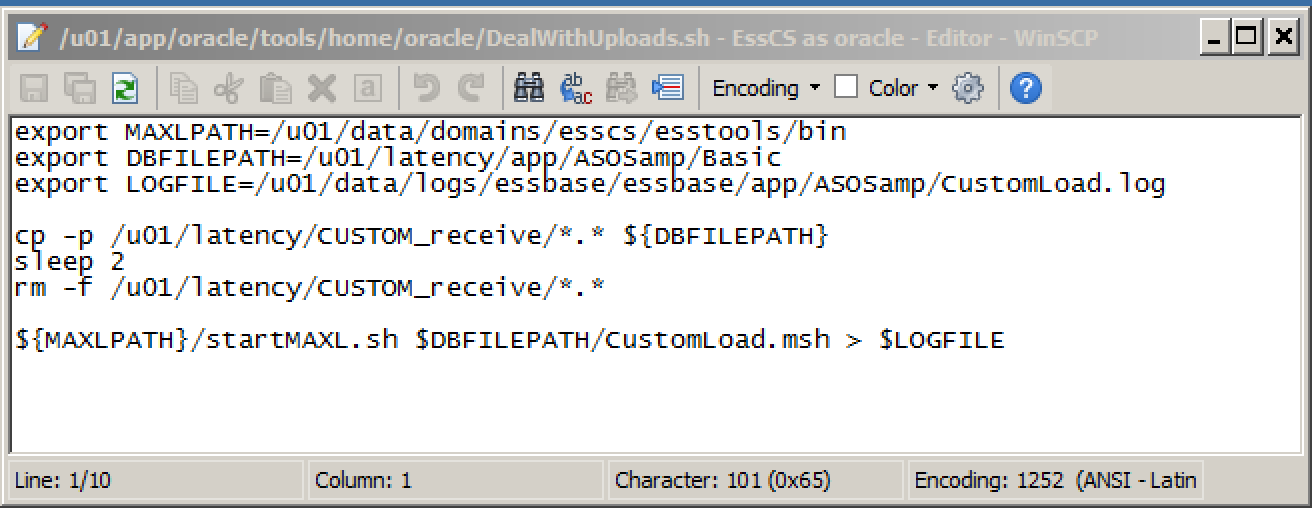
This copies all the files in the nominated receiving directory to the actual required location – in this case, the main ASOSamp/Basic directory. Note the use of ‘-p’ with the copy command to ensure that attributes (ie, the global ‘rw’) are retained. Once copied, the files are deleted from the receiving directory so that they are not processed again.
Once the files are copied into place, startMAXL is used to invoke a pre-prepared msh script:
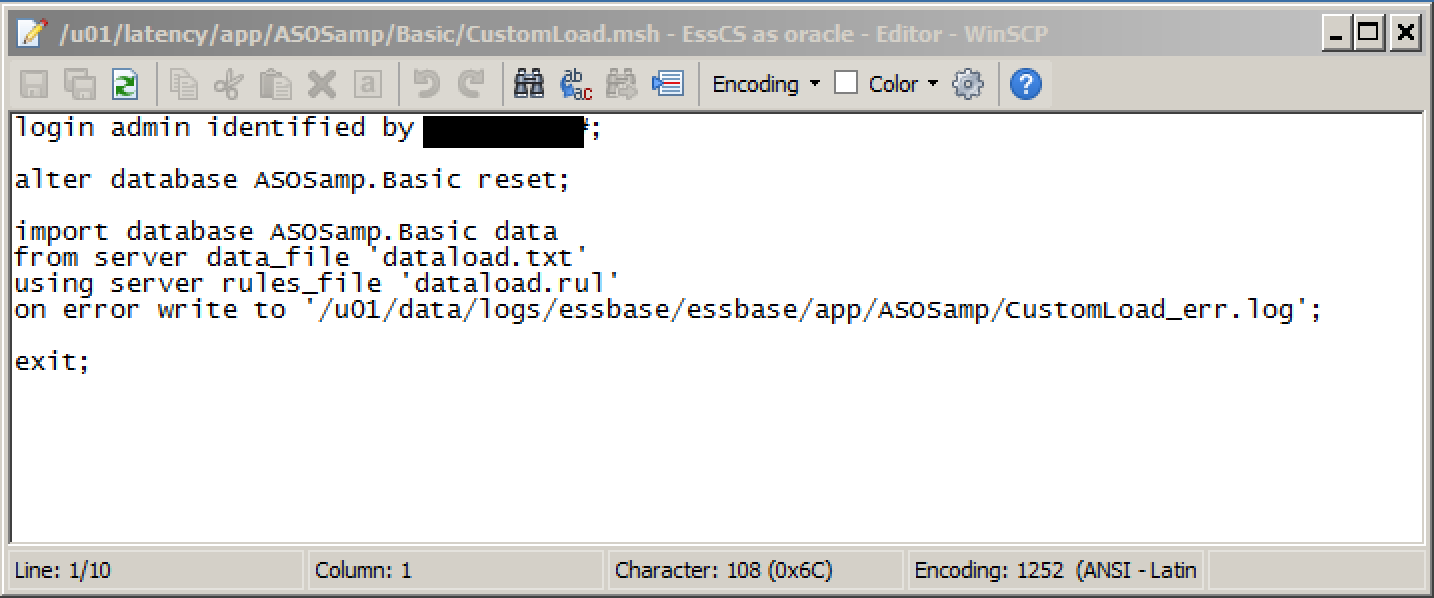
as can be seen, this clears the cube and re-imports from the uploaded file using the uploaded rules file. The clear here is a full reset, but a partial clear (in the case of ASO) can be used here instead if required
As with the ‘local’ half of the method, the DealWithUploads.sh script file can be added to the scheduler on OAC: the existing cron entries are already held in the file /u01/app/oracle/tools/home/oracle/crontab.txt; it is a simple exercise to schedule a call to this new custom script.
A routine such as this would need a good degree of refinement and hardening – the file lists for the transfers should be self-building, passwords need to be encrypted, the MAXL script should only be called if required, the posting locations for files should be content/context sensitive, etc – but in terms of feasibility testing the requirements listed above, it was successful.
This approach places additional directories and files in an environment / structure that could be maintained at any time: it is therefore imperative that some form of code control / release mechanism is employed so that it can be replaced in the event of any unexpected / uncontrollable maintenance taking place on the OAC environment that could invalidate or remove it.
Even once hardened, I think there is a considerable weak spot in this approach in that the rules file seemingly has to be crafted in an on-prem environment and uploaded: as I detailed here, even freshly-uploaded, working rules files error when an attempt is made to verify them. For now, I’ll keep looking for an alternative.
Summary
Whilst a lot of the high-level functionality is in place around data loads, often with multiple methods, I think there are a couple of detailed functionality areas that may currently require workarounds – to my mind, the addition of the ability to select & run an msh format ‘preload’ script when running a dataload Job (eg for clears) would be useful, whilst a fully functional rules file editor strikes me as important. The fact that an FTP connection is available at all is a bonus, but because this is as a non-oracle user, it is not possible to put a file in the correct place directly - the EssCS Upload faciity does this of course, but the seeming absence of an overwrite option or an additional Delete option for EssCS) somewhat limits its usefulness at this point. But can you implement a non attended, scheduled load or incremental load routine ? Sure you can.
OAC: Essbase – Loading Data
After my initial quick pass through Essbase under OAC here, this post looks at the data loading options available in more detail. I used the provided sample database ASOSamp.Basic, which first had to be created, as a working example.
Creating ASOSamp
Under the time-honoured on-prem install of Essbase, the sample applications were available as an install option – supplied data has to be loaded separately, but the applications / cubes themselves are installed as part of the process if the option is selected. This is not quite the same under OAC – some are provided in an easily installable format, but they are not immediately available out-of-the-box.
One of the main methods of cube creation in Essbase under OAC is via the Import of a specifically formatted Excel spreadsheet, and it is via the provision of downloadable pre-built ‘template’ spreadsheets that the sample applications are installed in this version.
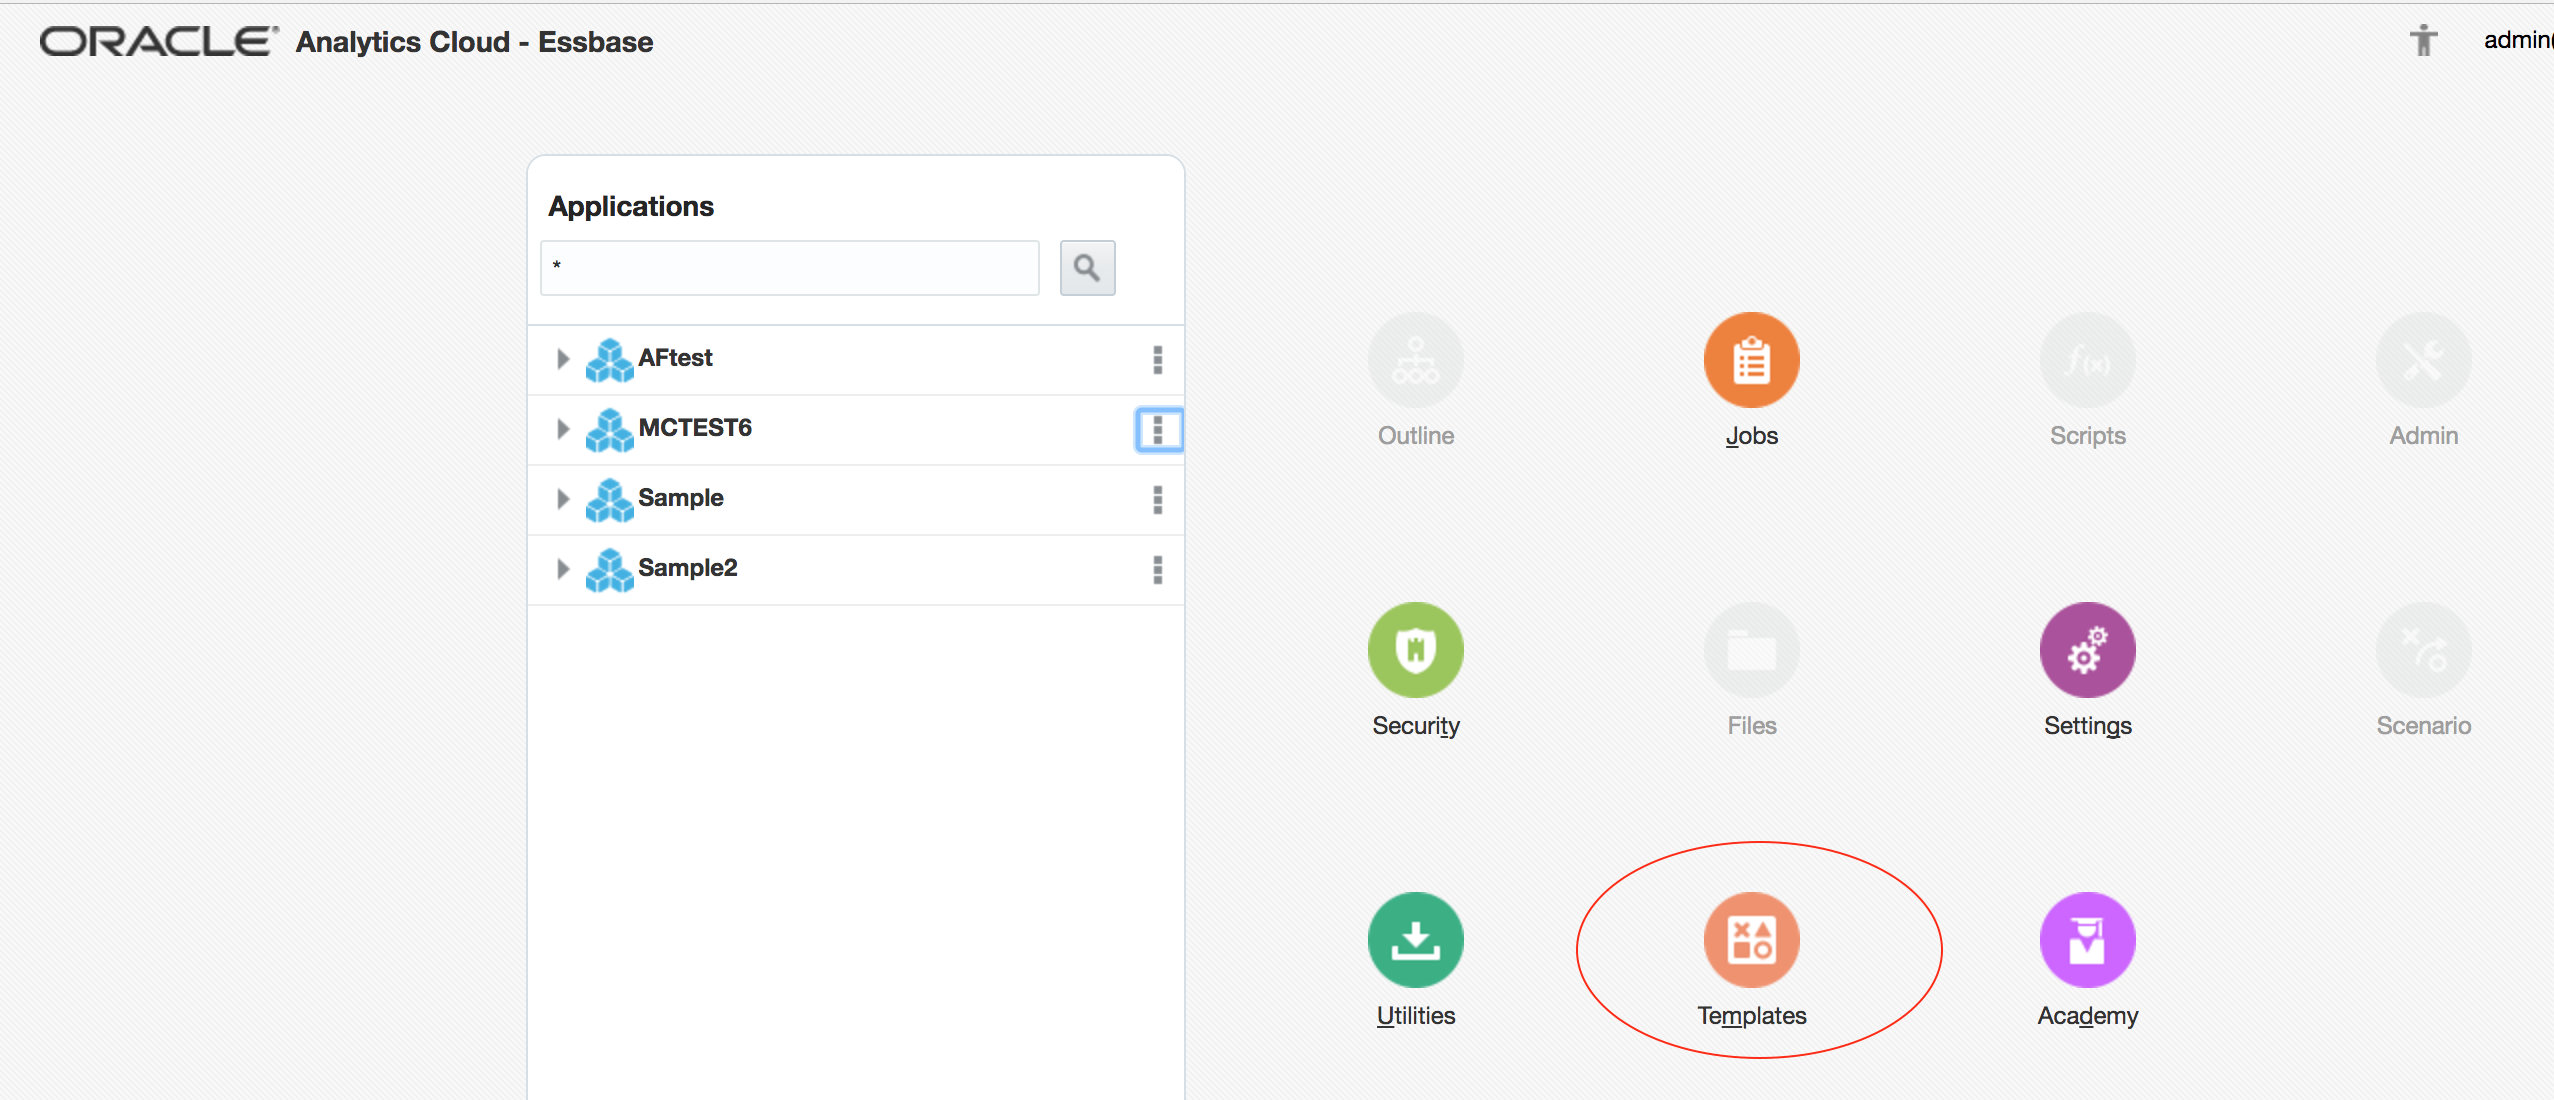
After accessing the homepage of Essbase on OAC, download the provided cube creation template – this can be found under the ‘Templates’ button on the home page:
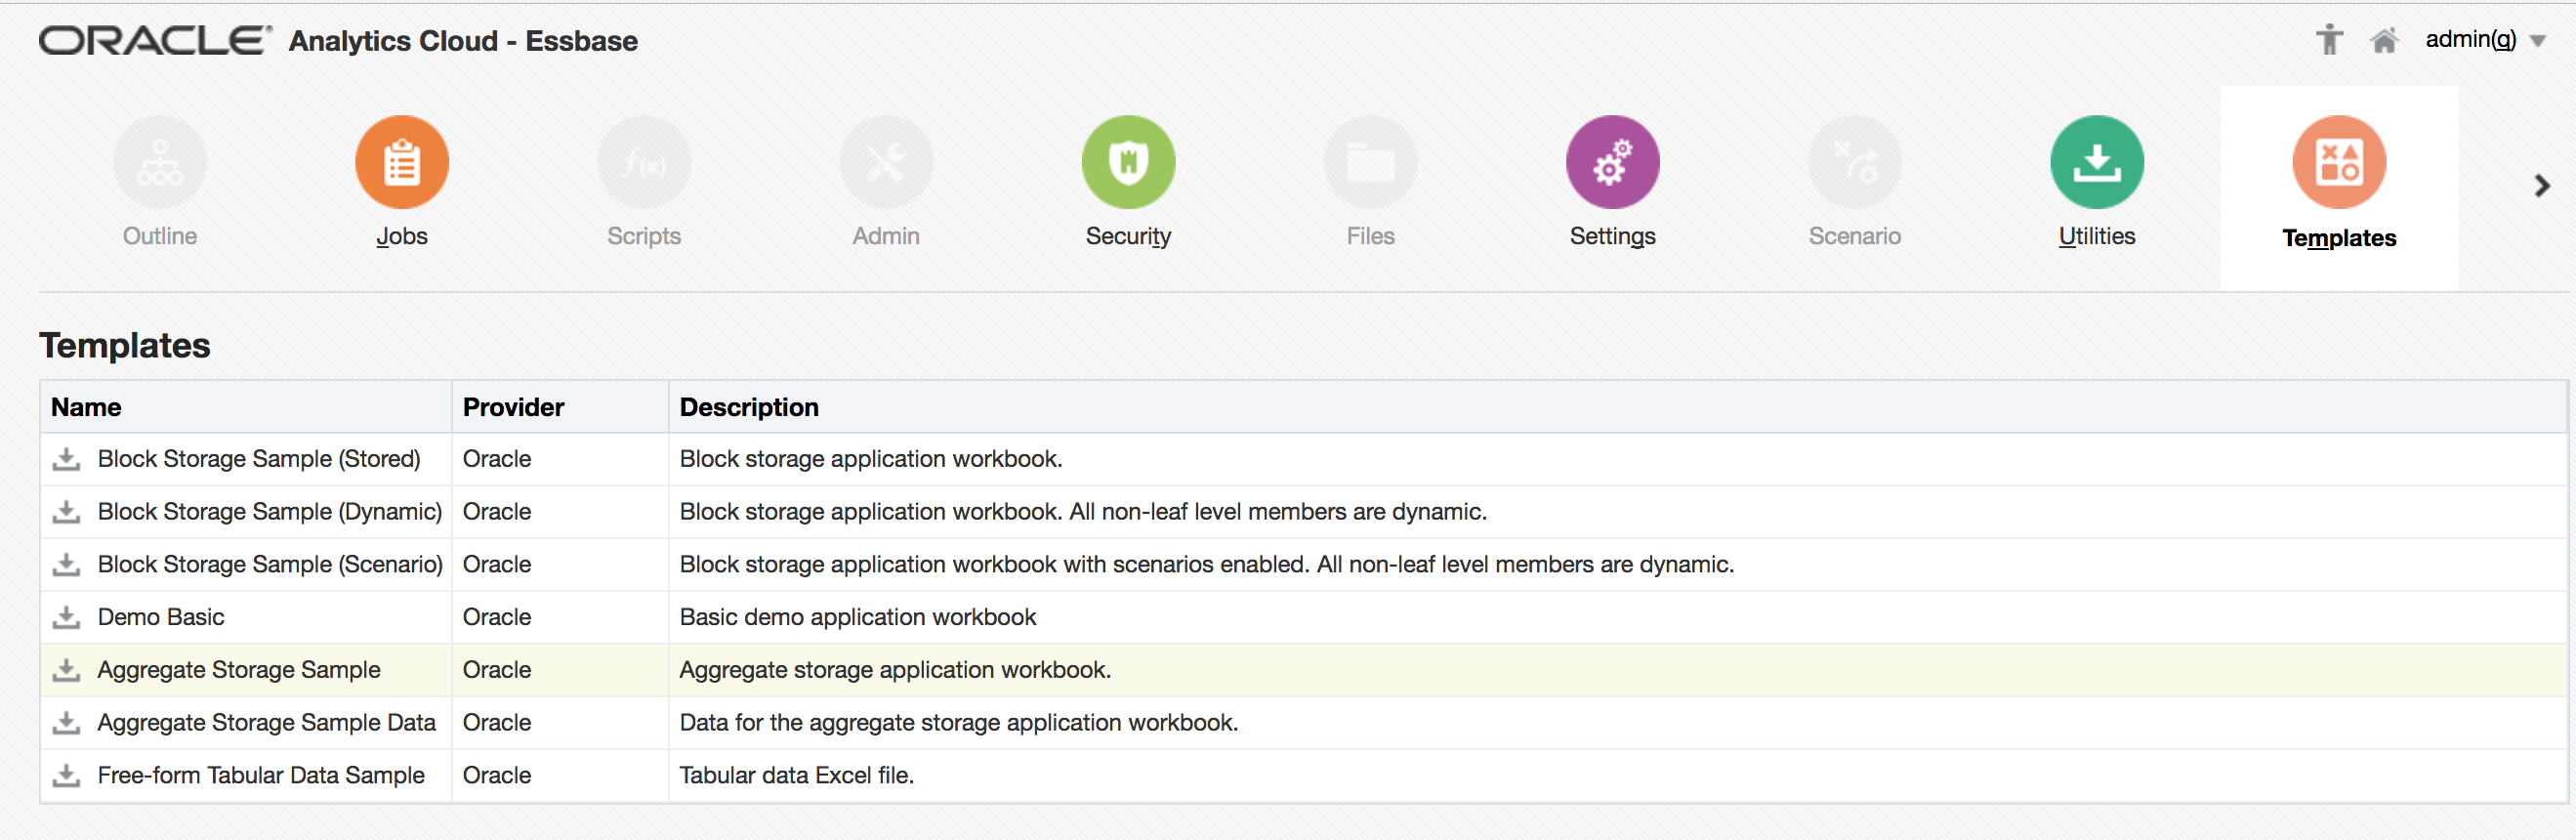
Note that in the case of the sample the ASOSamp.Basic database, the data is not in the main template file – it is held in a separate file. This is different to other examples, such as Sample.Basic, where the data provided is held in a dedicated tab in the main spreadsheet. Download both Aggregate Storage Sample and Aggregate Storage Sample Data:
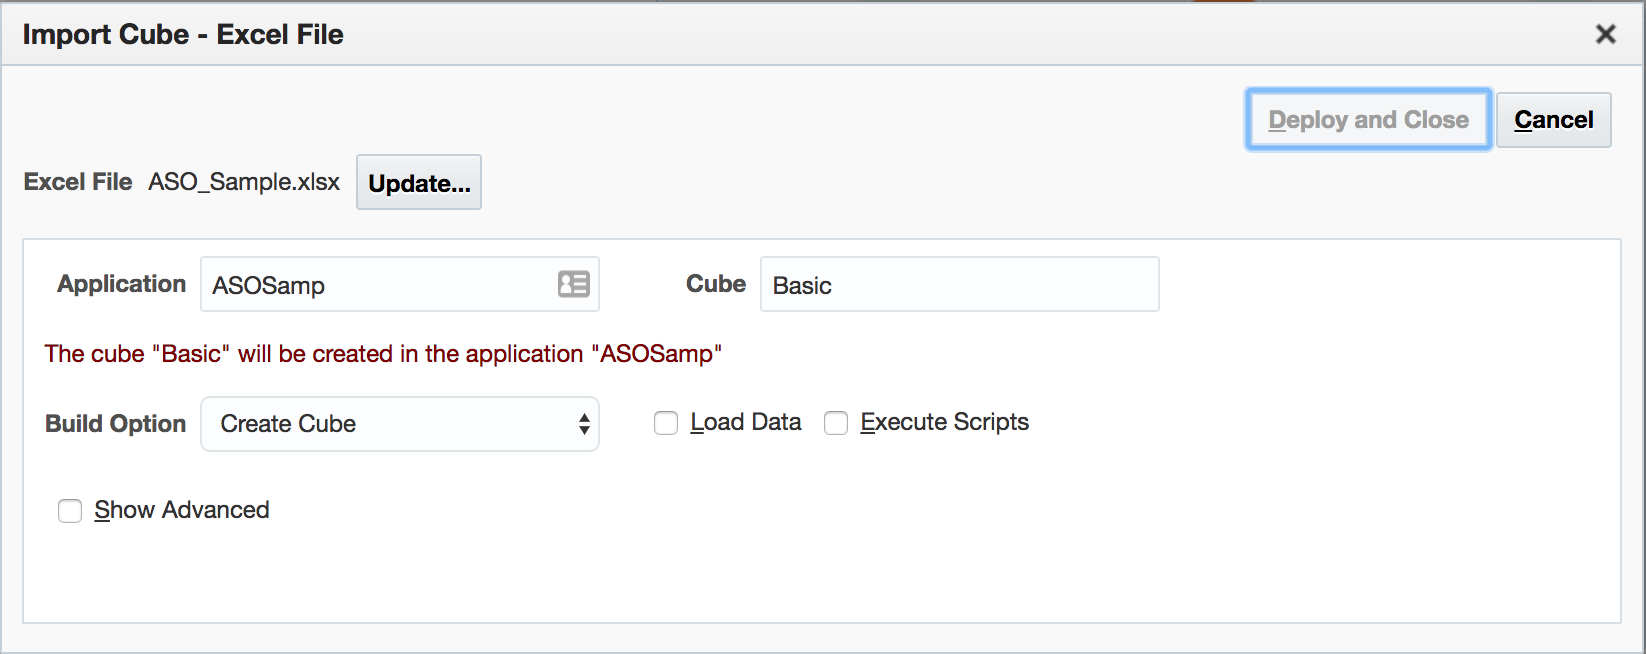
Return to the home page, and click Import. Choose the spreadsheet downloaded as Aggregate Storage Sample (ASO_Sample.xlsx) and click Deploy and Close.
This will effect all of the detail in the spreadsheet – create the application, create the cube, add dimensions / attribute dimensions and members to the outline, etc:
Loading ASOSamp.Basic
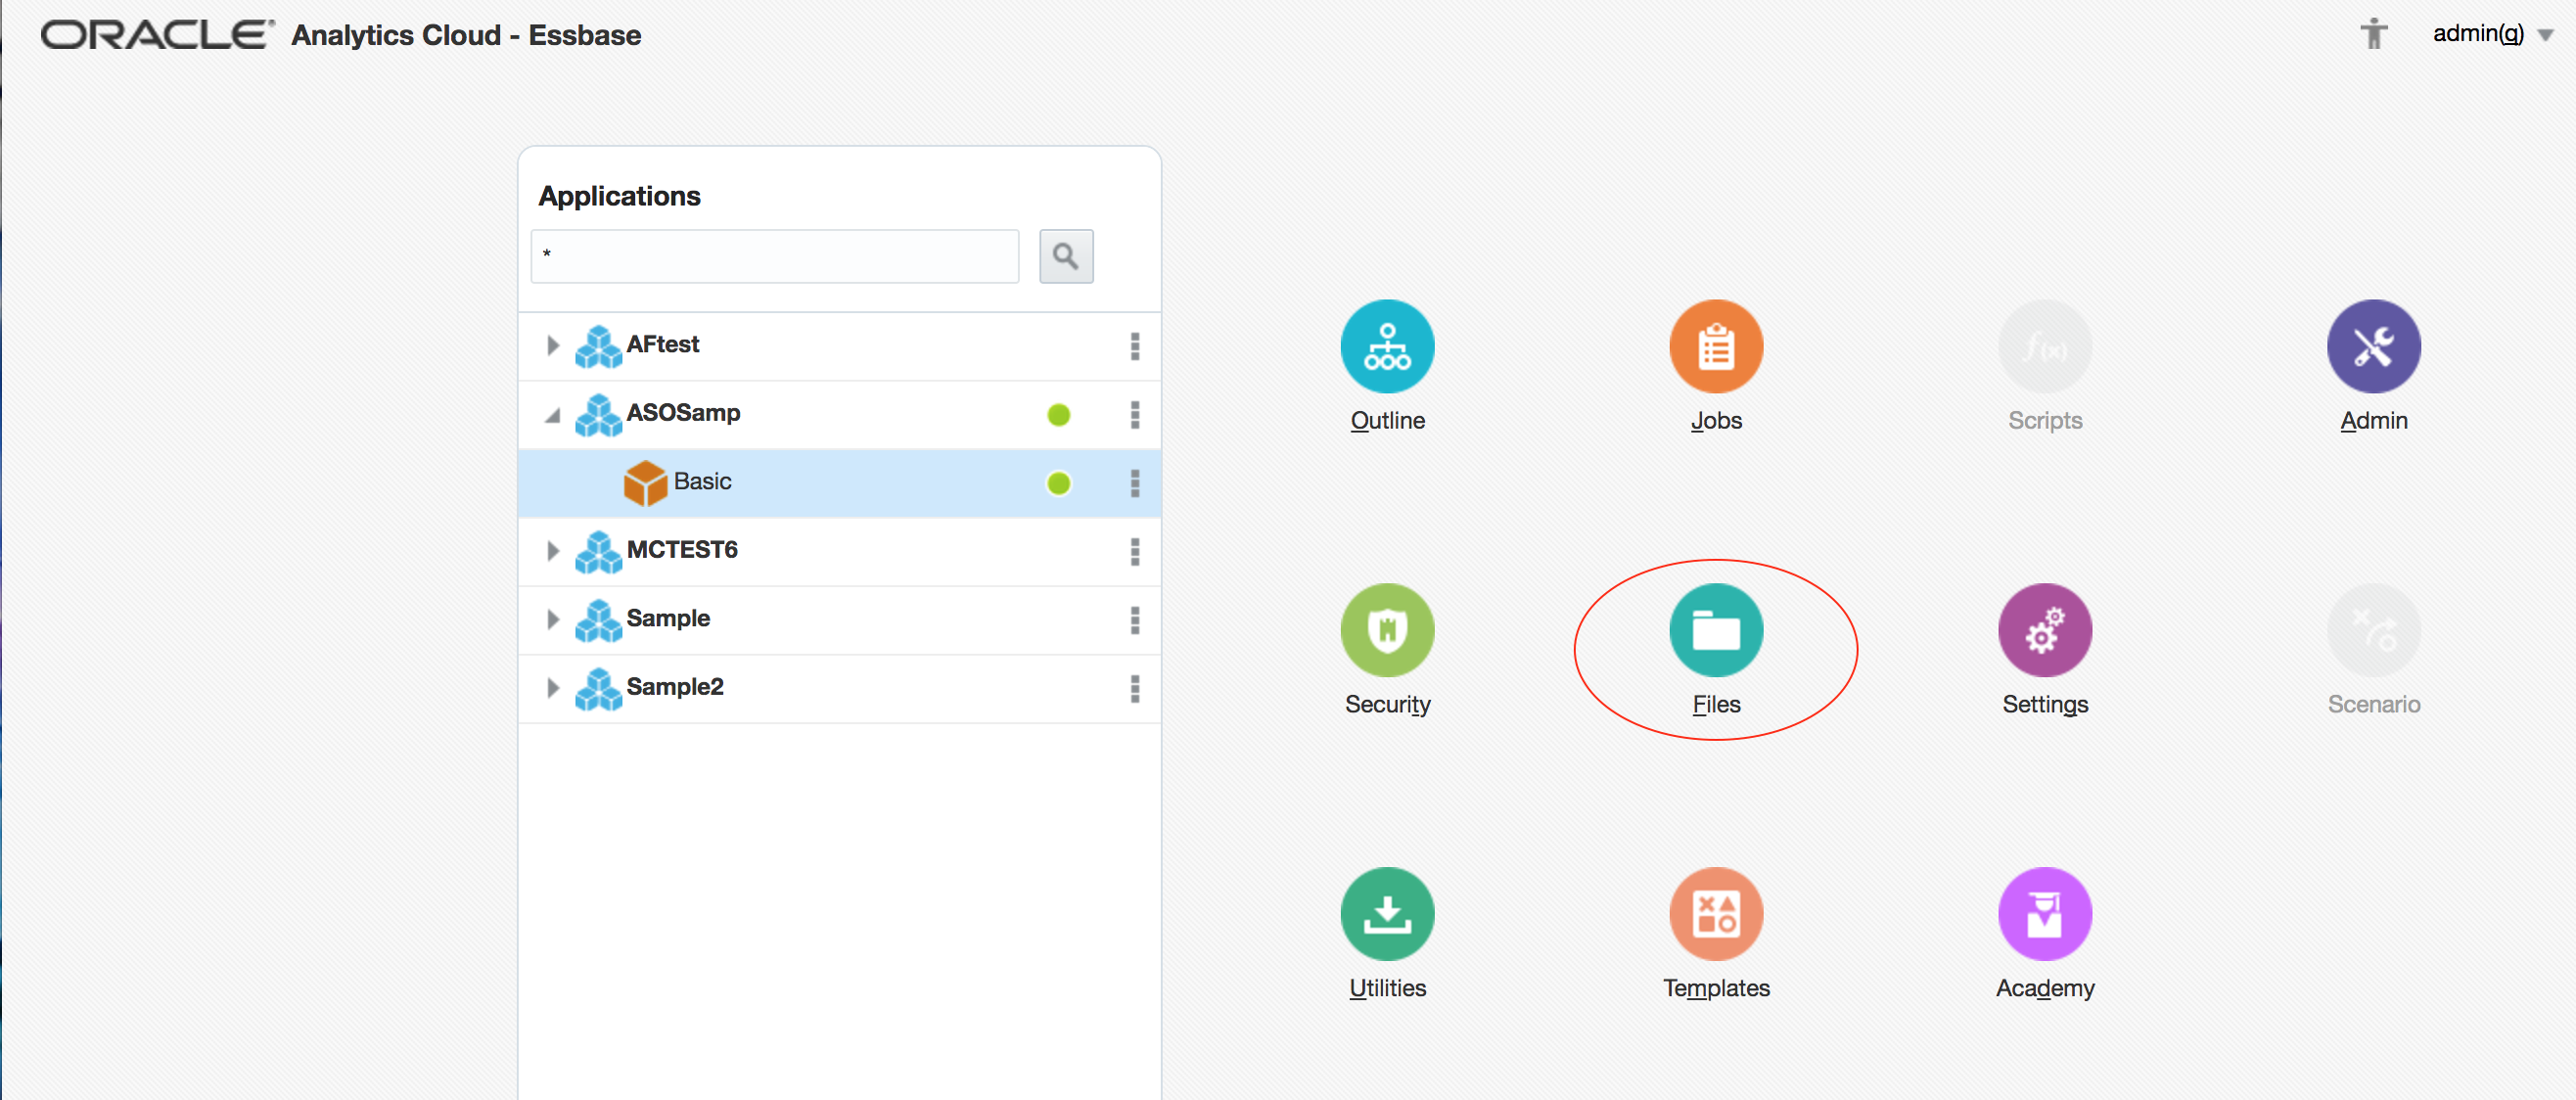
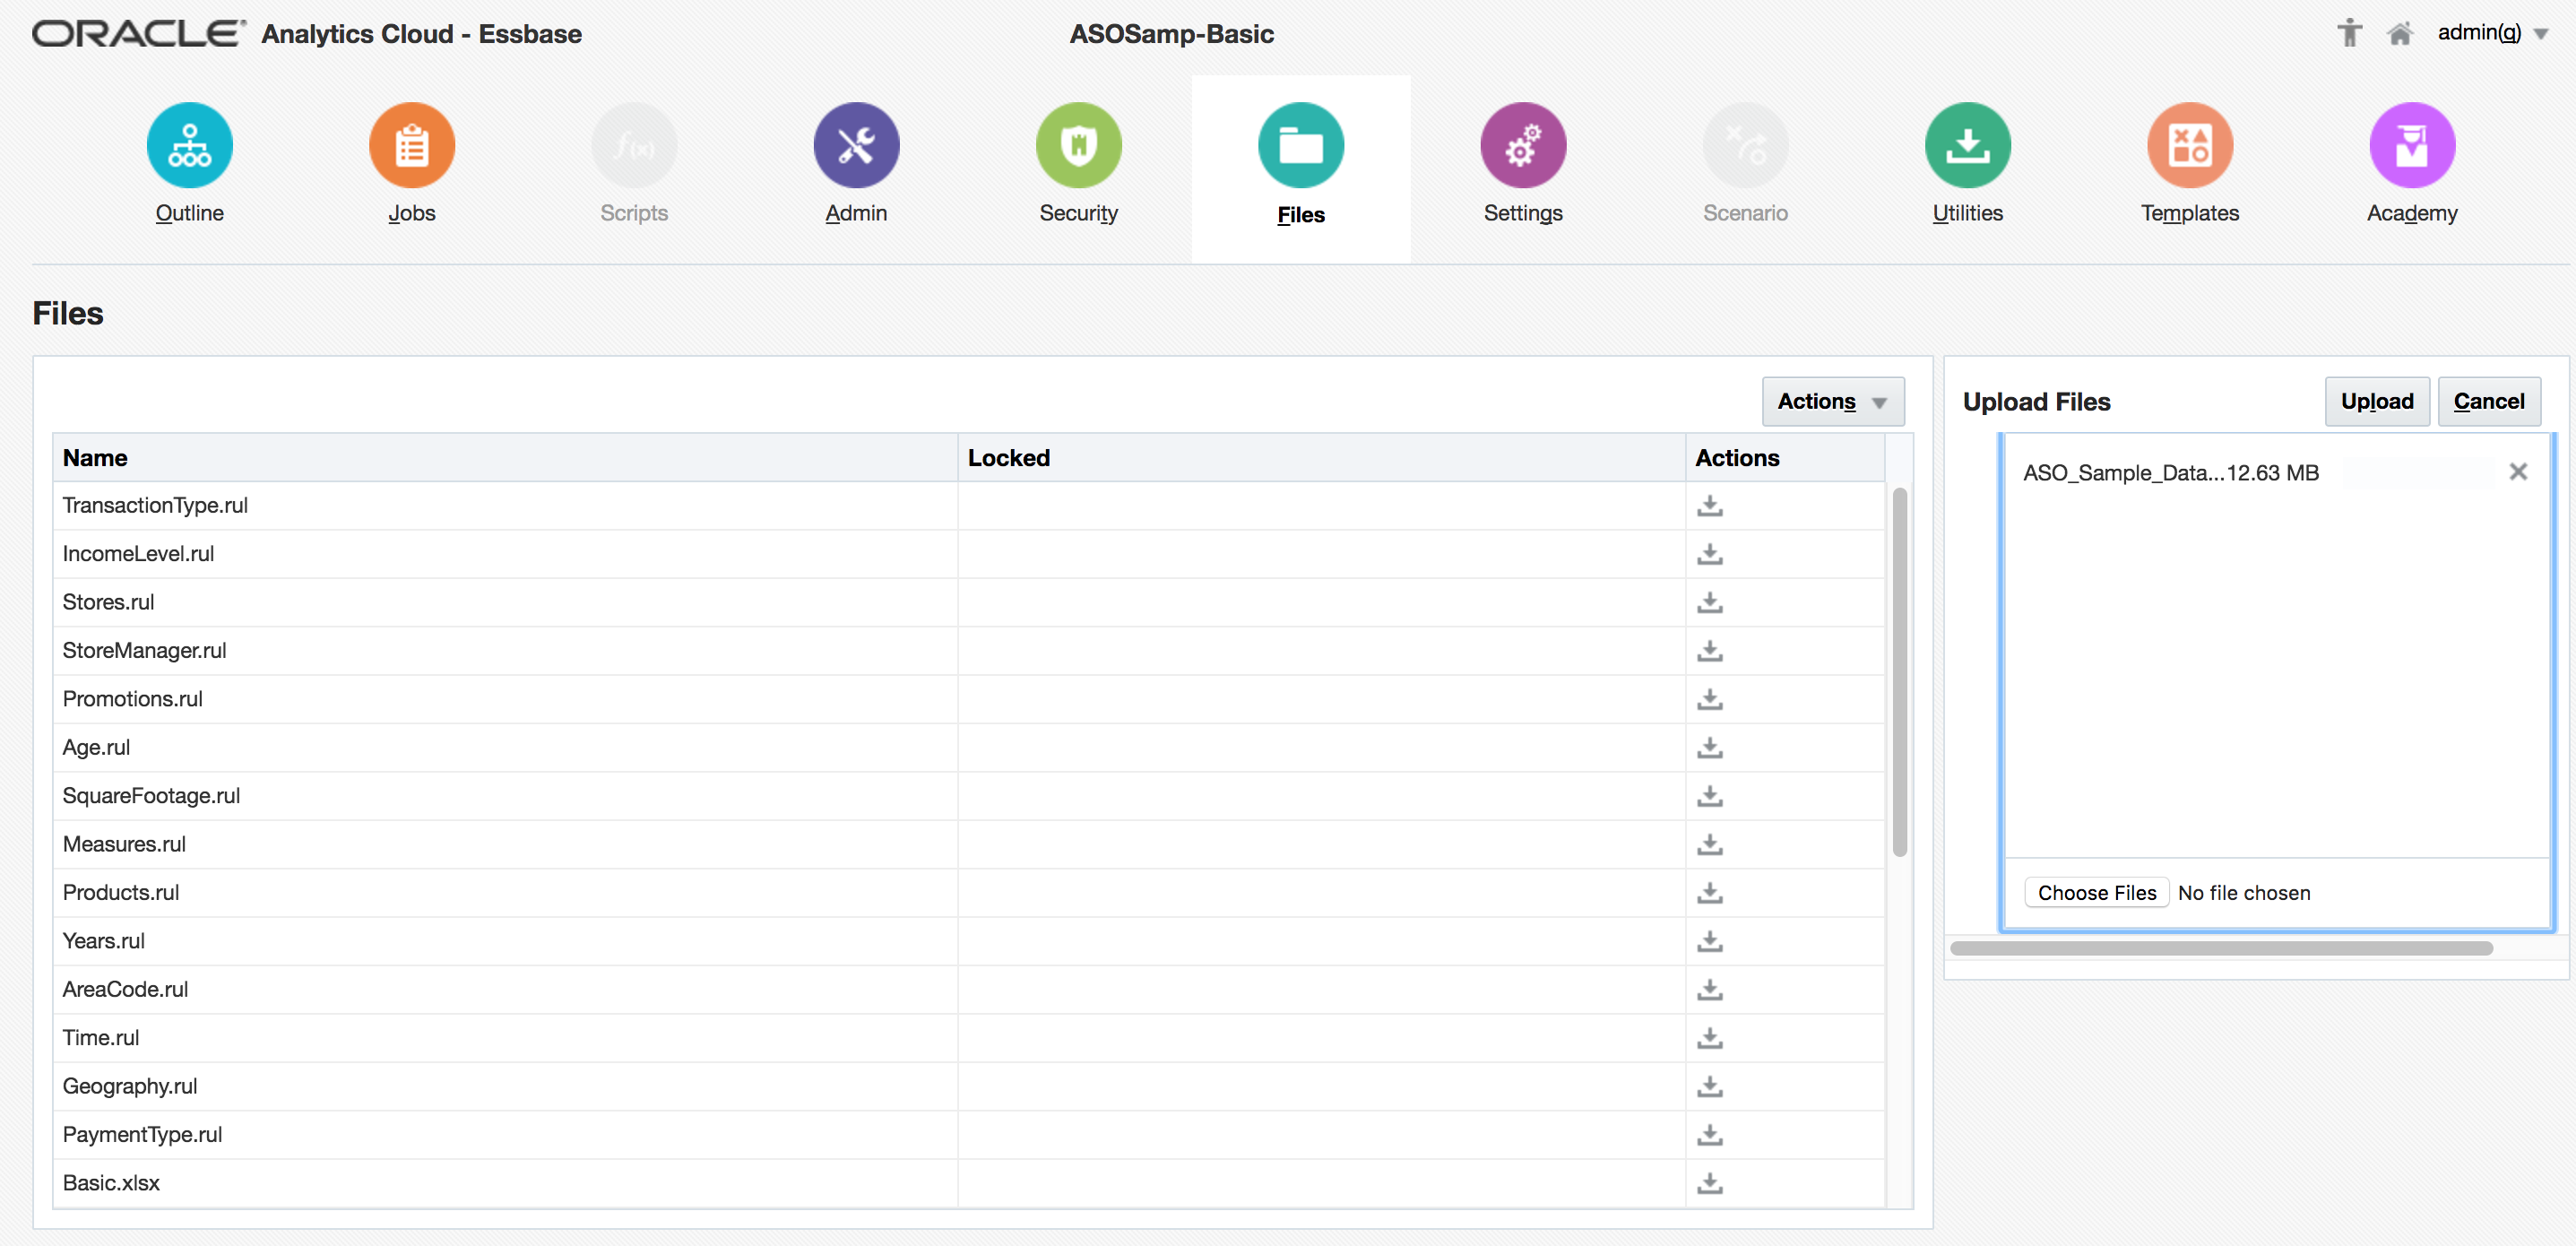
Because the data file is separate from the spreadsheet, the next step is to uploaded this to OAC so that it is available for loading: back on the home page, select the newly-created ASOSamp.Basic (note: not ASOSamp.Sample as with on-prem), and click Files:
In the right-hand window, select the downloaded data file ASOSampleData.txt and click the Upload button:
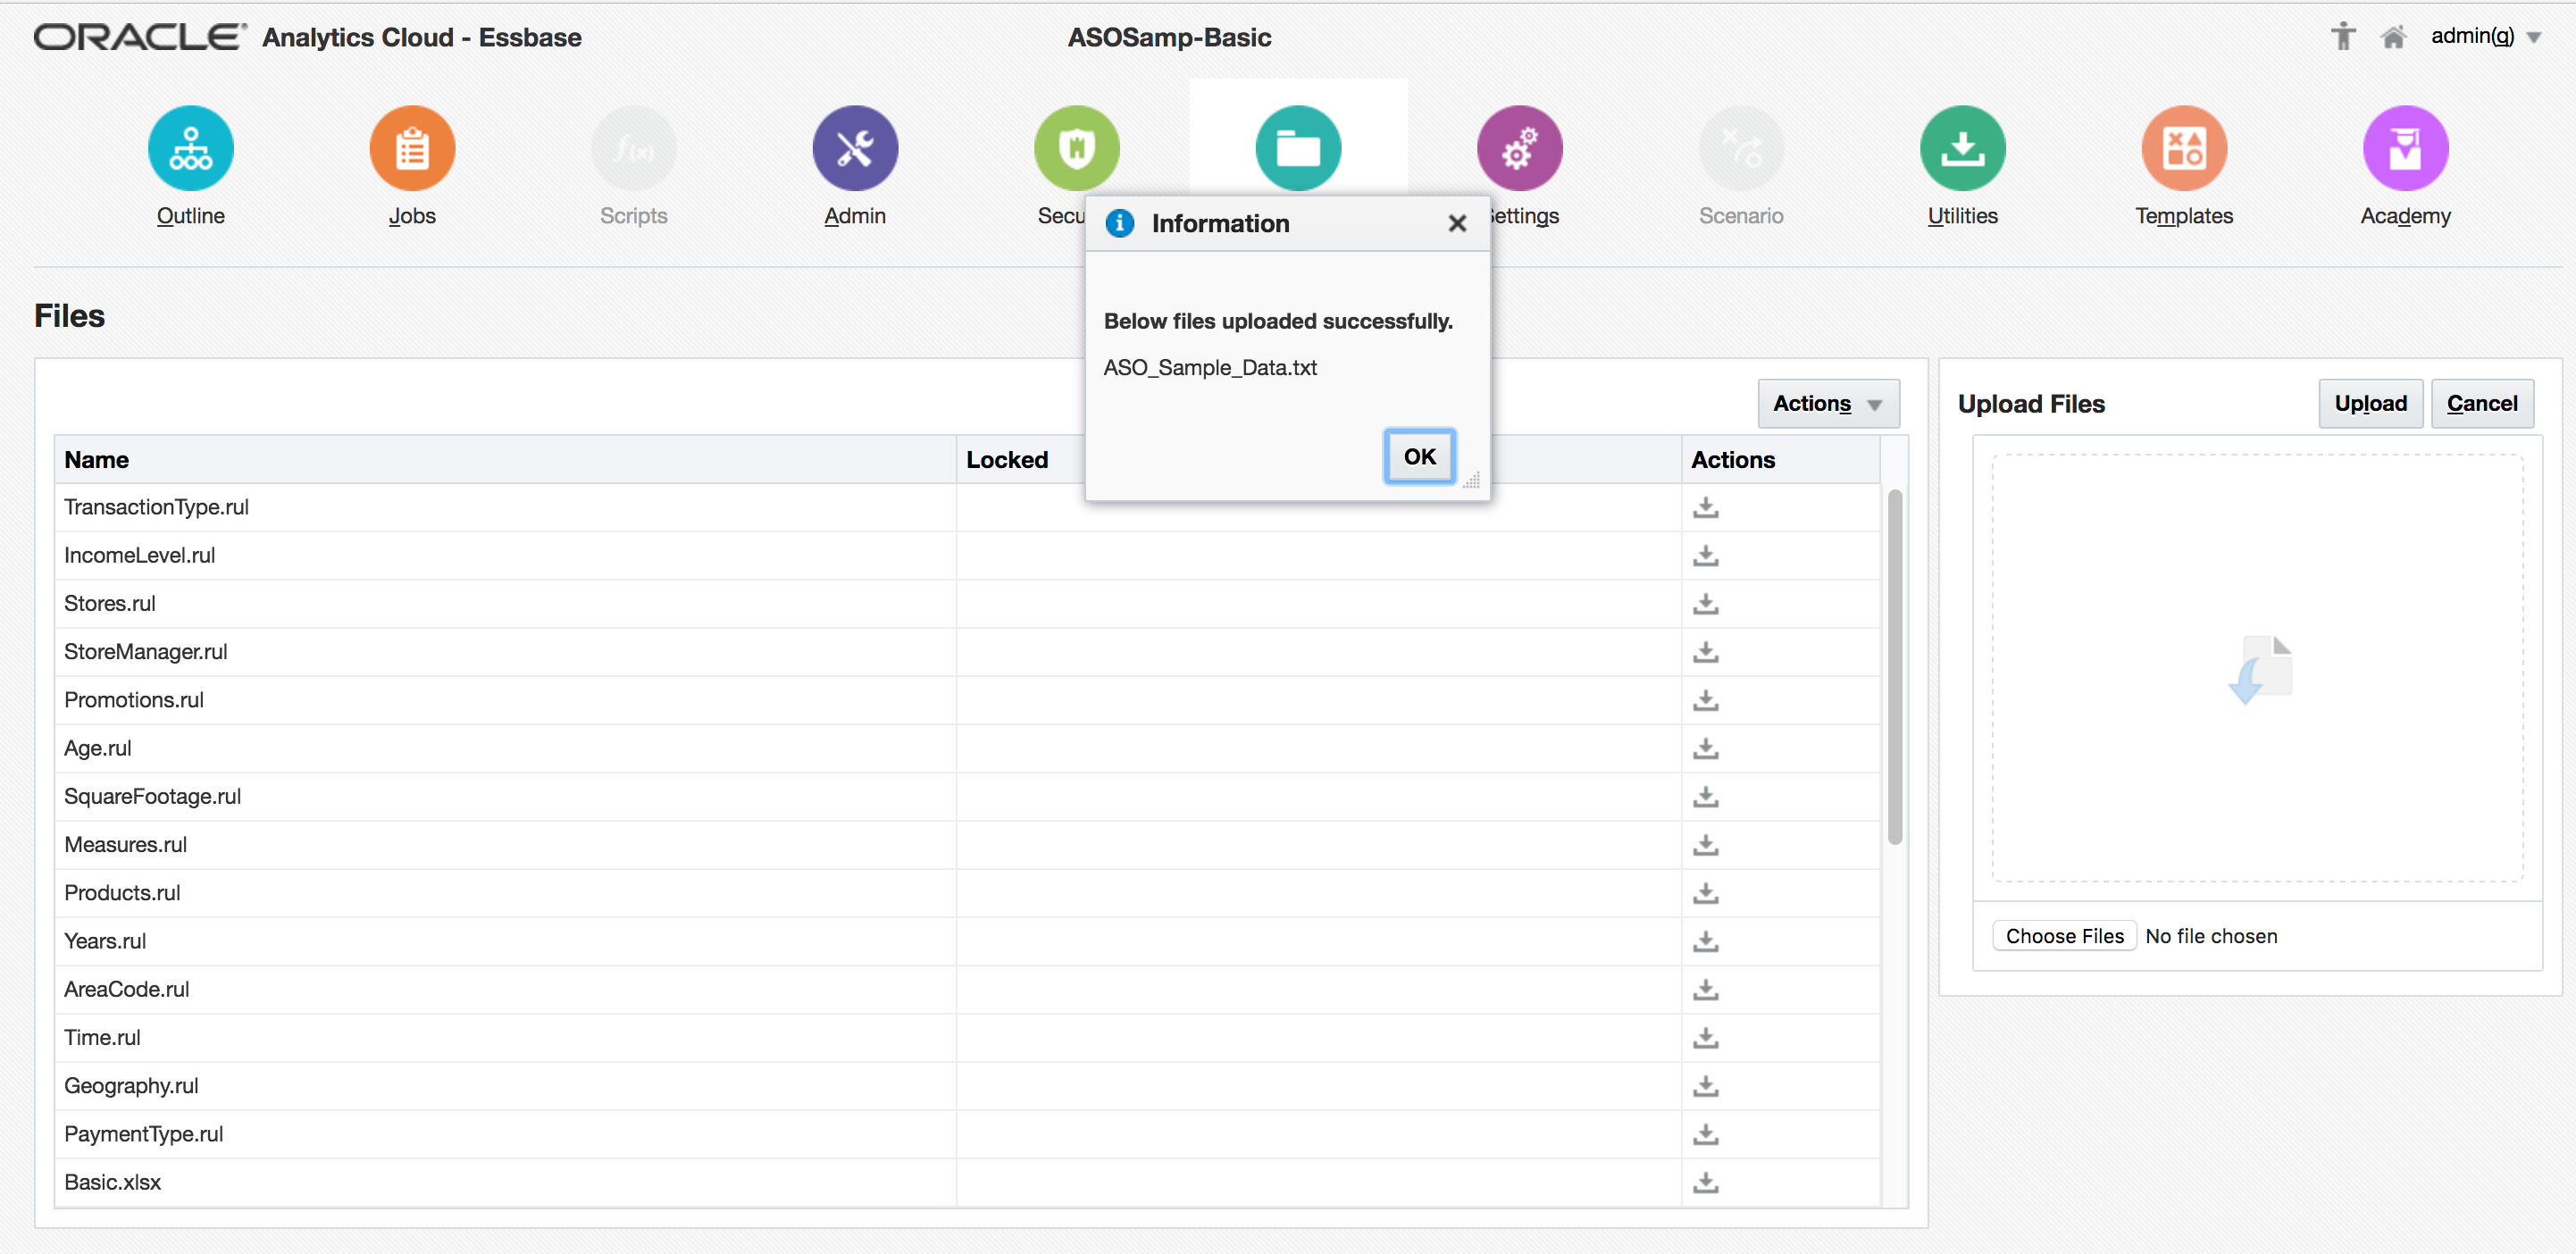
This will upload the file:
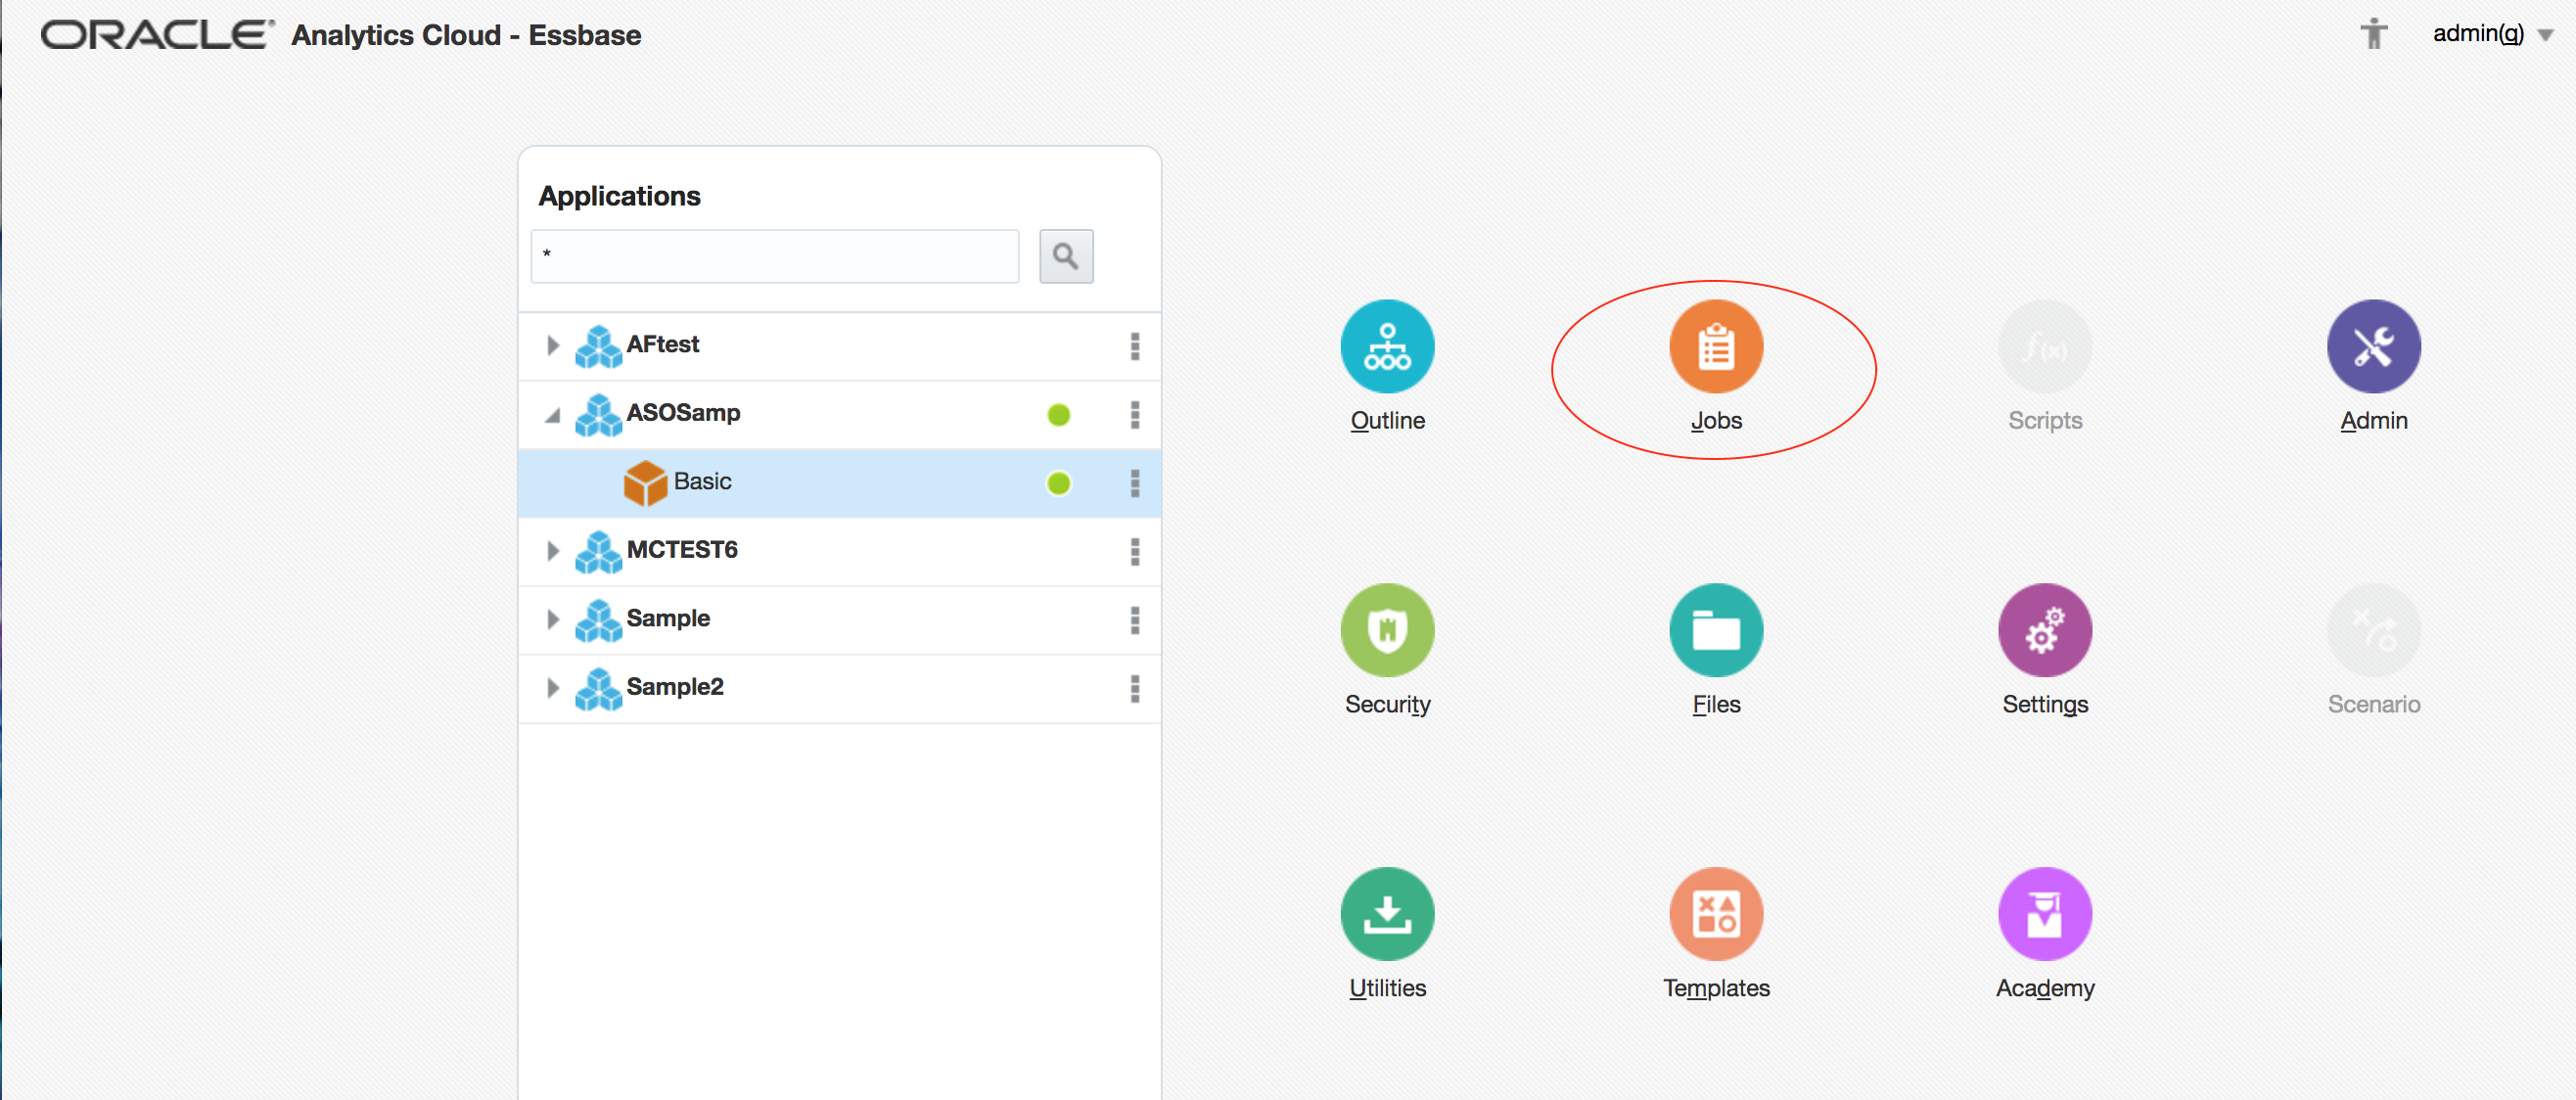
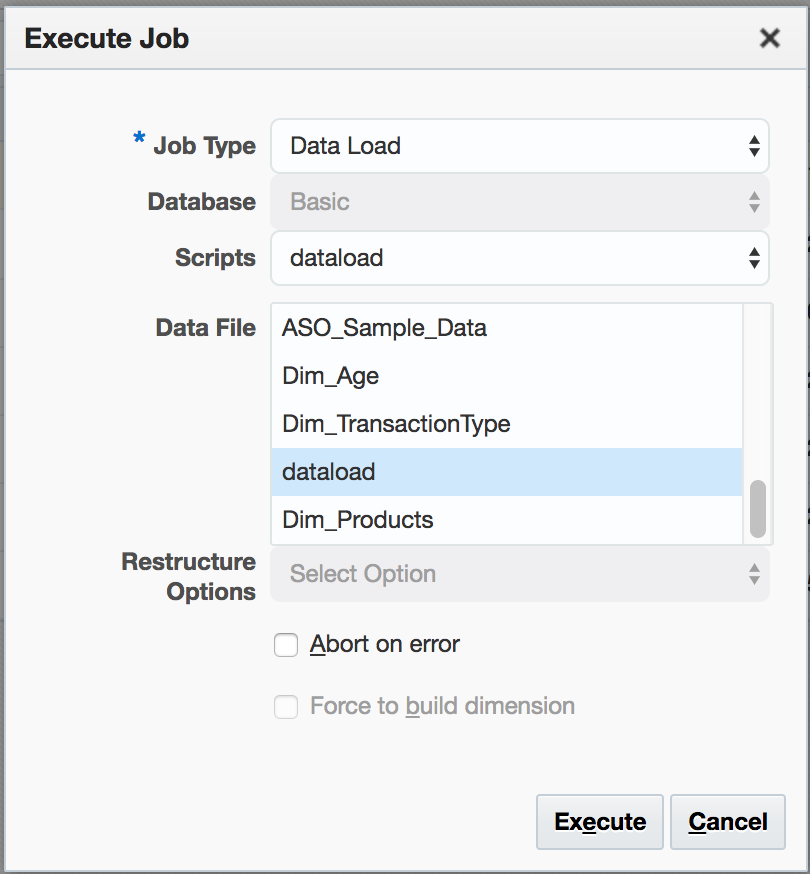
Once the file upload is complete, return to the home page. With the newly-created ASOSamp.Basic still selected, click Jobs:
Choose Data Load as the Job Type, and highlight the required Data File:
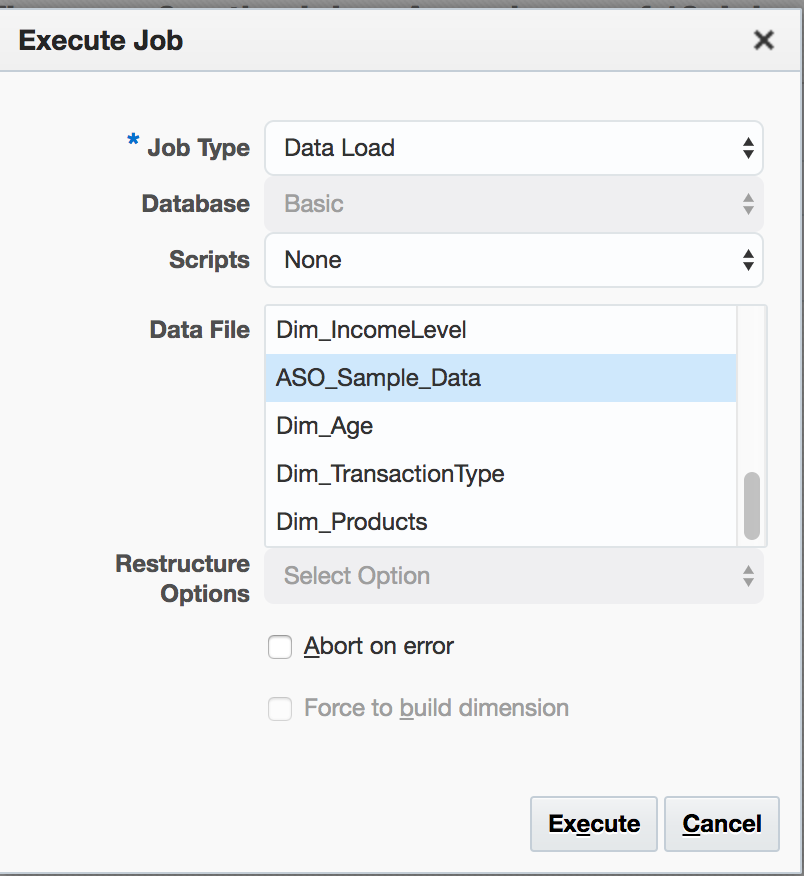
Click Execute.
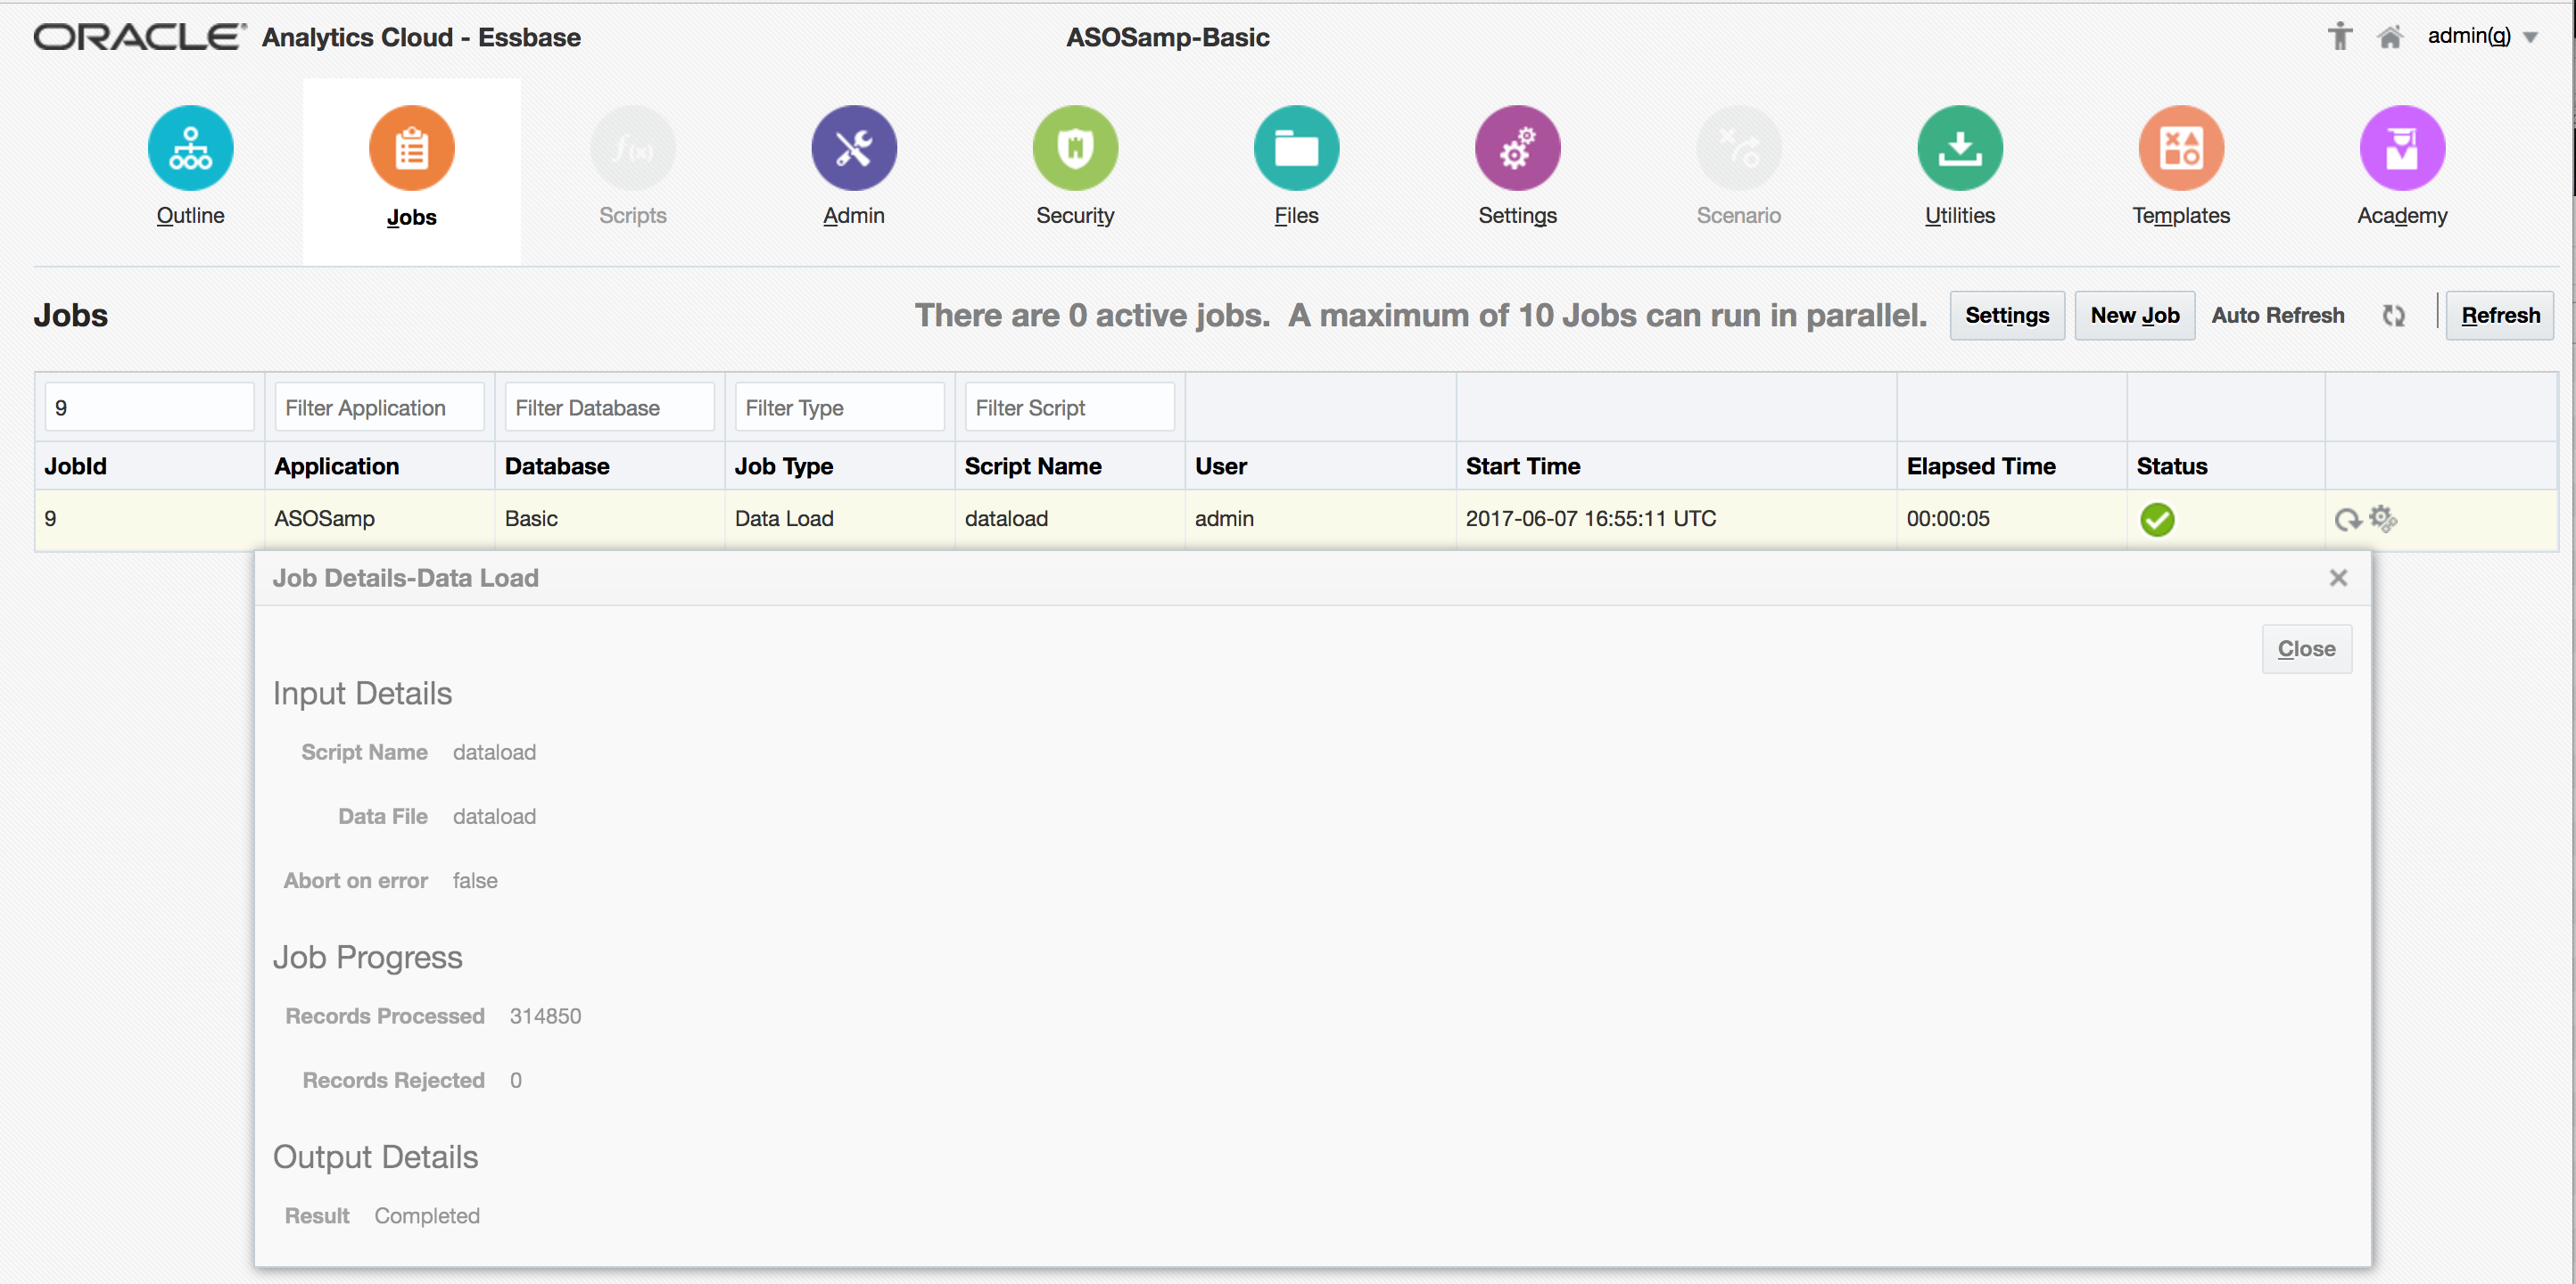
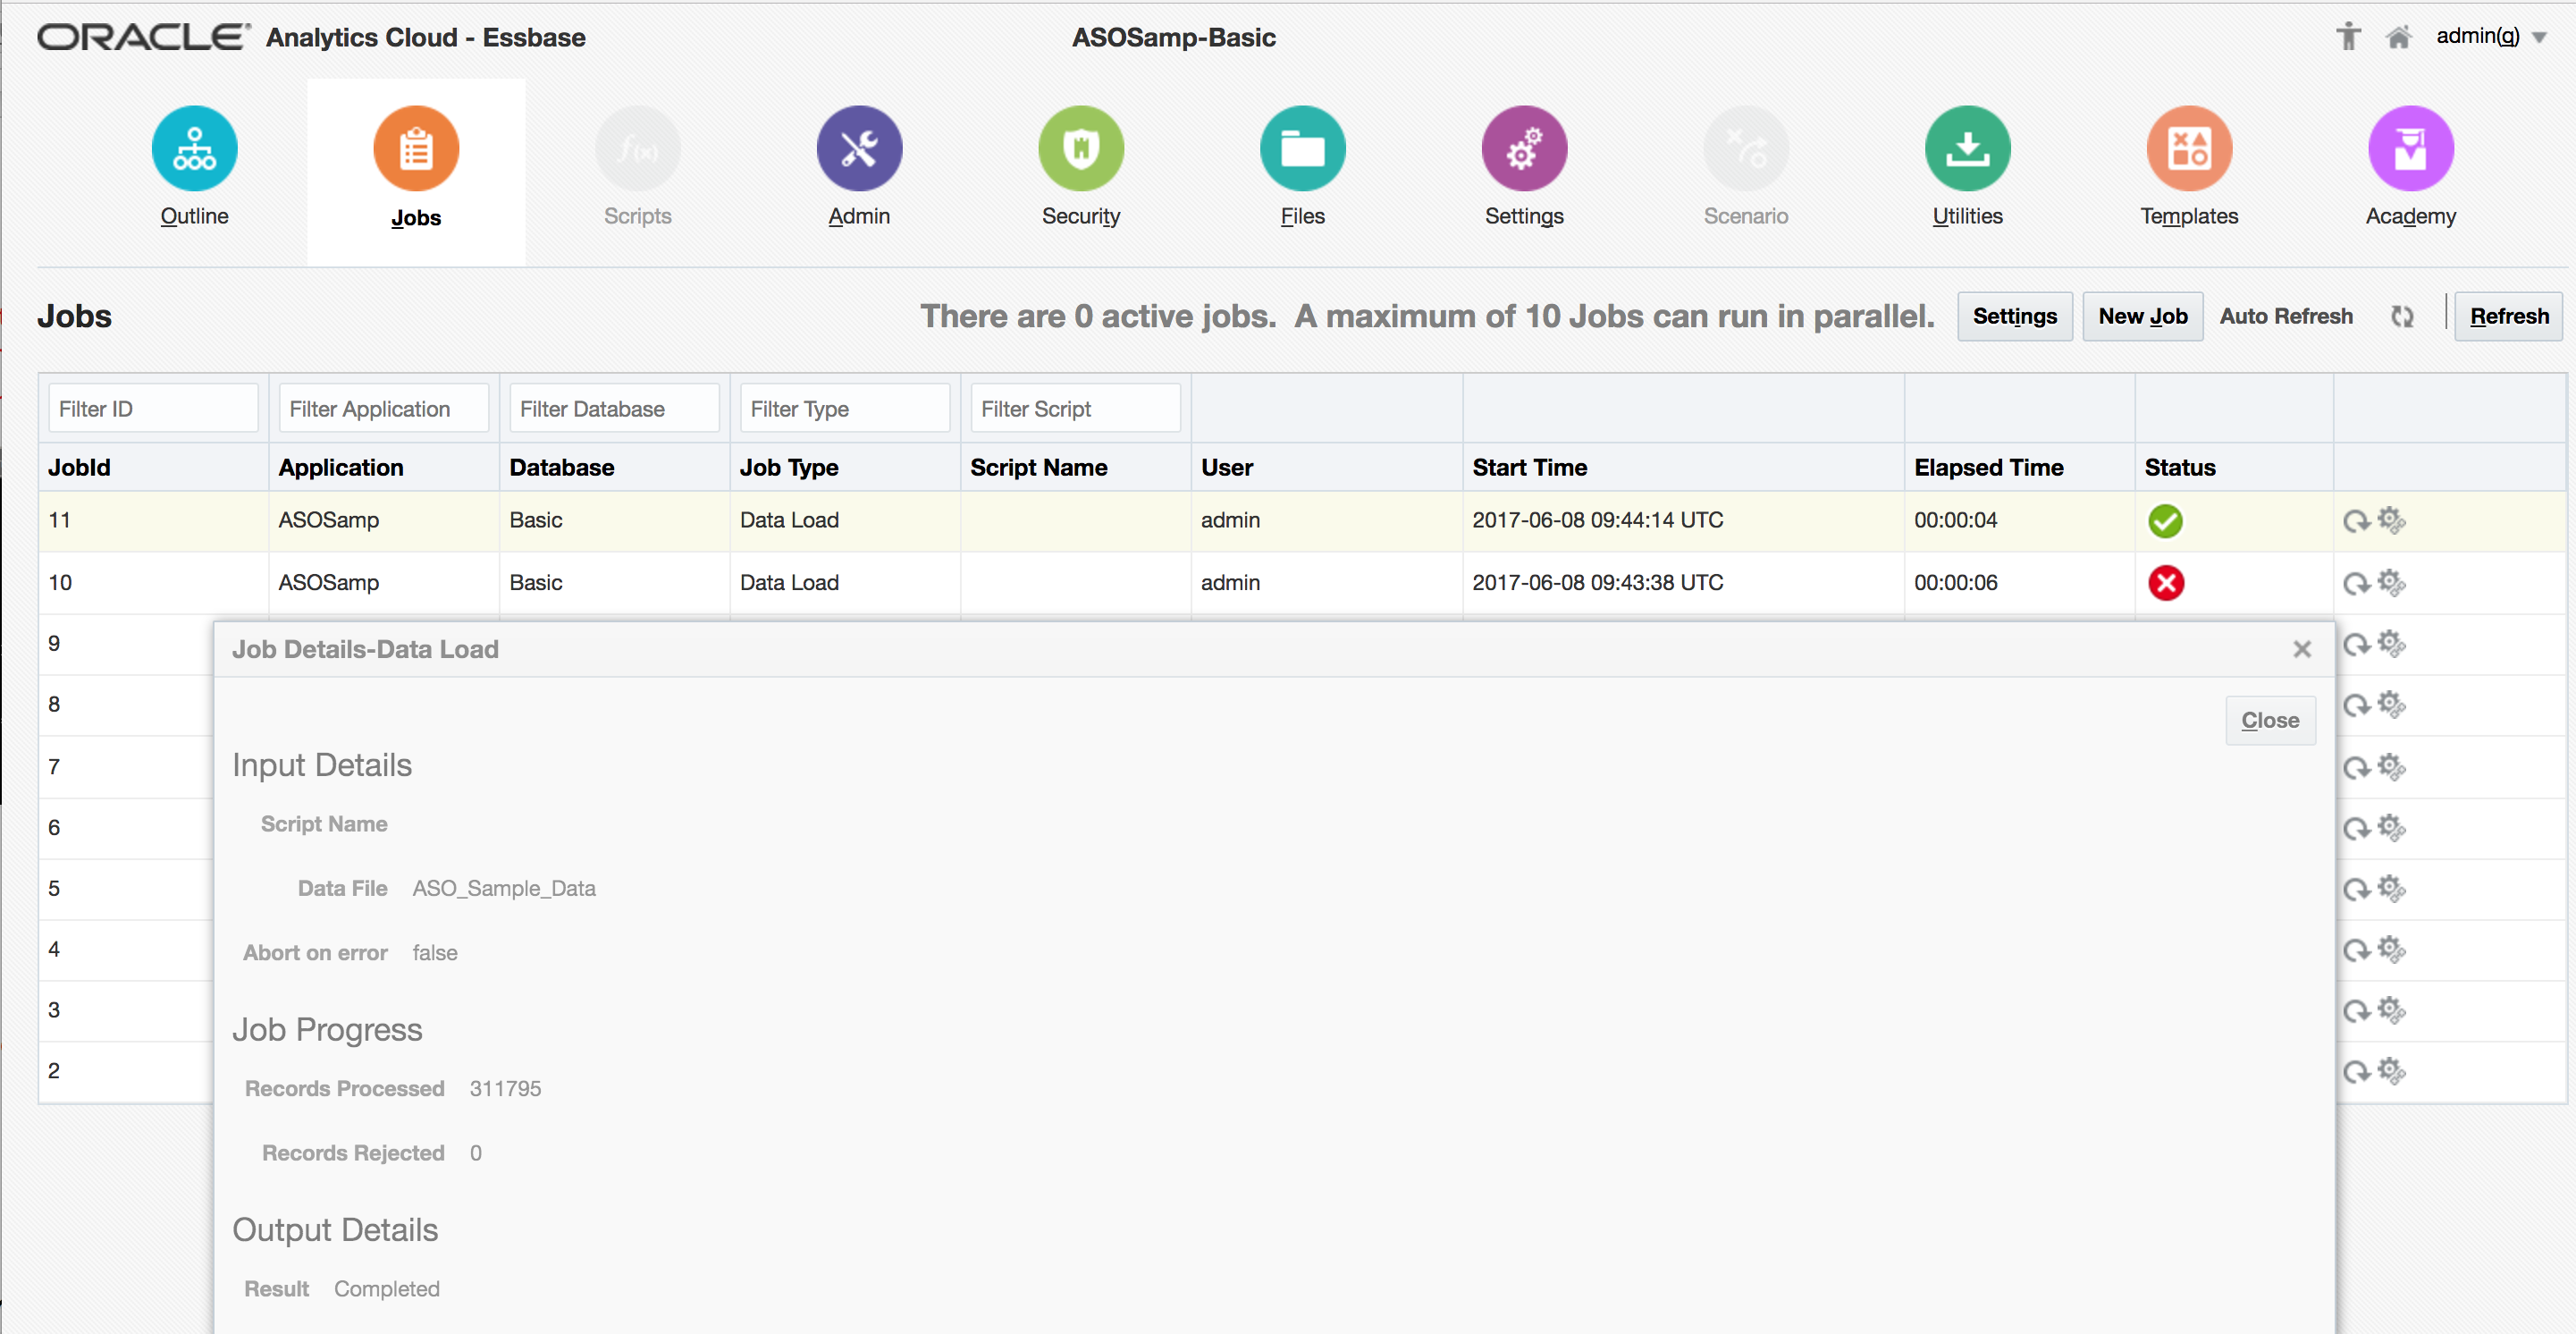
A new line will be added to the Job Monitor:
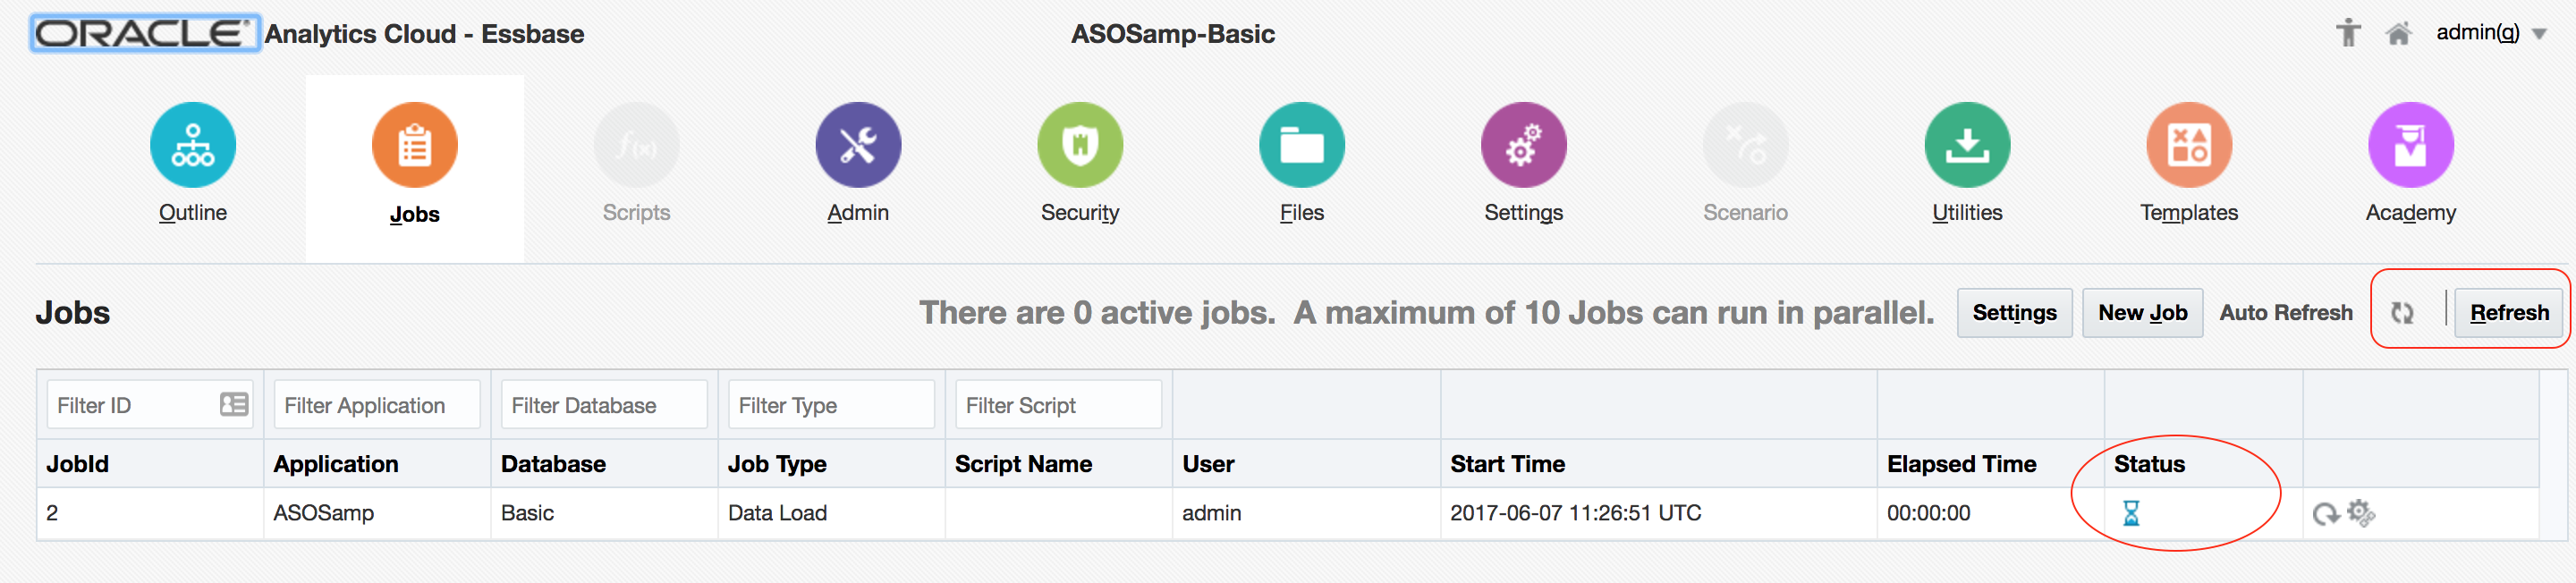
The current status of the job is shown – in this case, ‘in progress’ – and the screen can be refreshed.
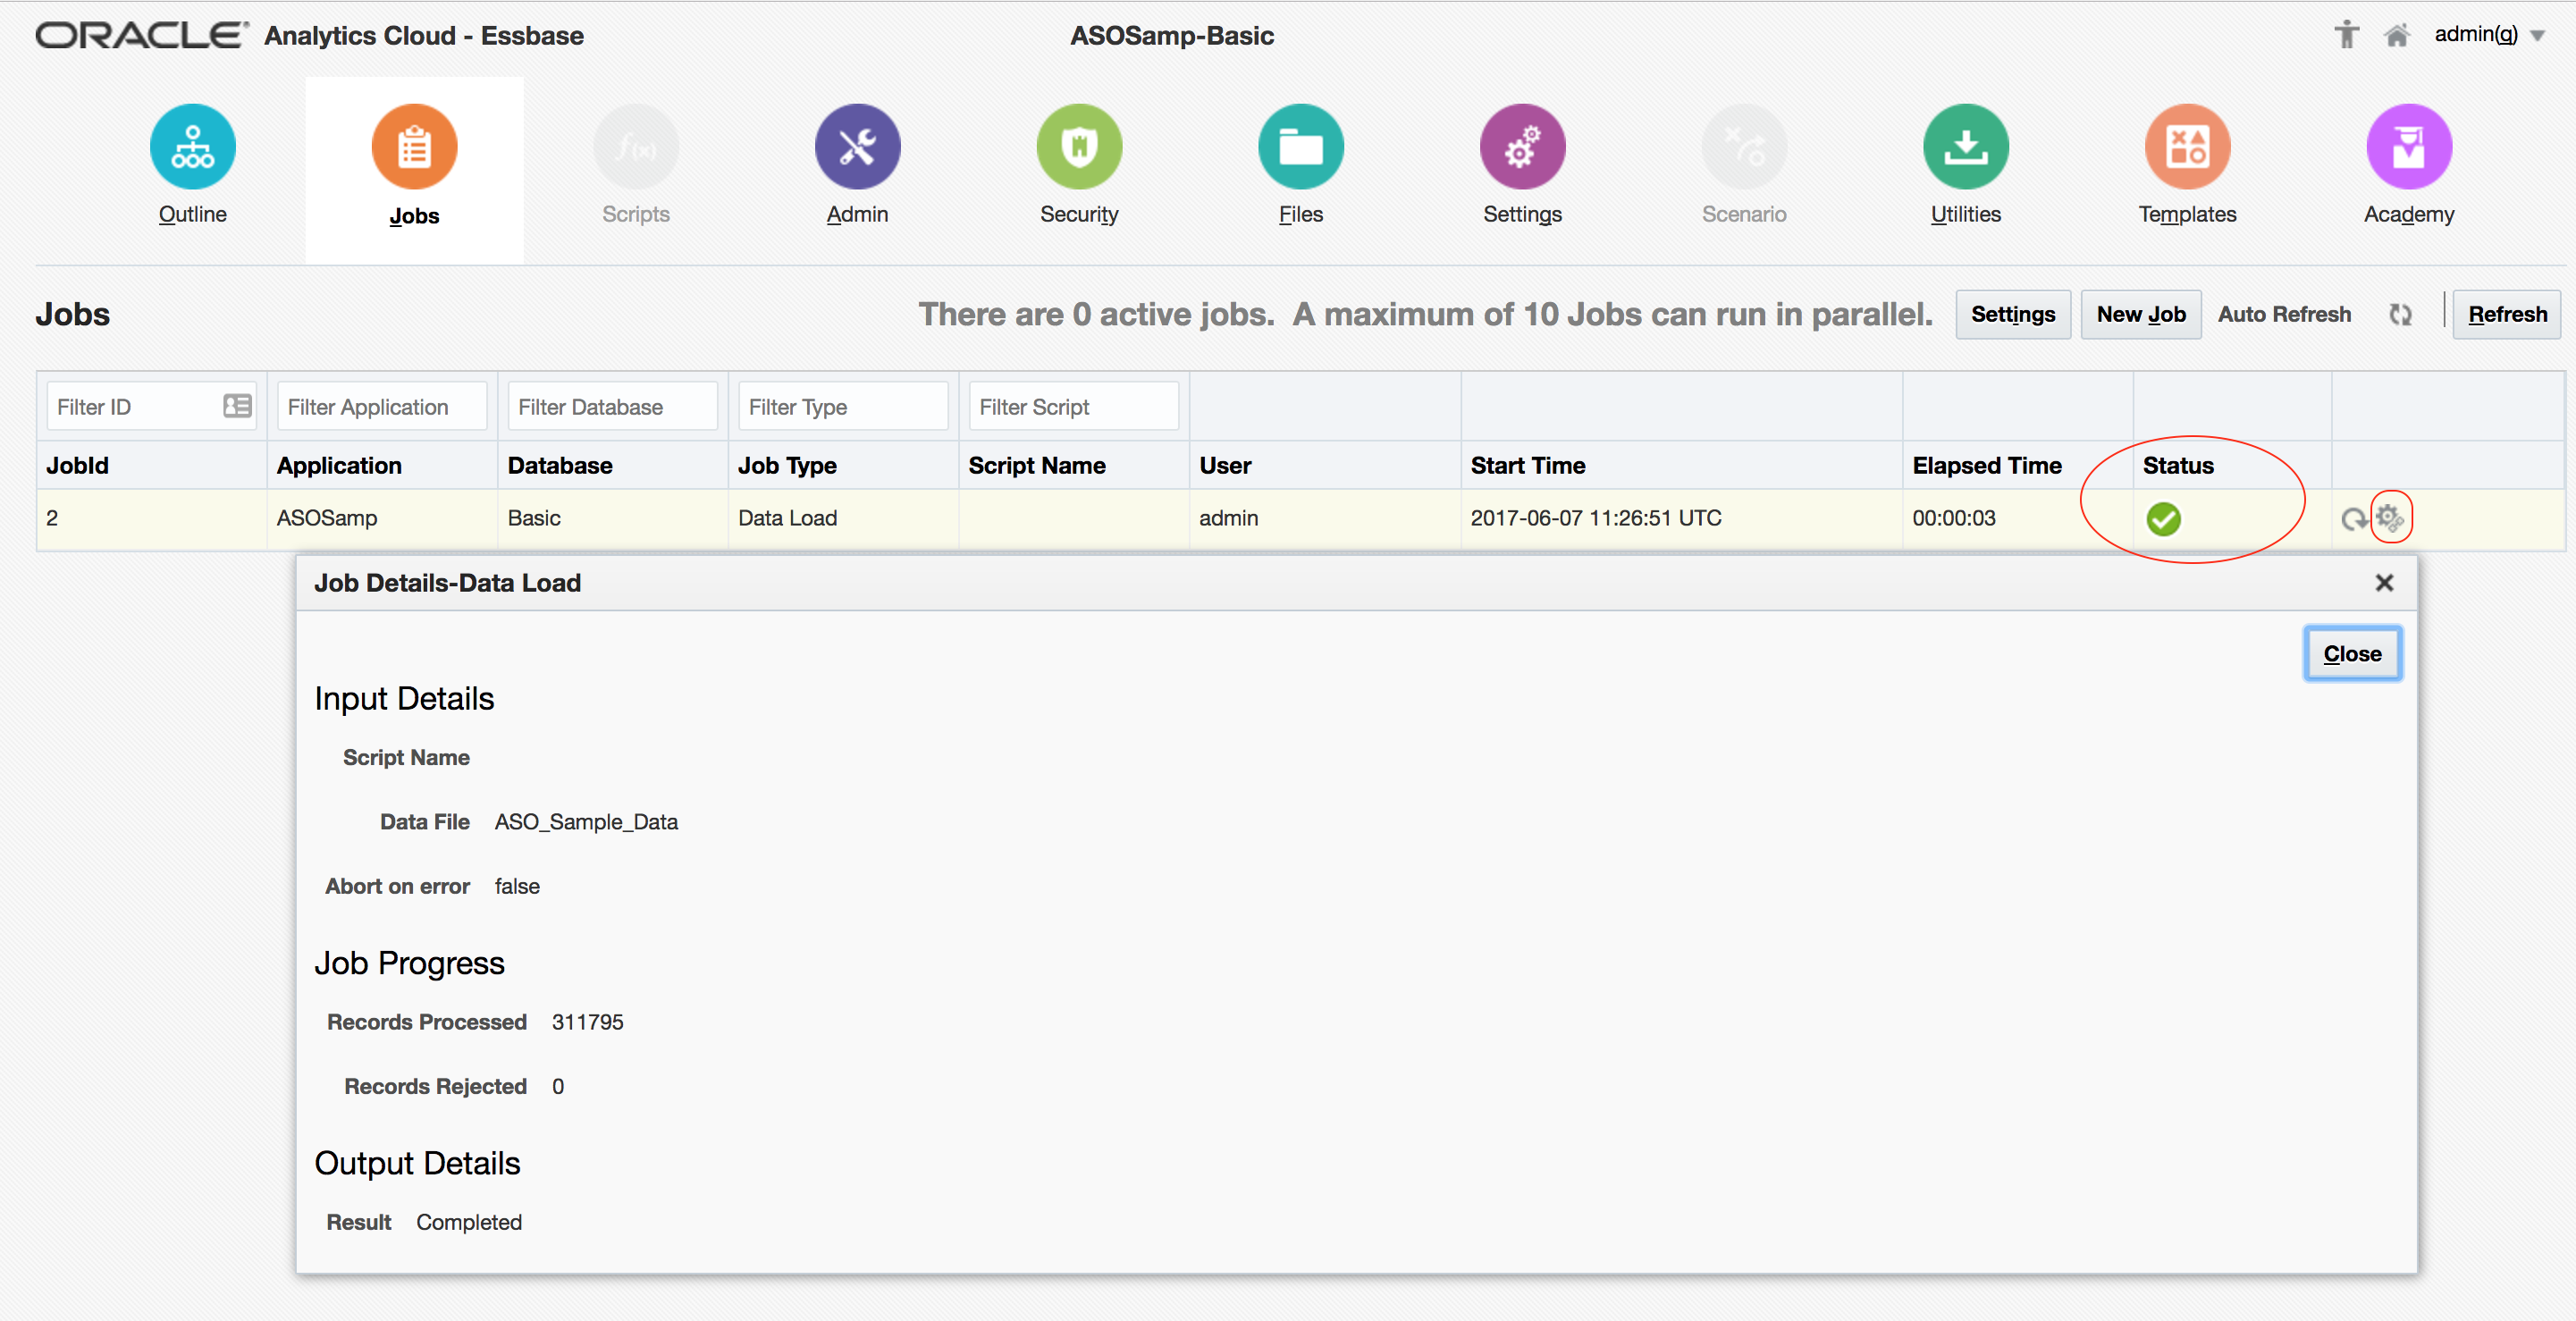
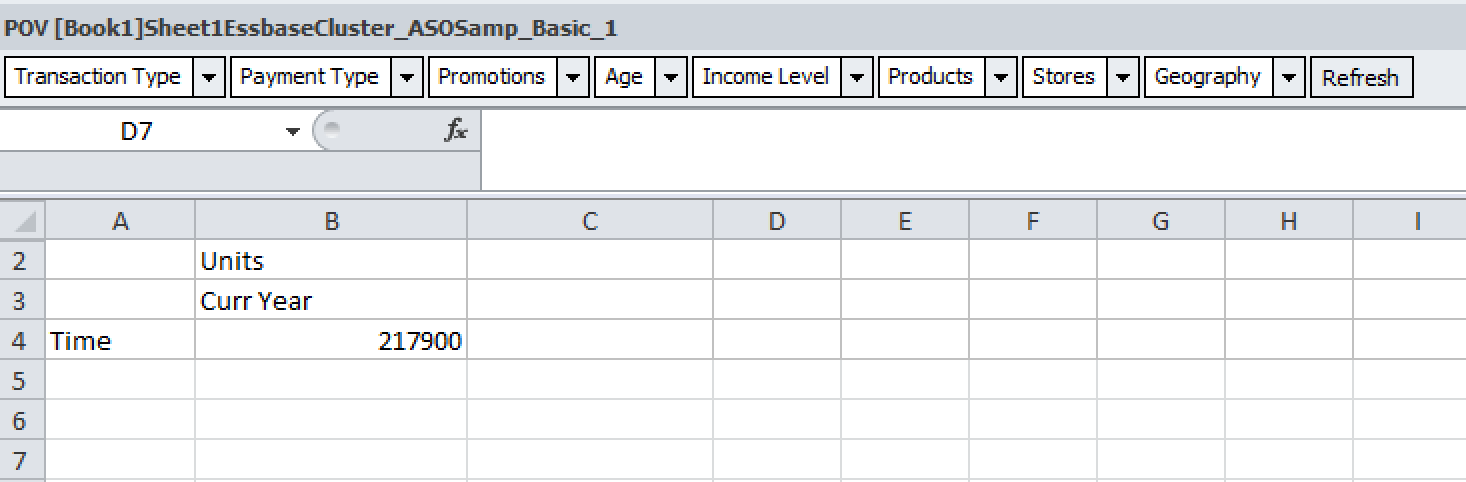
Once complete, the Status field will show the completion state of the job, whilst the Job Details icon on the right-hand side provides more detail – in this case, confirming that 311,795 records were successfully loaded, and 0 rejected:
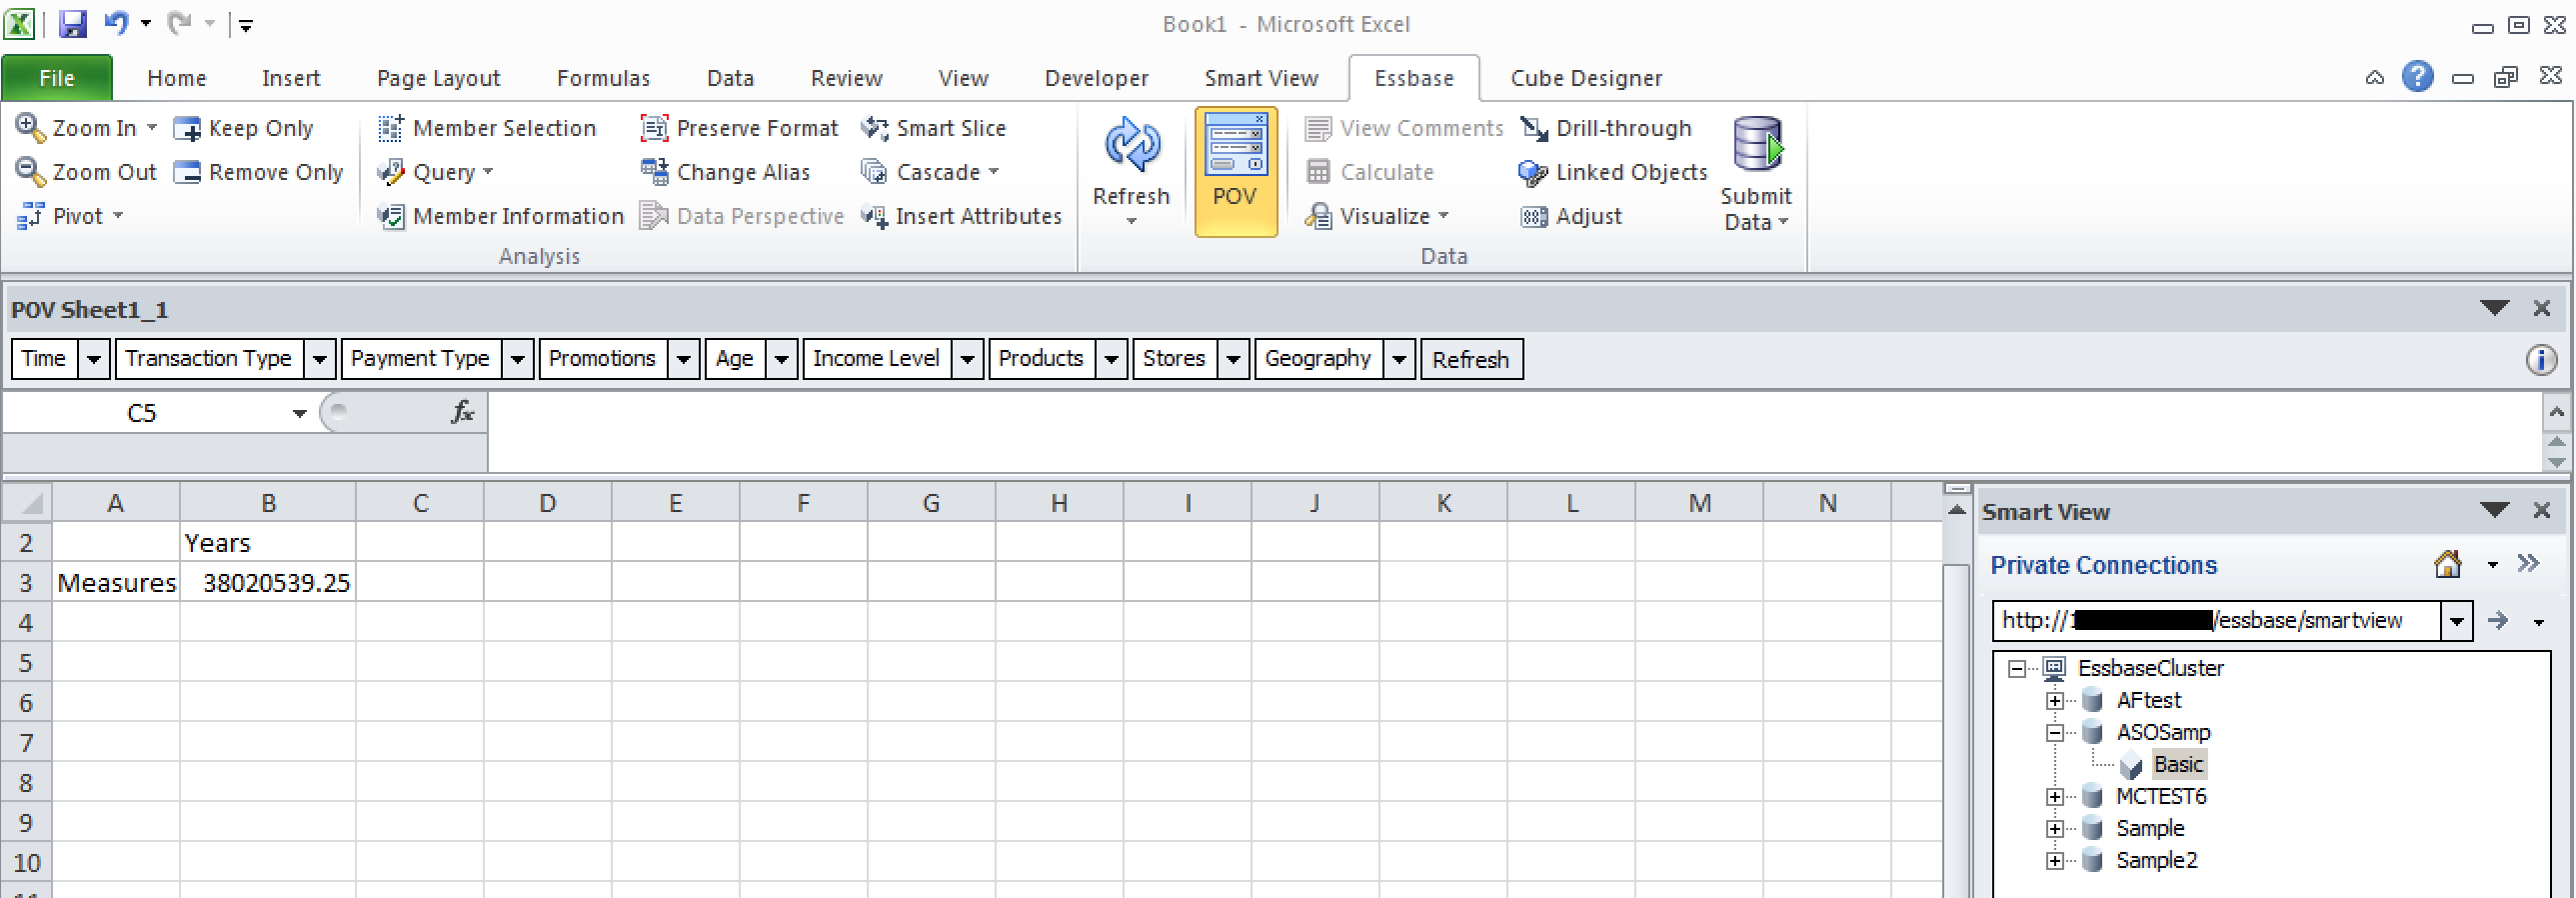
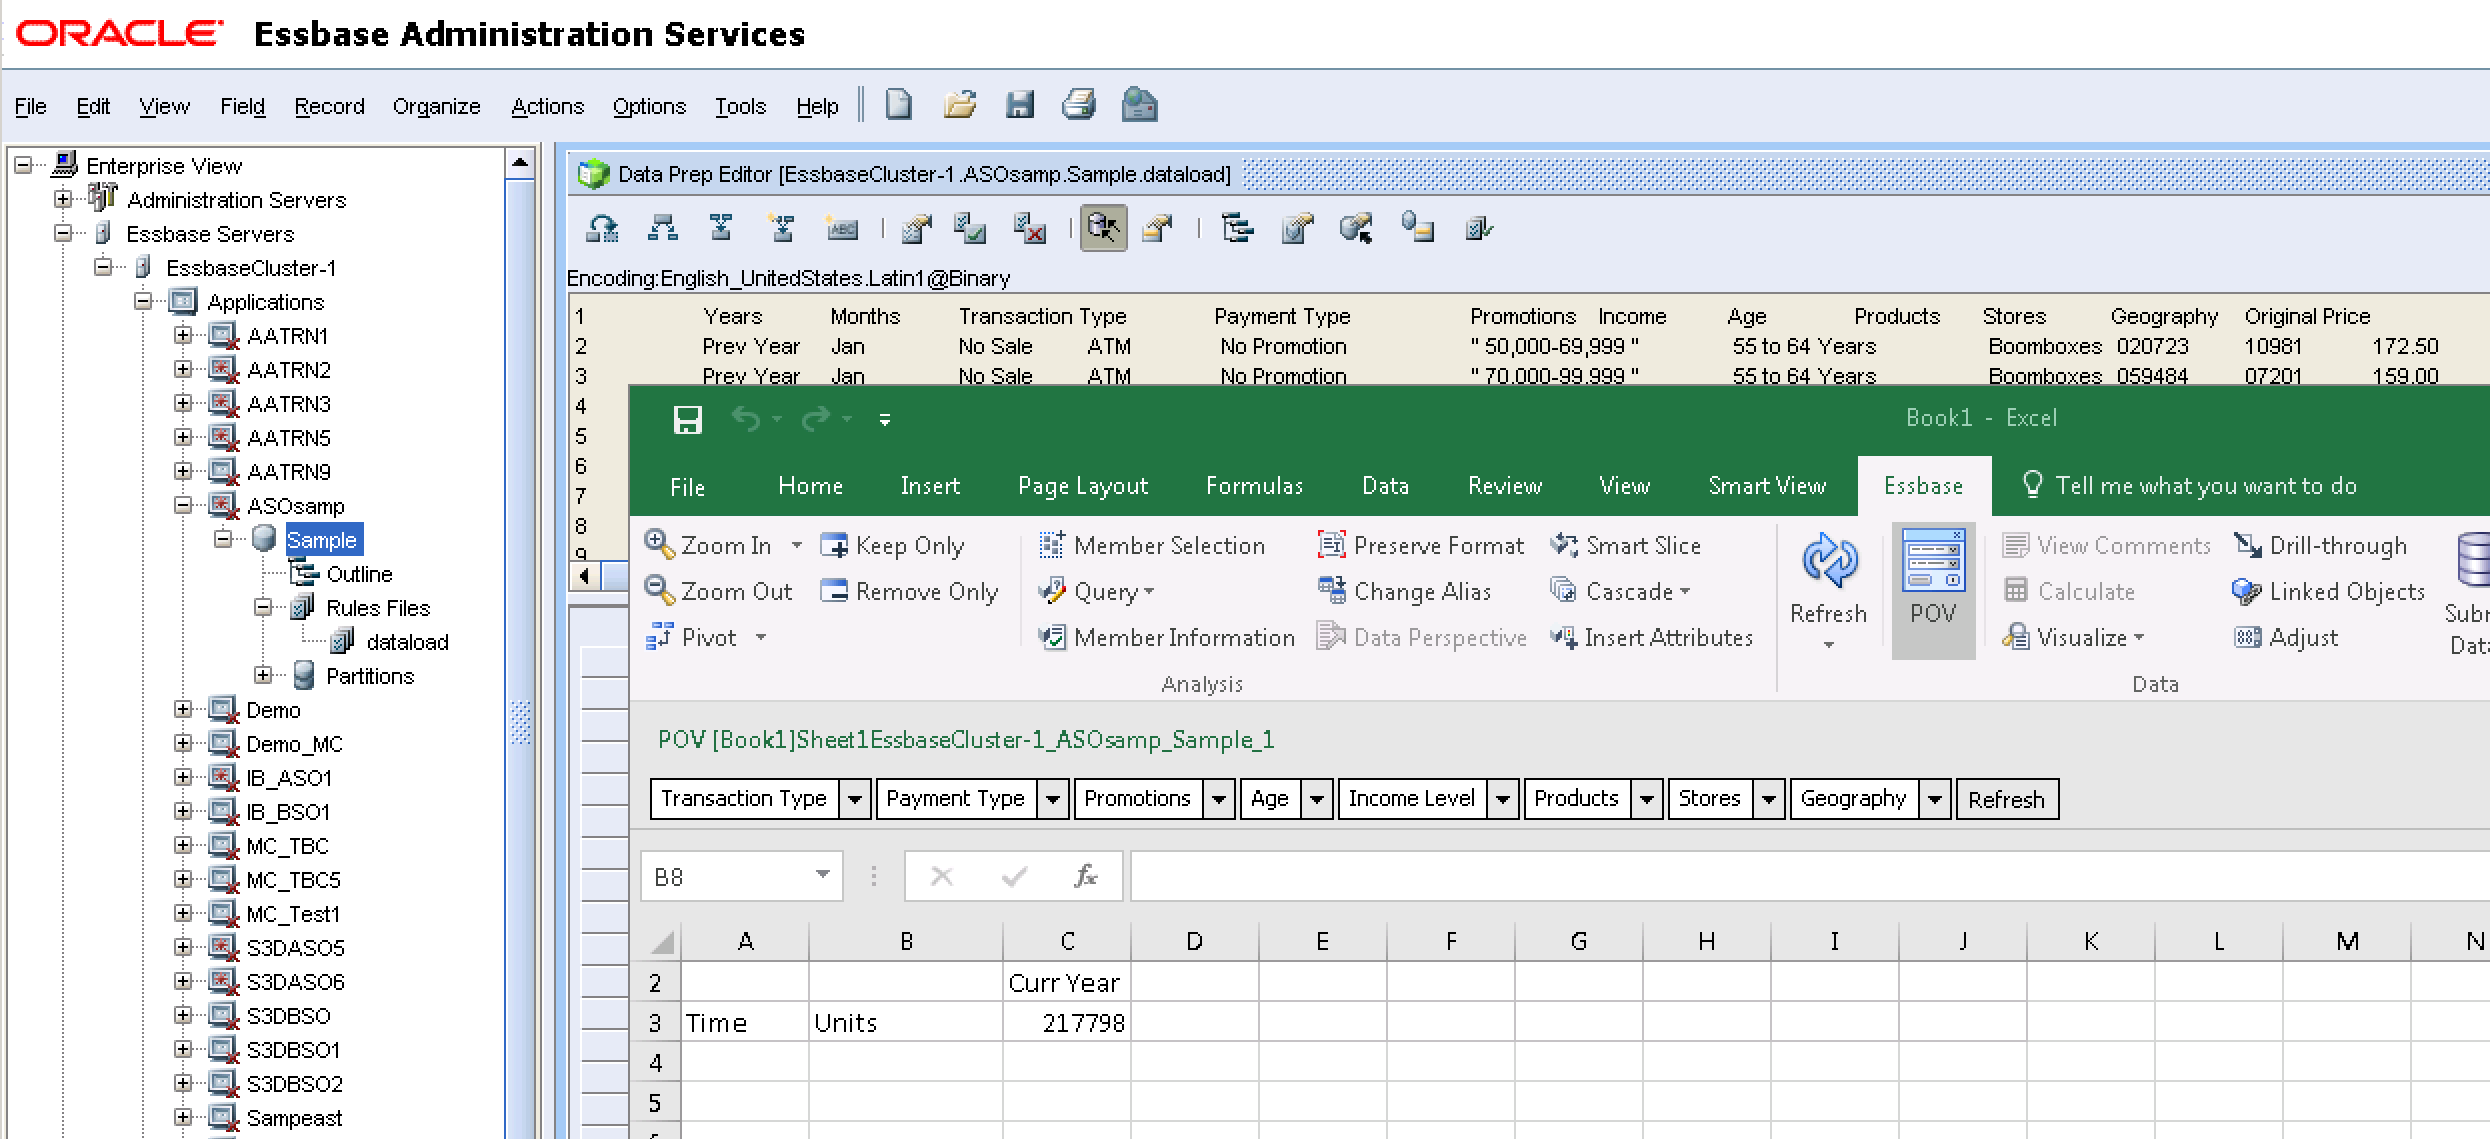
The success of the load is confirmed by a quick look in Smartview:
Note that a rules file was not selected as part of the job – this makes sense when we look at the data file…
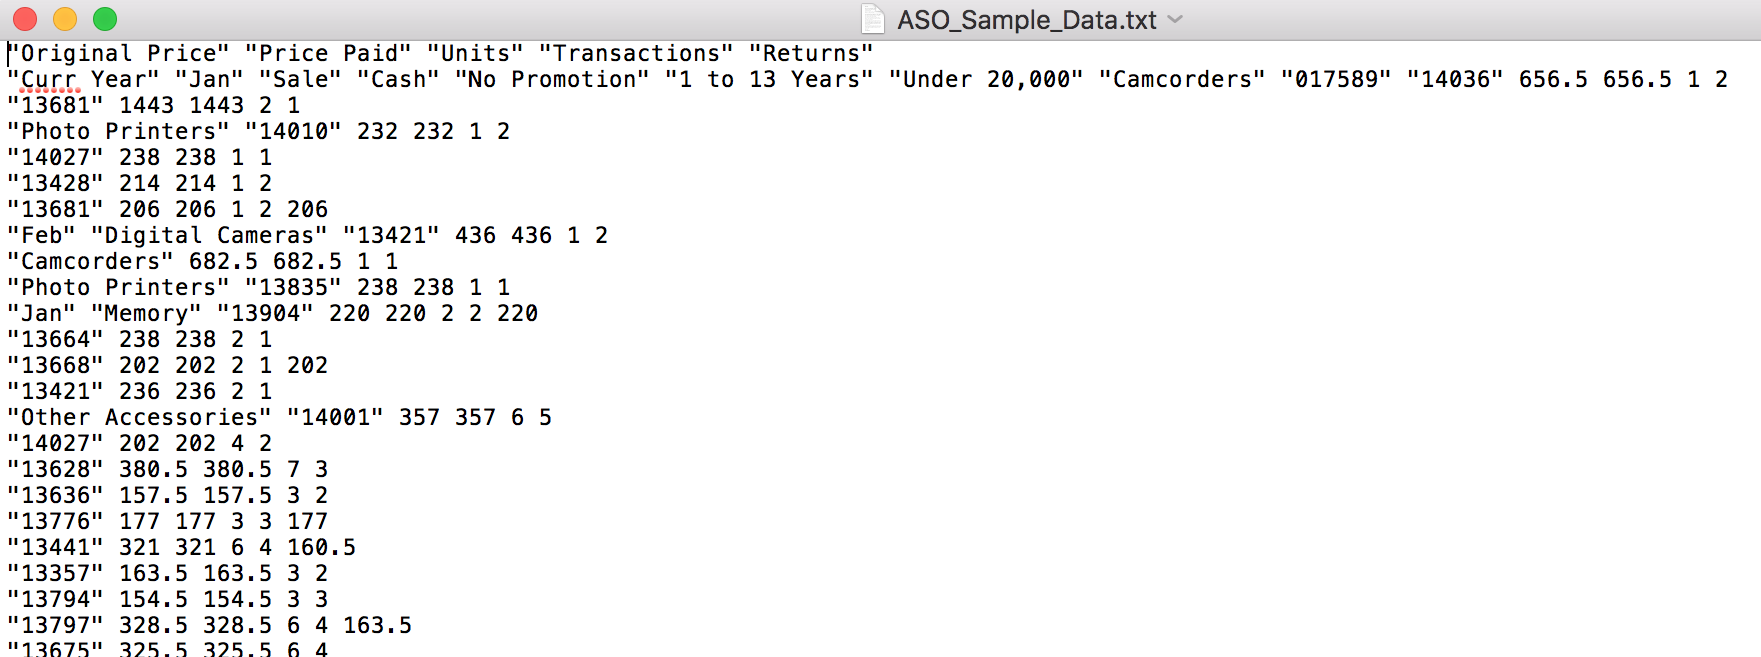
...which is familiar-looking: just what we would expect from a EAS export (MAXL: export database), which can of course just be loaded in a similar no-rules-file way in on prem.
Incidentally, this is different to the on-prem approach to ASOSamp.Sample where a ‘flat’, tab-delimited data file is provided for the sample data, along with a rules file that is required for the load:
...although the end-results are the same:
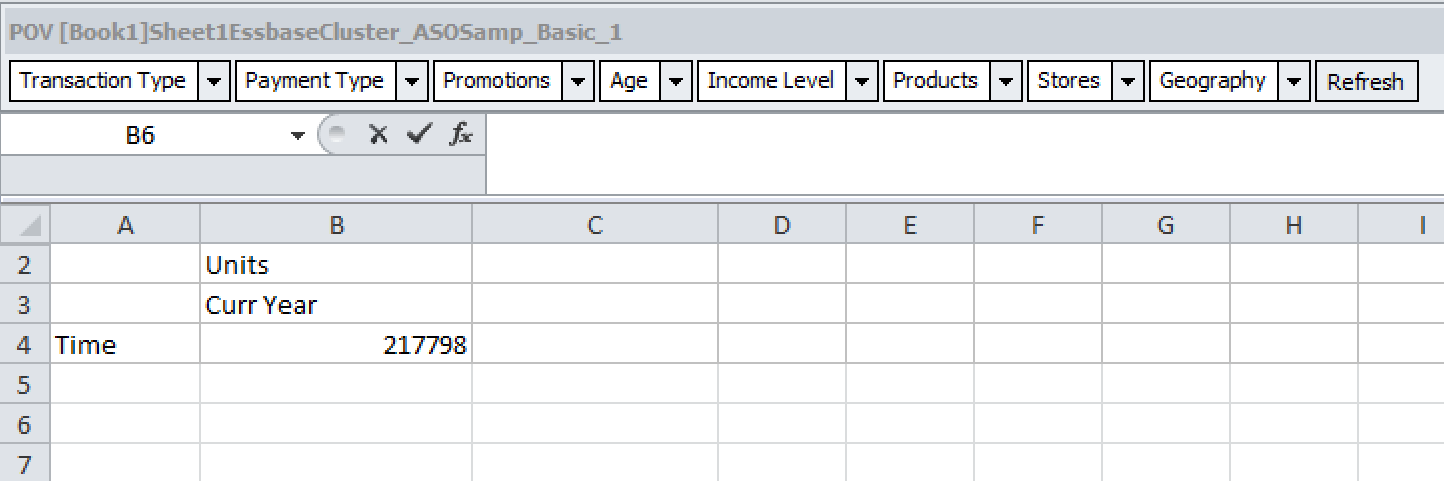
This ‘standard’ load works in overwrite mode – any new values in the file will be added, but any that exist already will be overwritten: running the load again and refreshing the Smartview report results in the same numbers confirms this.
This can be verified further by running with a changed data file: taking a particular node of data for the Units measure…
One of the constituent data values can be changed in a copy of the data file – in this example, one record (it doesn’t matter which for this purpose) can be increased – in this case, ‘1’ has been increased to ‘103’:
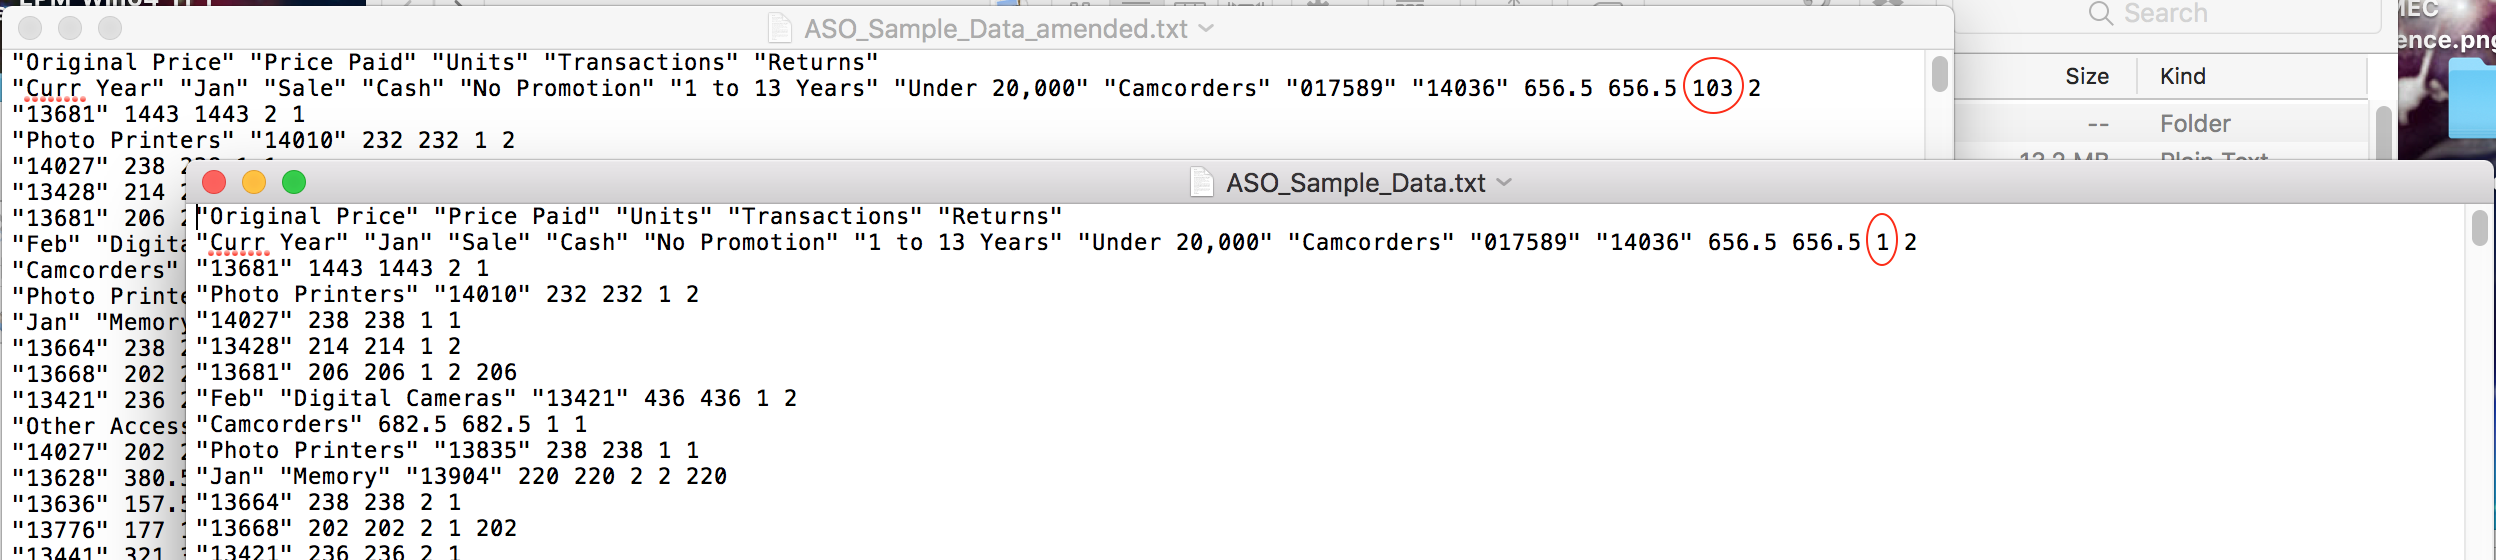
The amended file needs to be saved and uploaded to OAC as outlined above, and the load process repeated, this time using the amended file. After a successful load, the aggregated value on the test Smartview report has increased by the same 102:
Loading flat files
So, how might we load the same sort of flat, tab delimited file of the like supplied as the on-prem ASOSamp.Sample data file ?
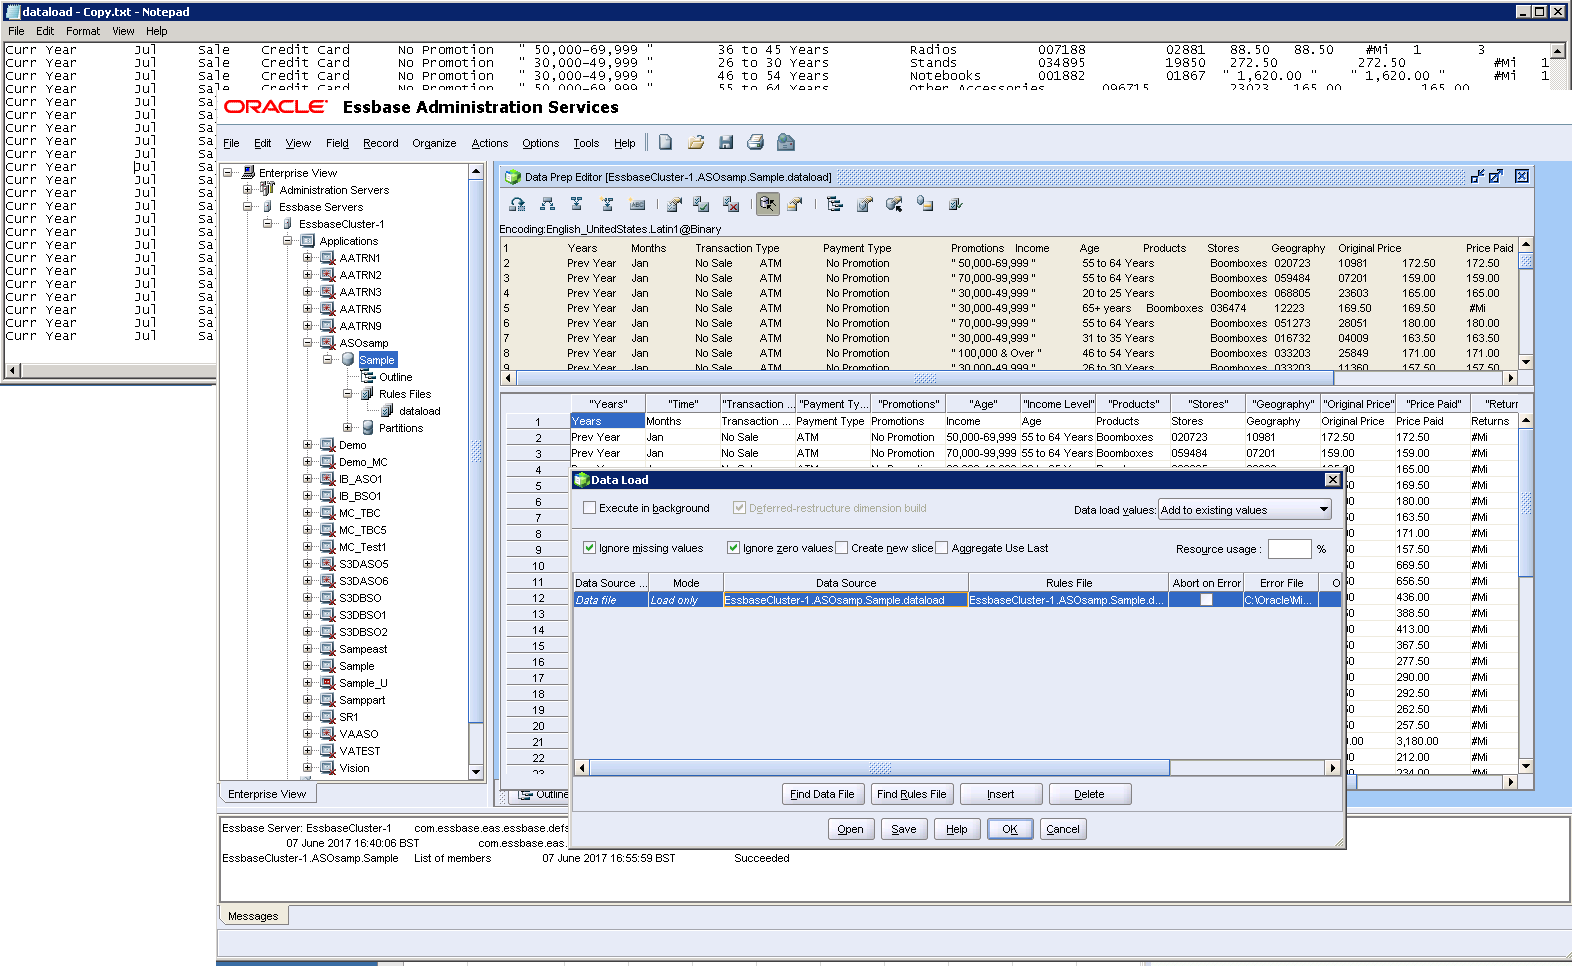
As above, files can be uploaded to OAC, so putting the dataload.txt data file from the on-prem release into OAC is straightforward. However, as you’d expect, attempting to run this as a load job without a rules file results in an error.
However, it is possible to run an OAC load with a rules file created in an on-prem version: firstly, upload the rules file (in this case, dataload.rul) in the same way as the data file. When setting up the load job, select the data file as normal, but under Scripts select the rules file required:
The job runs successfully, with the ‘Details’ overlay confirming the successful record count.
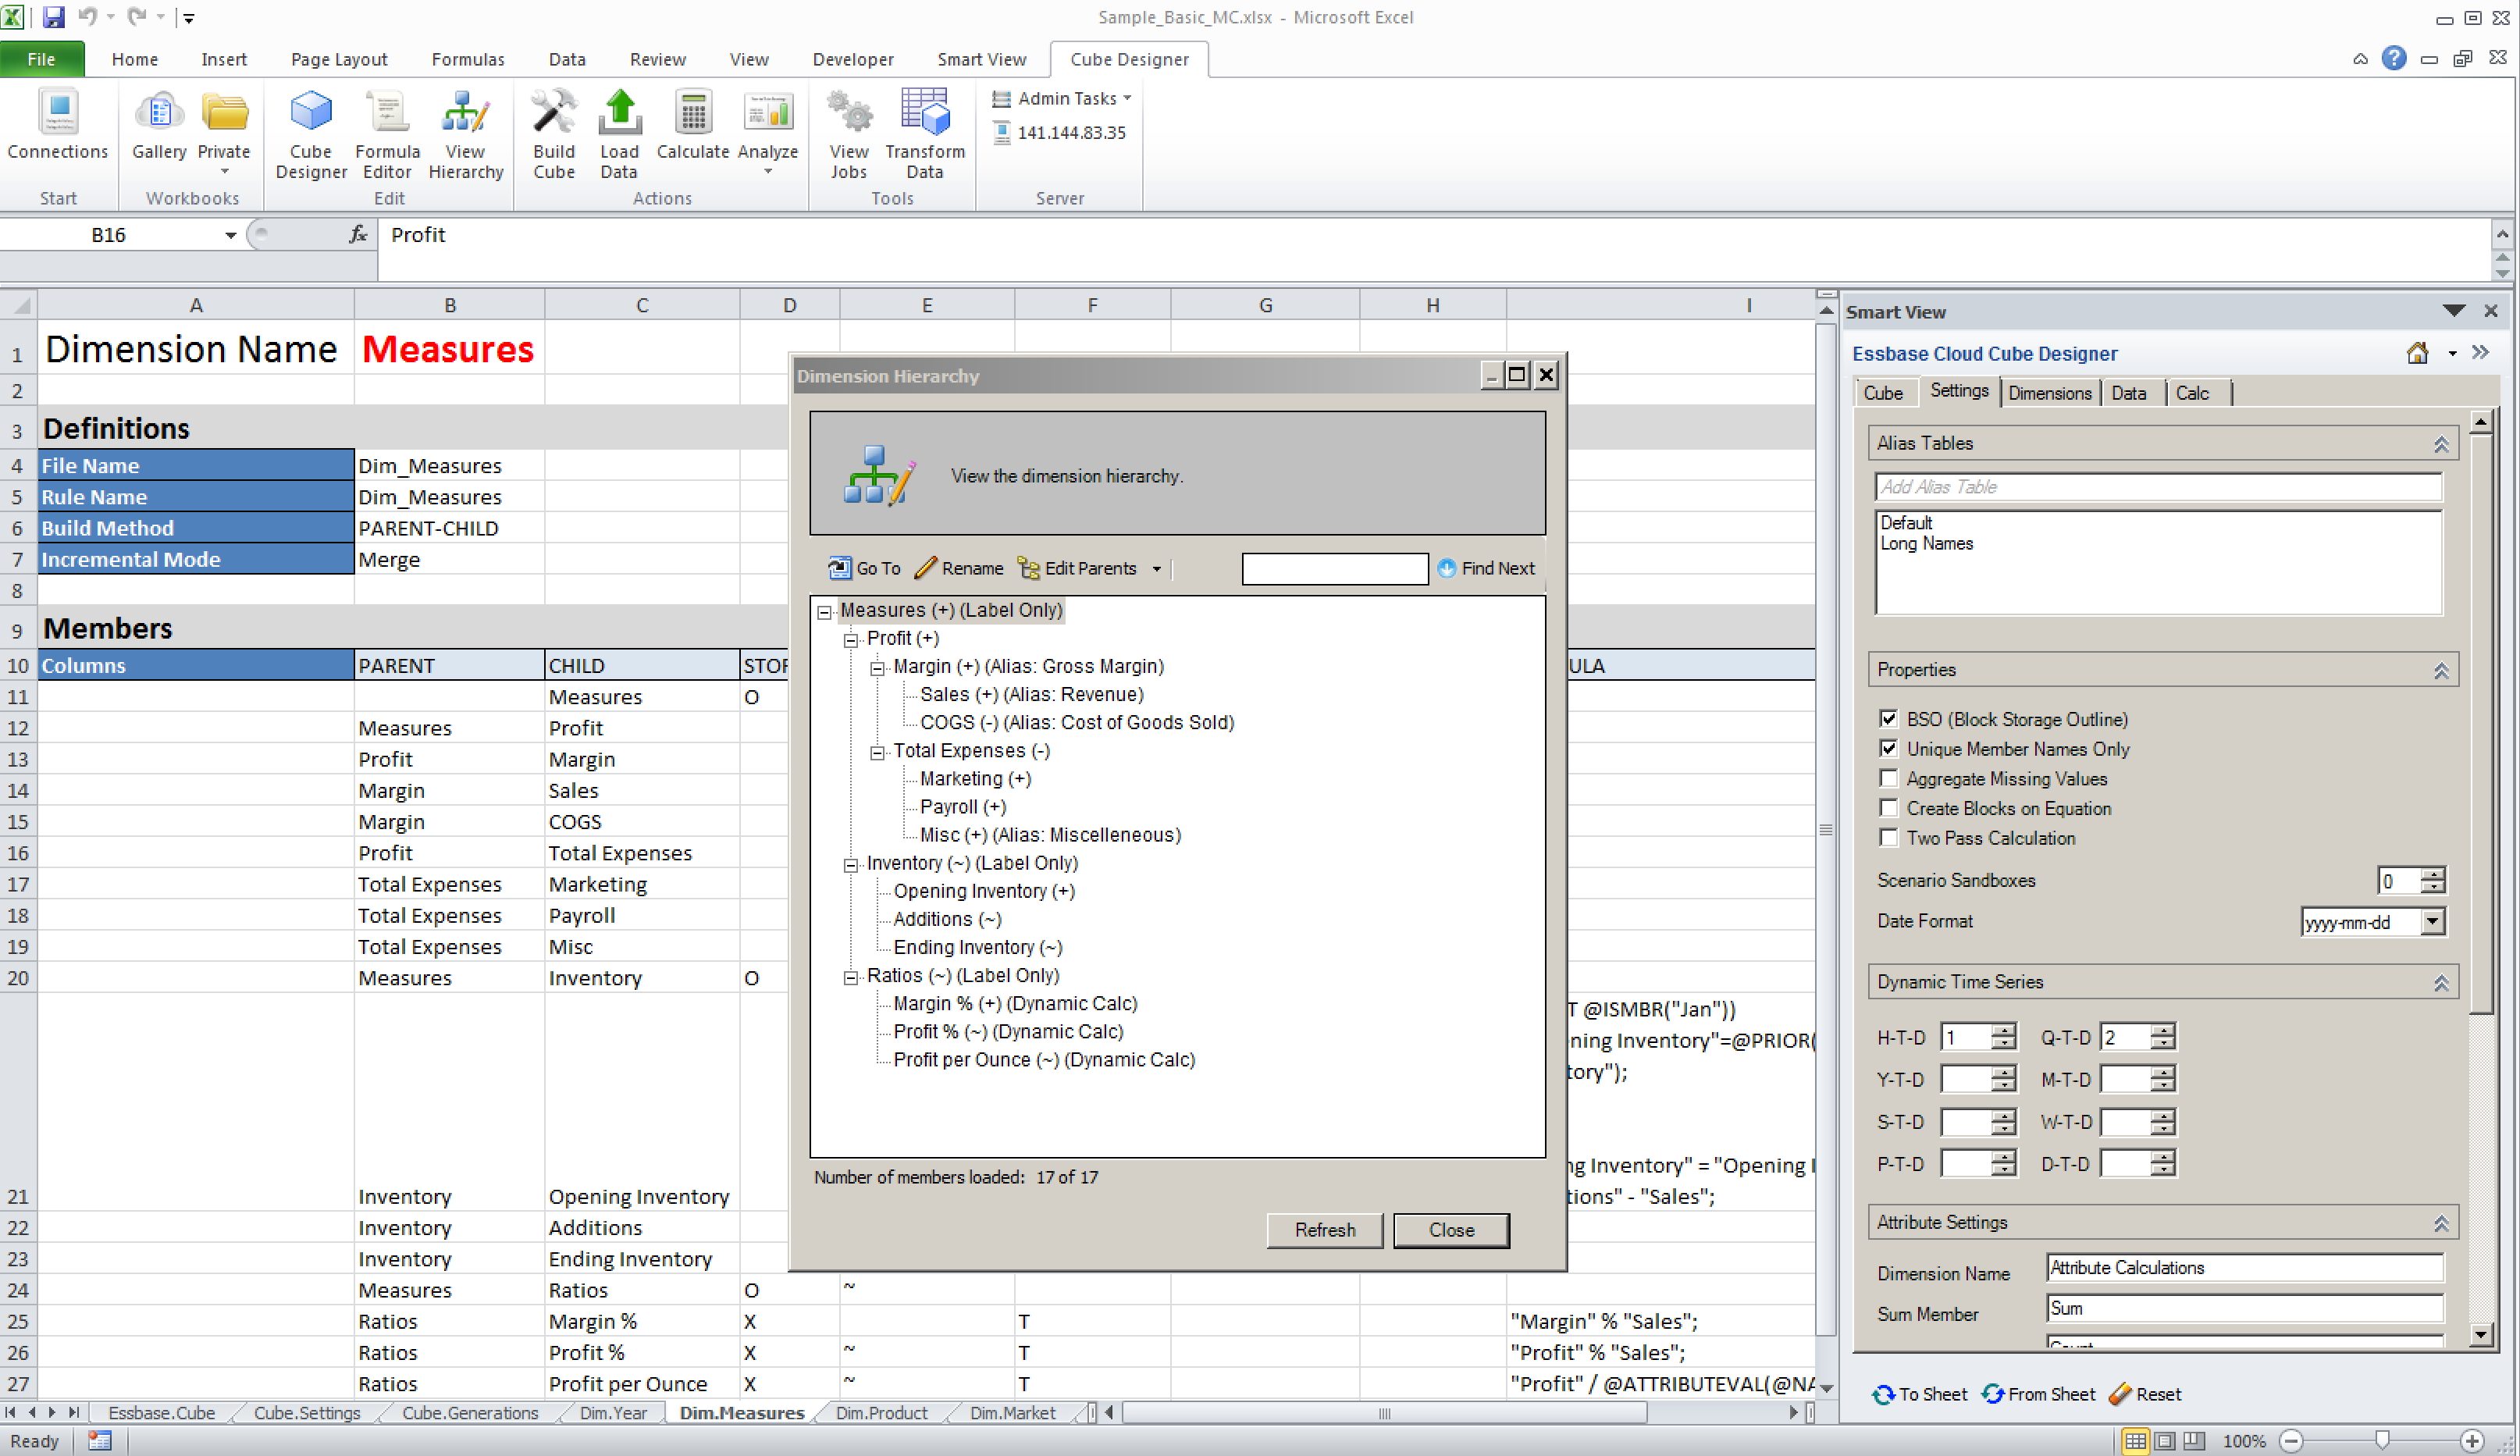
As with rules files generated by the Import facility, uploaded rules files can also be edited in text mode:
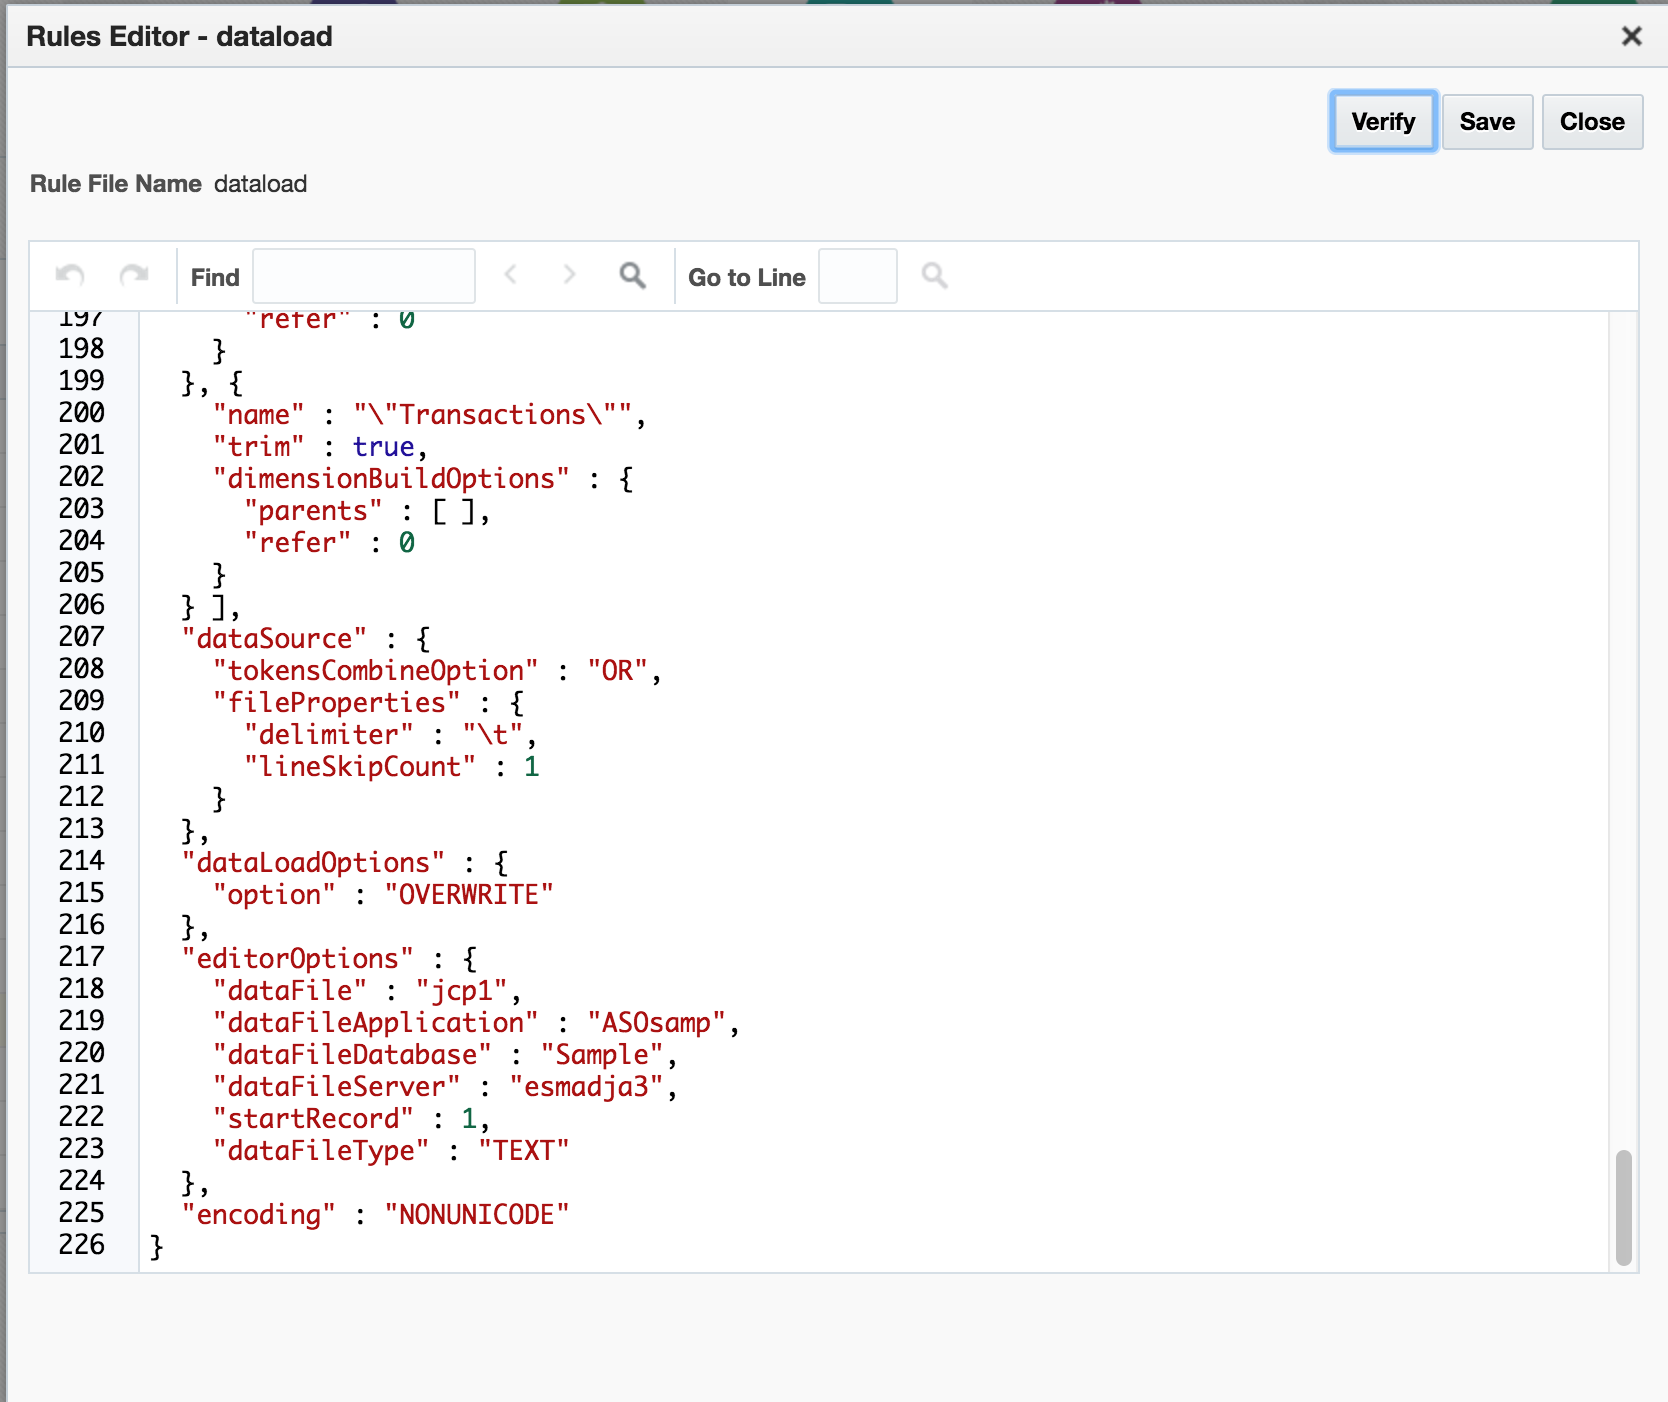
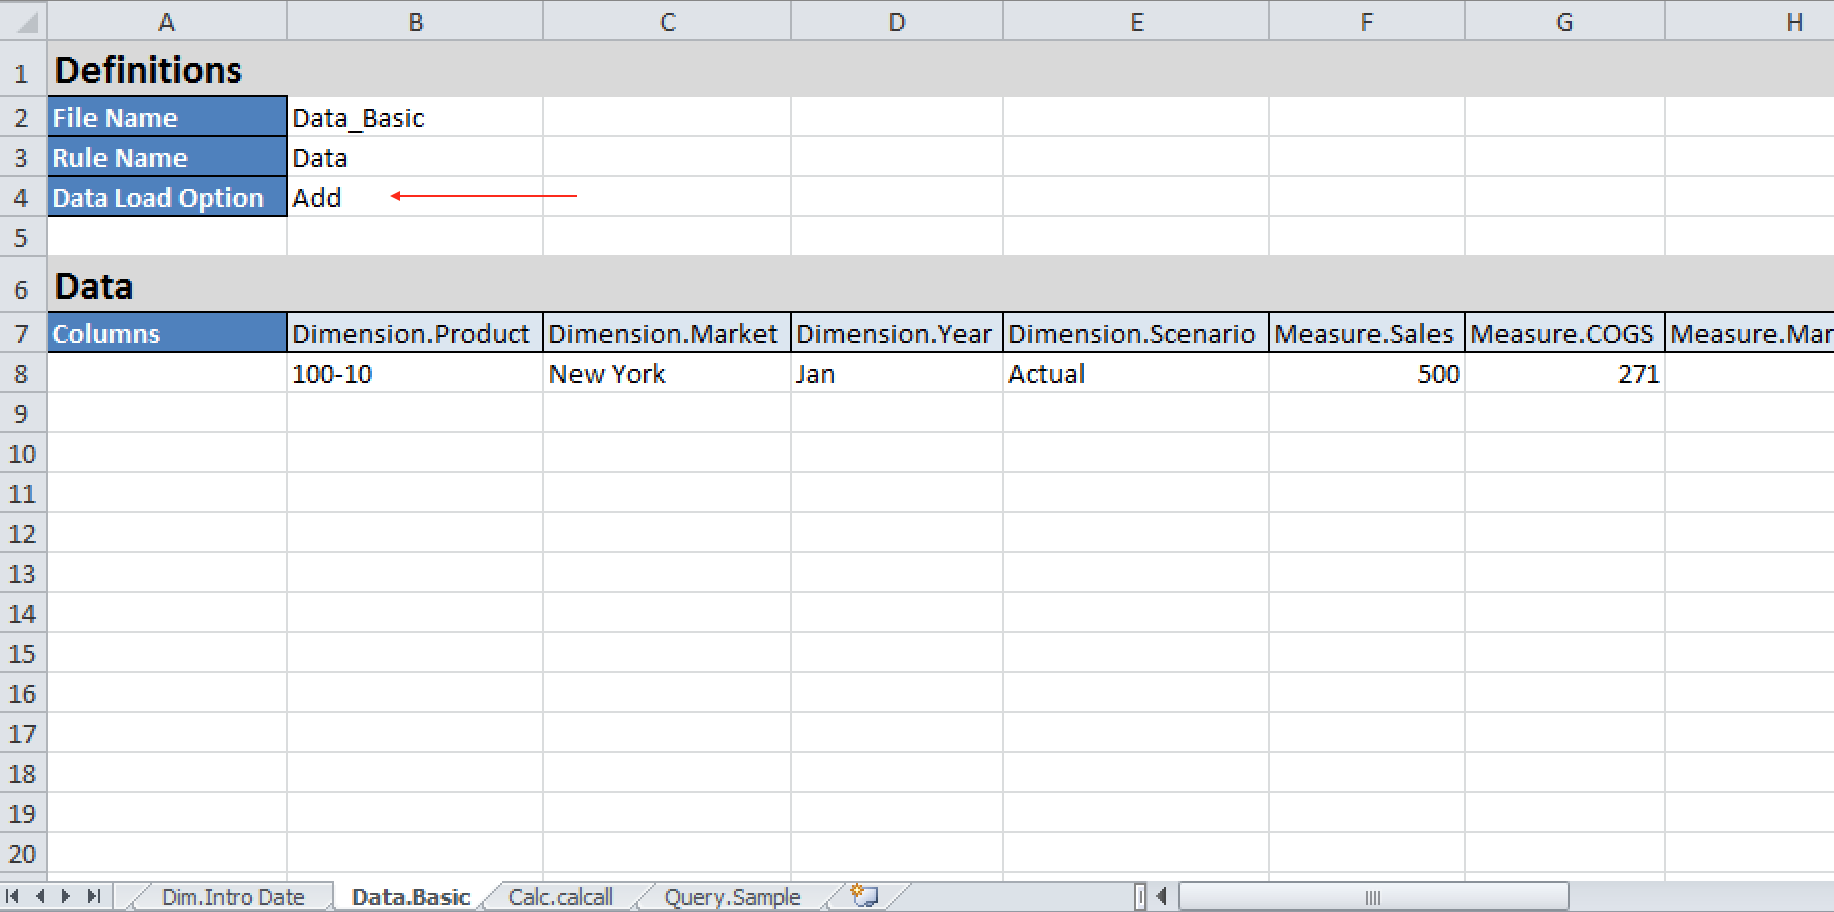
It would seem logical that changing the dataLoadOptions value at line 215 to a value other than OVERWRITE (eg ADD) might be a quick behavioural change for the load that would be easy to effect. However, making this change resulted in verification errors. Noting that the errors related to invalid dimension names, an attempt was made to verify the actual, unchanged rules file as uploaded…which also resulted in the same verification errors. So somewhat curiously, the uploaded on-prem rules file can be successfully used to load a corresponding data file, but (effectively) can’t be edited or amended.
Loading from Spreadsheet Template
The template spreadsheets used to build applications can also contain one or more data tabs. Unlike the OAC Jobs method or EssCS Dataload, the spreadsheet method gives you the option of a rules file AND the ability to Add (rather than overwrite) data:
Within OAC, this is actioned via the ‘Import’ function on the home page:
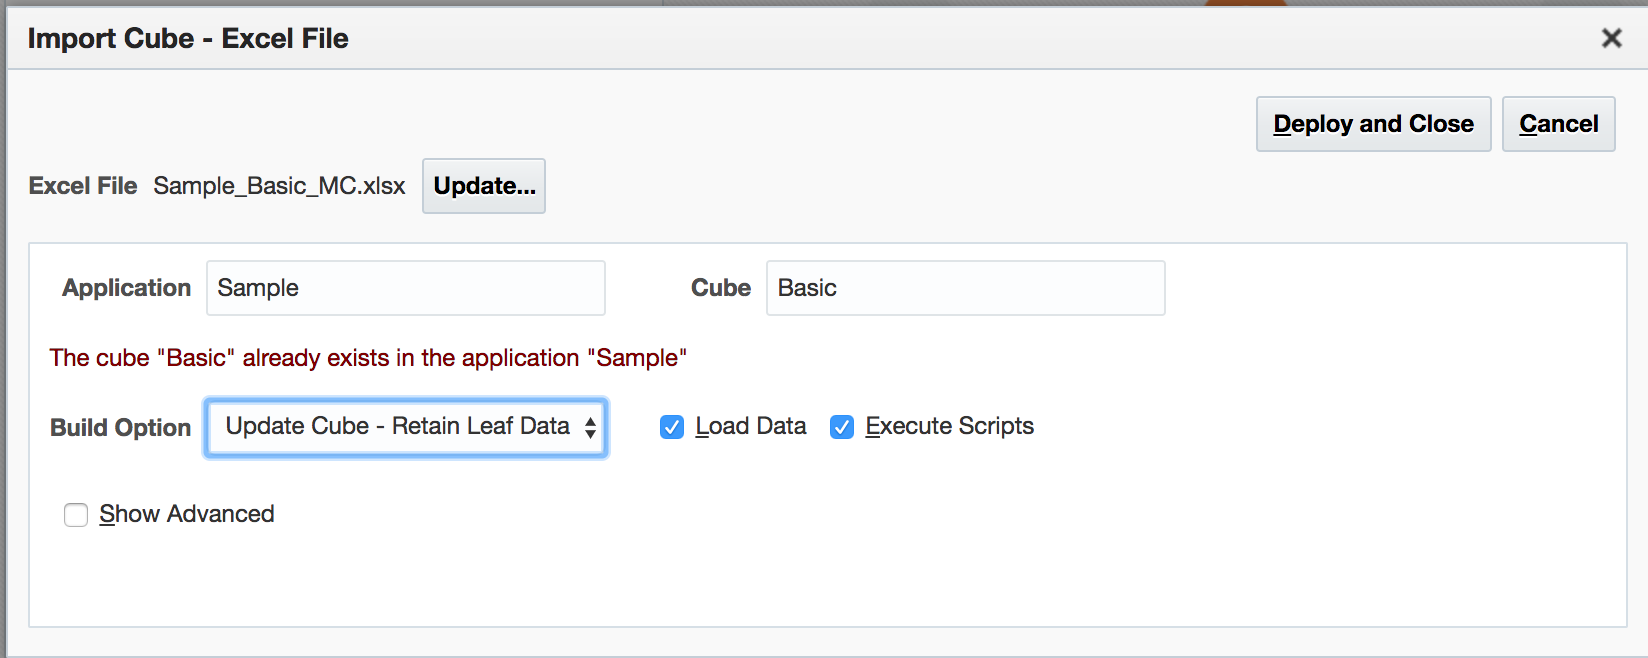
Note that we are retaining all data, and have the Load Data box checked. Checks confirm the values in the file are added to those already in the cube.
The data can also be uploaded via the Cube Designer in Excel under Cube Designer / Load Data:

Note that unlike running this method under OAC, the rules file (which was created by the initial import as the Data tab existed in the spreadsheet at that point) has to be selected manually.
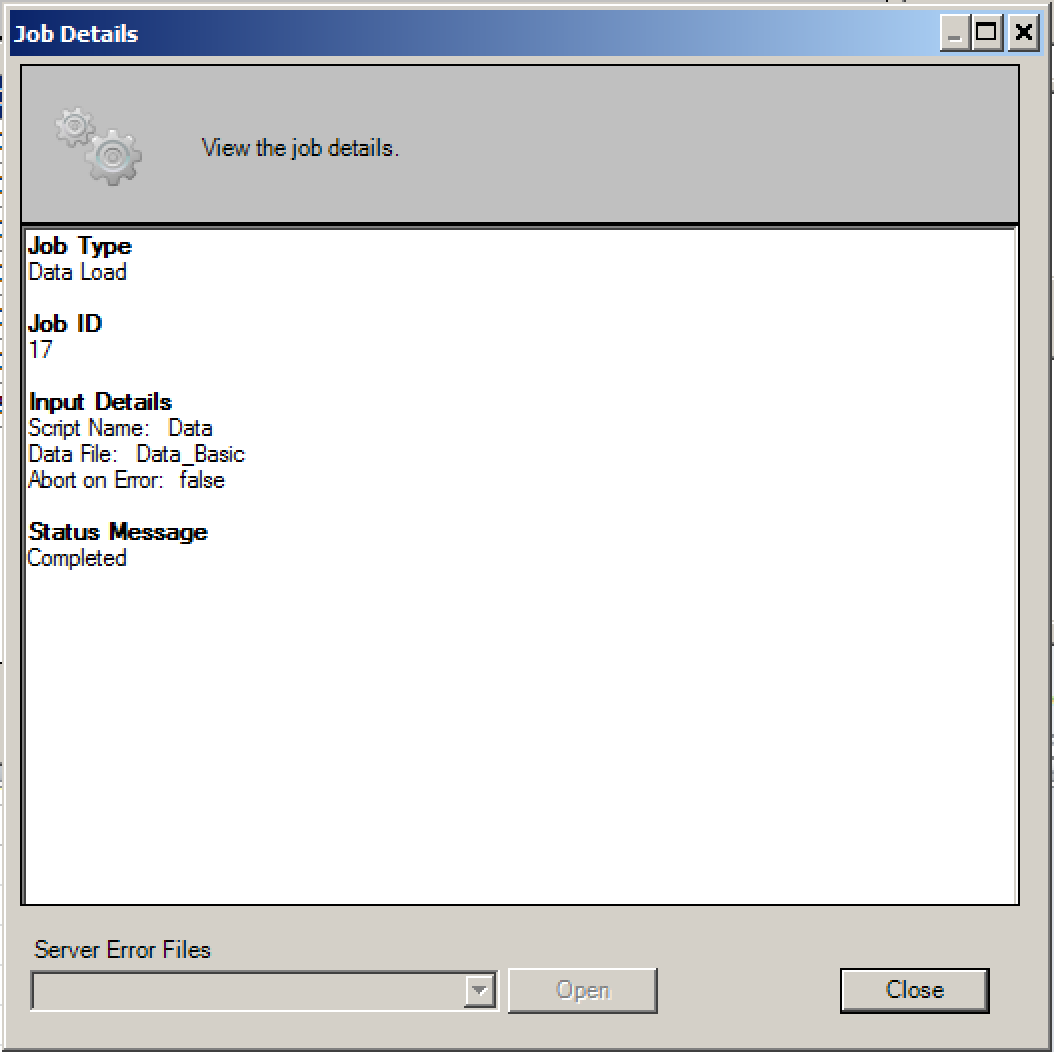
Once complete, an offer is made to view the Job Status Viewer (which can also be accessed from Cube Designer / View Jobs):
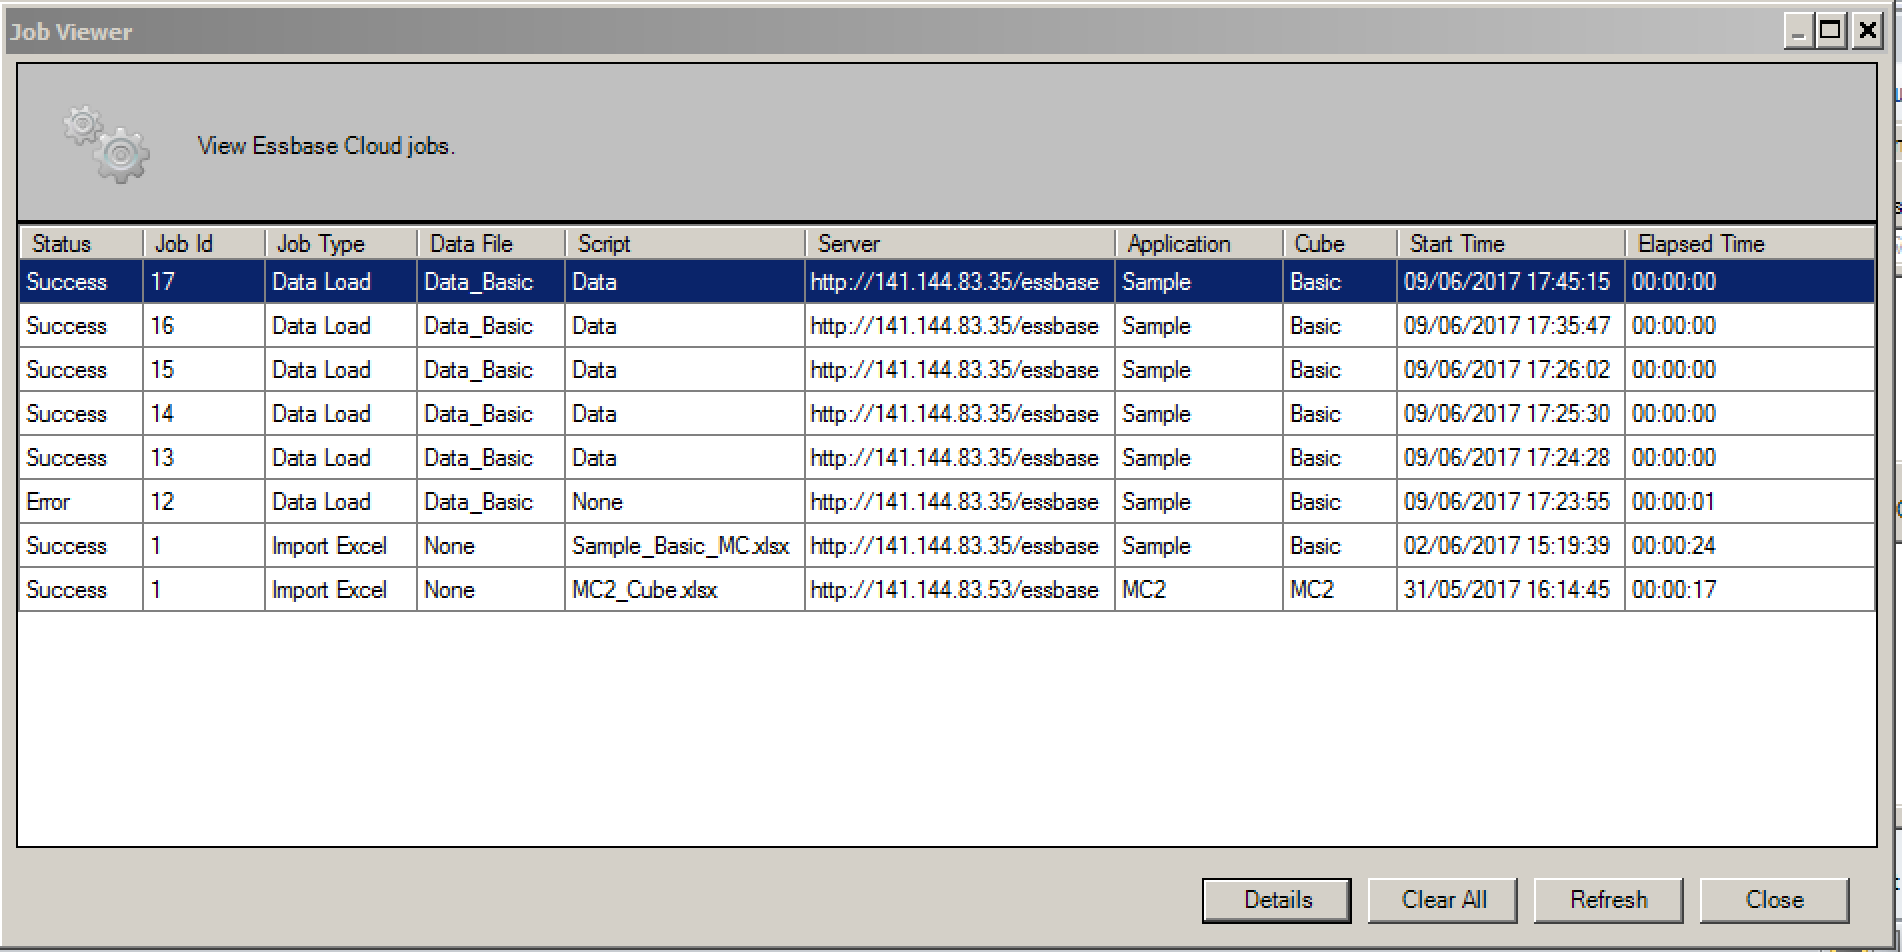
With further detail for each job also being available:
Use facilities to upload files
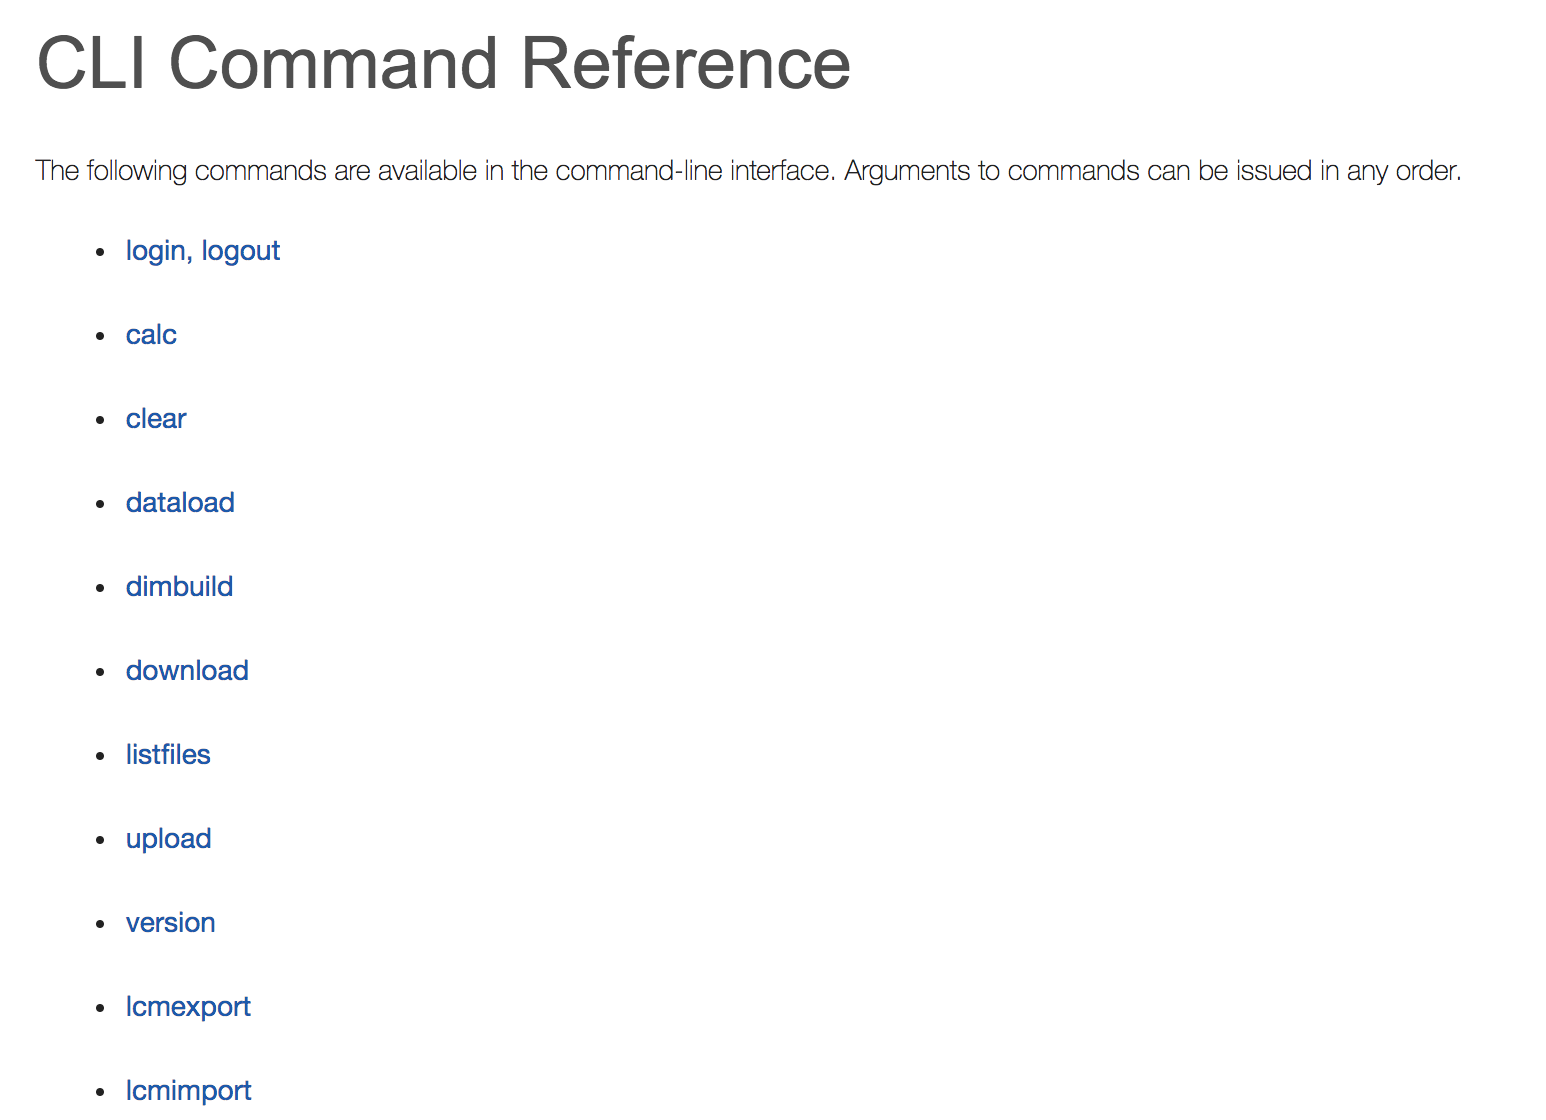
Given the ability to upload and run both data and rules files, the next logical step would be to script this for automated running. OAC contains a downloadable utility, the Command Line Tool (aka CLI , EssCS) which is a number of interface tools that can be run locally against an OAC instance of Essbase:
Login / Logout
Calc
Dataload
Dimbuild
Clear
Version
Listfiles
Download
Upload
LcmExport
LcmImport
Running locally, a successful EssCS login effectively starts a session that then remains open for other EssCS commands until the session is closed with a logout command.
The login syntax suggests the inclusion of the port number in the URL, but I had no success with this…although it worked without the port reference:
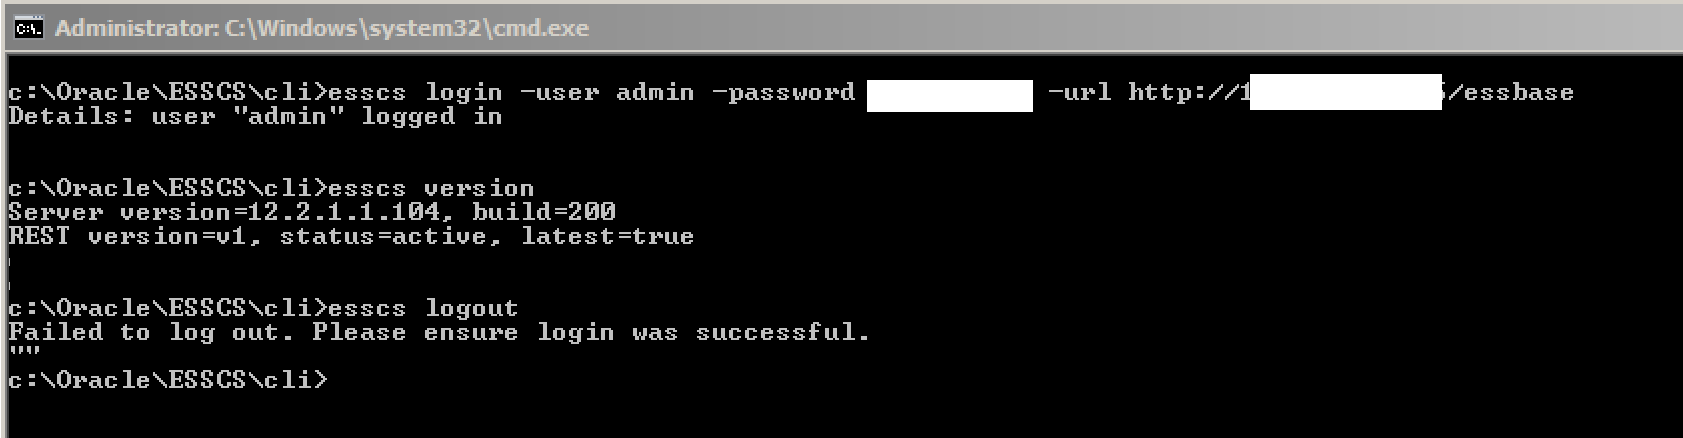
As above, the connection is made and is verified by the successful running of another command (eg version), but the logout command produced an error. Despite this, the logout appeared successful – no other EssCS commands worked until a login was re-issued.
With EssCS installed and working, the Listfiles and Upload facilities become available. The function of these tools is pretty obvious from the name. Listfiles should be issued with at least arguments for the application and cube name:
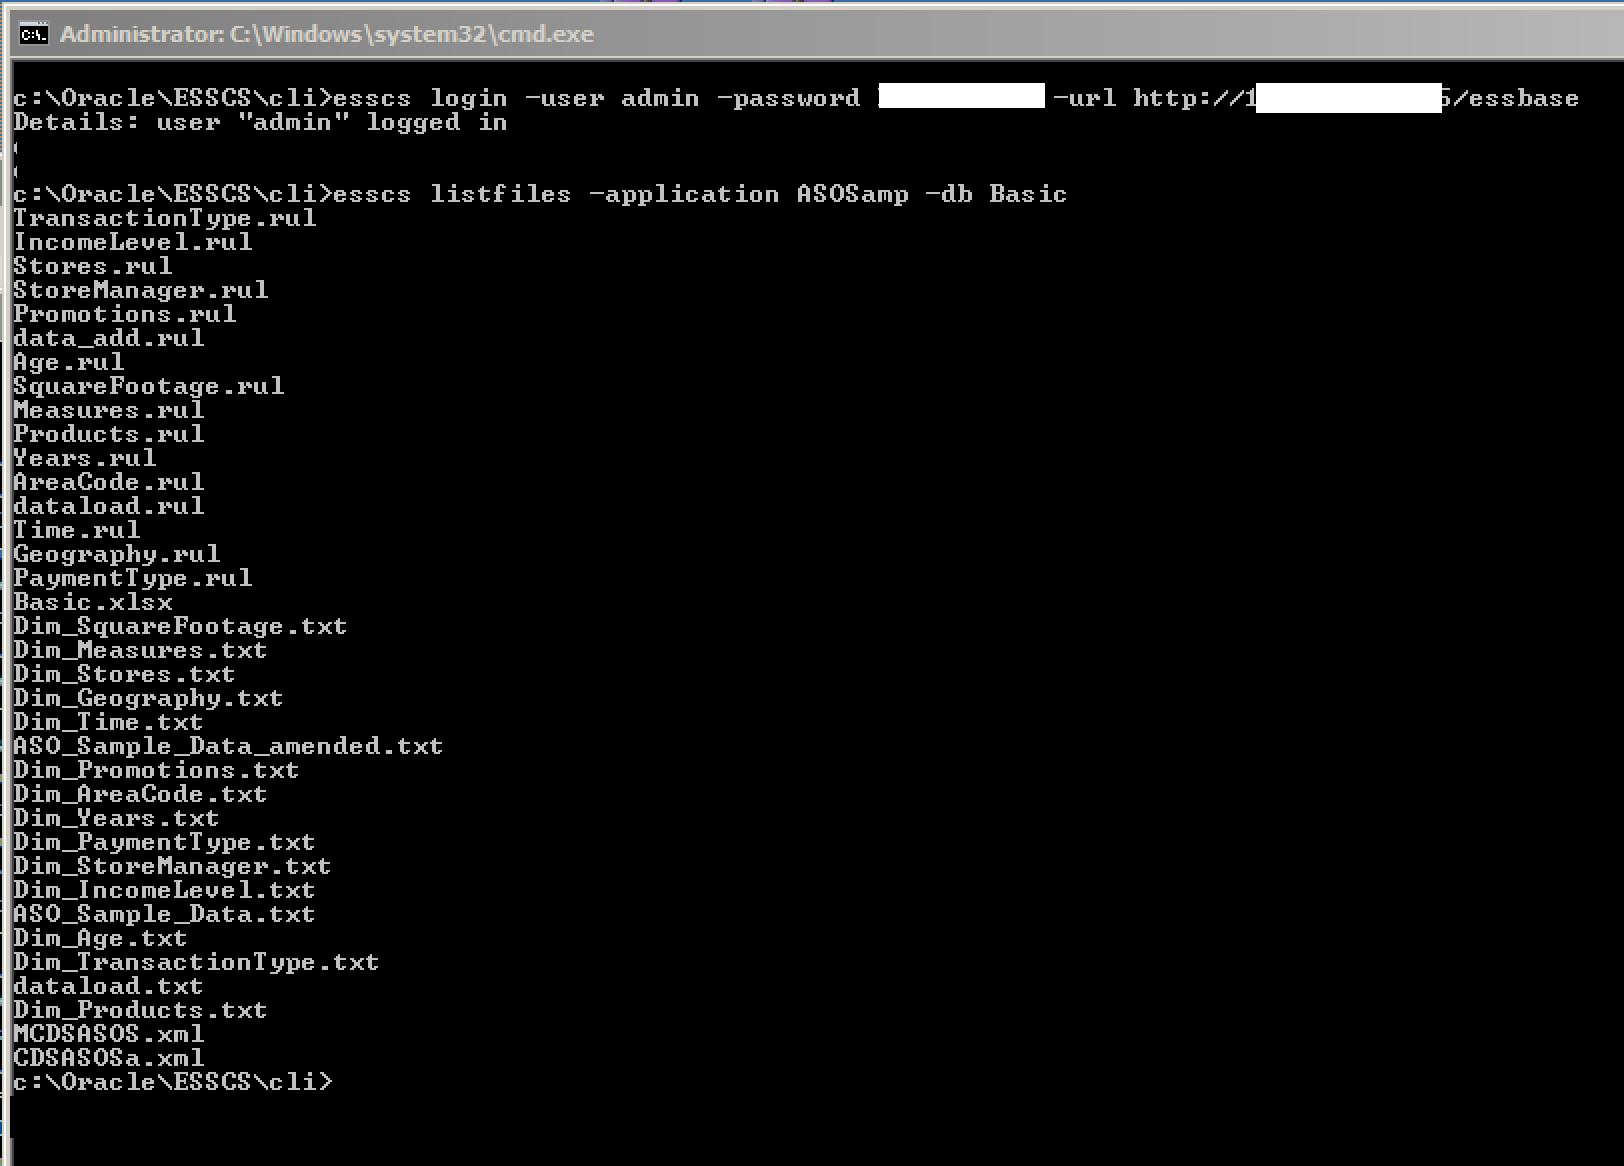
The file type (csc, rul, txt, msh, xls, xlsx, xlsm, xml, zip, csv) can be included as an additional argument…
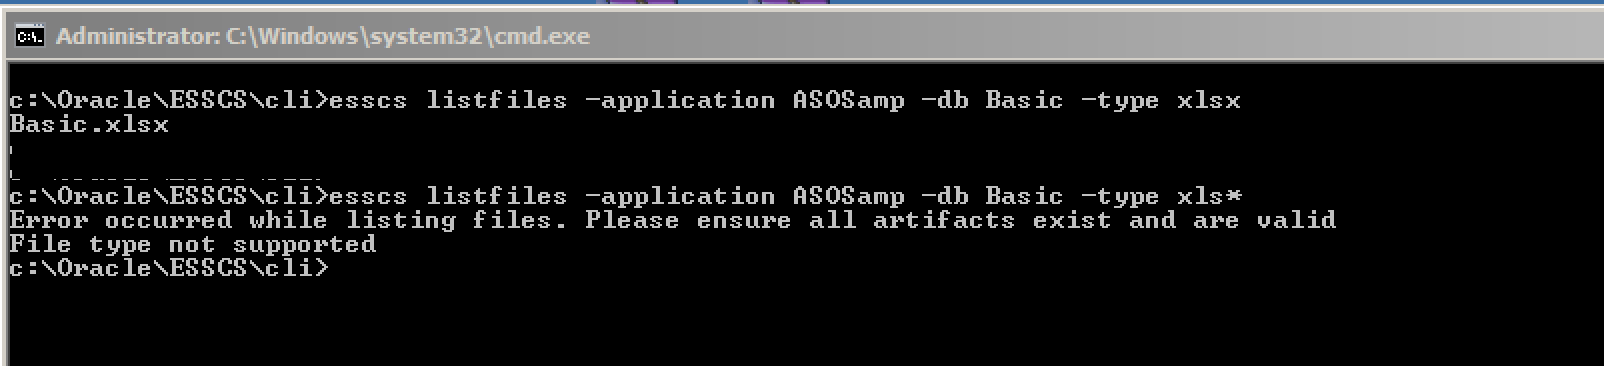
…although the file types is a fixed list – for example, you don’t seem to be able to use a wild card to pick up all spreadsheet files.
Whilst there is an Upload (and Download) facility, there does not seem to be the means to delete a remote file…which is a bit of an inconvenience, because using Upload to upload a file that already exists results in an error, and there is no overwrite option. The dataload.txt and dataload.rul files previously uploaded via the OAC front end were therefore manually deleted via OAC, and verified using Listfiles.
The files were then uploaded back to OAC using the Upload option of EssCS:

As you would expect, the files will then appear both in a Listfiles command and via OAC:
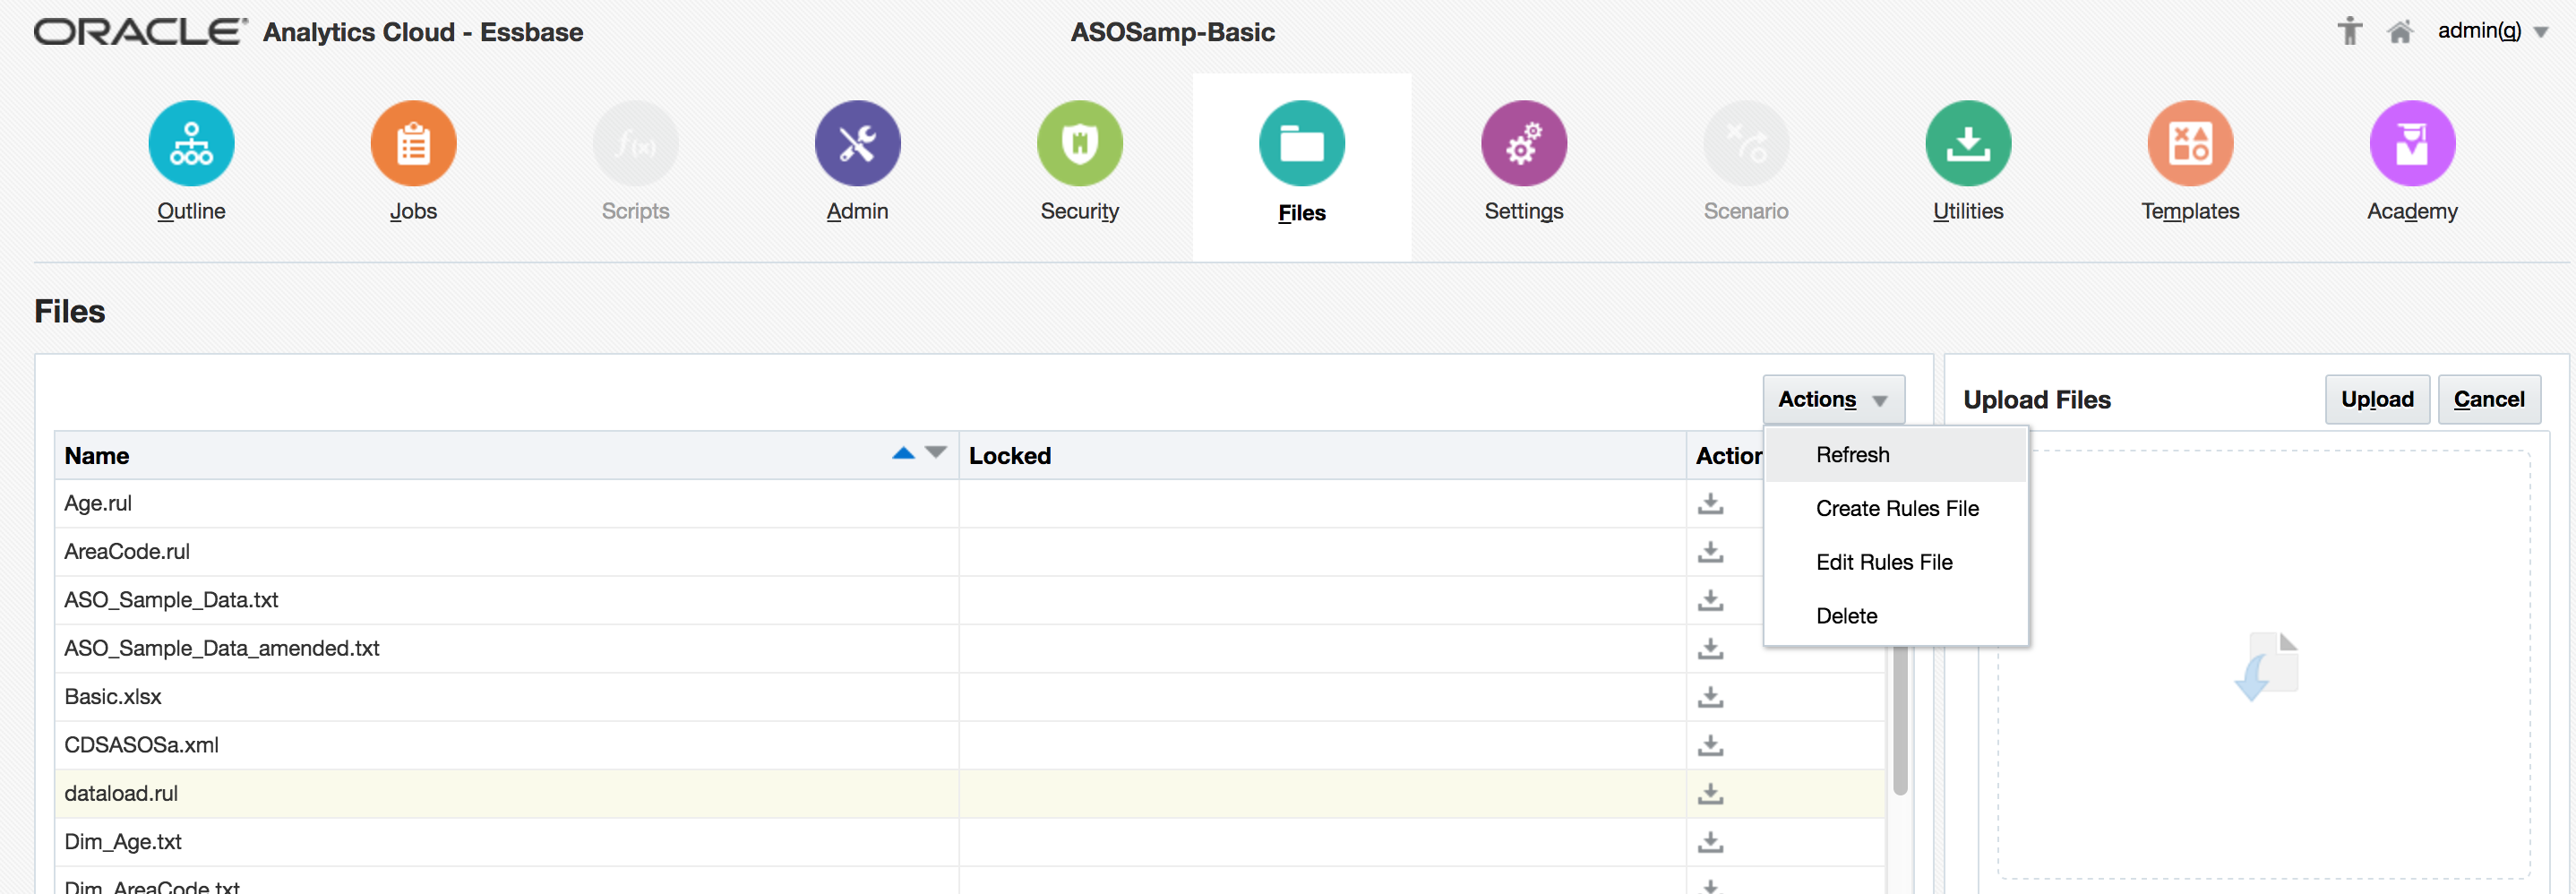
Note that the file list in OAC does not refresh with a browser page refresh or any ‘sort’ operation: use Refresh under Actions as above.
With the files now re-uploaded, the data can be loaded. EssCS also contains a DataLoad command, but unfortunately there appears to be no means to specify a rules file – meaning it would seem to be confined to overwrite, ‘export data’ style imports only:
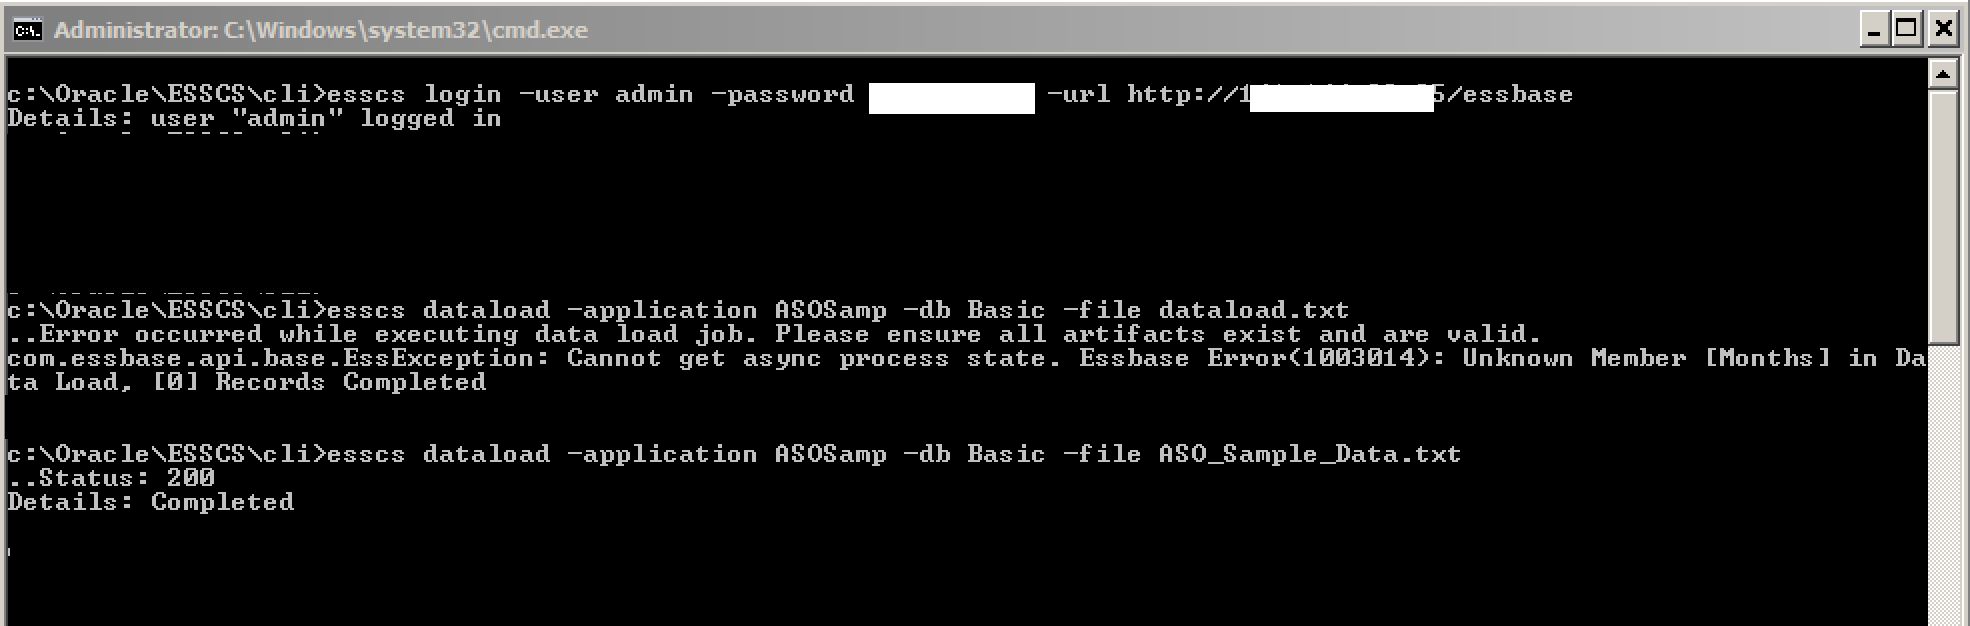
A good point here is that the a DataLoad EssCS command makes an entry to the Jobs table, so success / record counts can be confirmed:
Summary
The post details three methods of loading data to Essbase under OAC:
- Via the formatted template spreadsheet (on import or from Cube Designer)
- Via the Command Line Interface
- Via the Jobs facility of OAC
There are some minor differences between them, which may affect which you may wish to use for any particular scenario.
Arguably, given the availability of MAXL, there is a further custom method available as the actual data load can be effected that way too. This will be explored further in the next post that will start to consider how these tools might be used for real scenarios.
OAC: Essbase and DVCS
Finally managed to get around to having a proper look at Essbase within Oracle Analytics Cloud Service (OAC) after a busy couple of months. This post focusses mainly on initial impressions on the ‘out of the box’ the Essbase side of this - which we will explore in more detail in future posts, as well as more detail on the use of Essbase with DVCS.
Using Essbase with DVCS
One of the features we are keen to explore more in this context is the integration of Essbase and the Data Visualisation Cloud Service (DVCS). One point that we found that we do not think is being expressed clearly anywhere else we have seen is how to configure this: In setting up our OAC instance, we were having difficulty coming up with a combination of configuration selections that enables Essbase and DV to work at the same time.
Oracle documentation (such as the price list) suggest that both should be available within Standard Edition OAC:
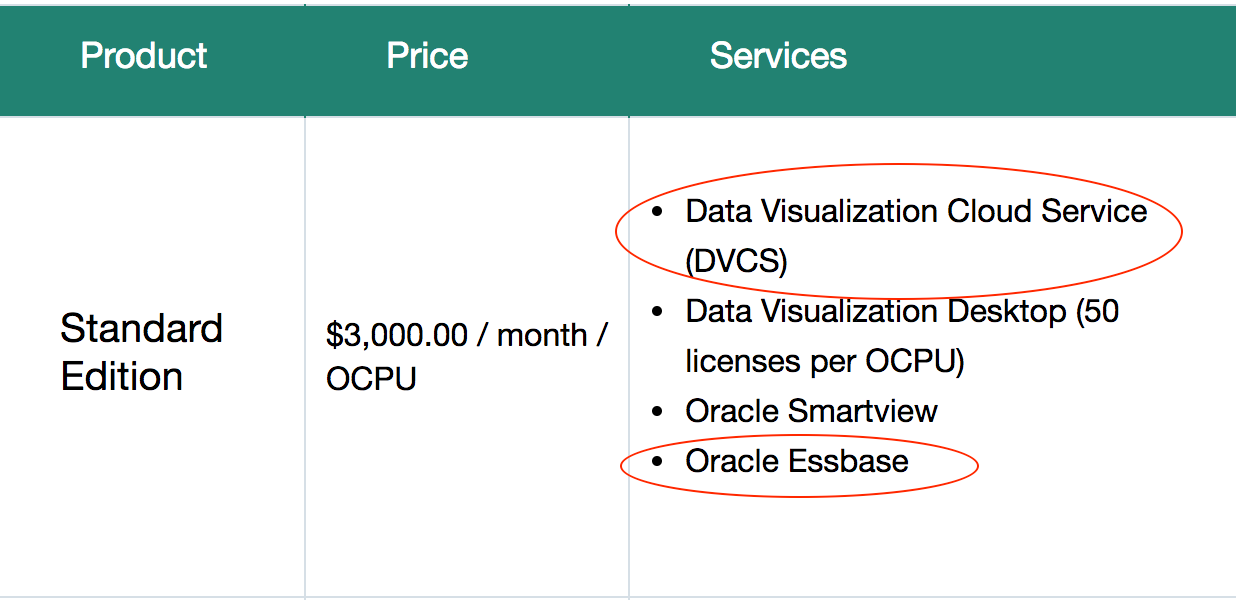
But Doc ID 2265410.1 on MoS suggests, by needing to add a security rule to the Essbase OAC, that two OAC instances are required. We could not find any reference to this requirement in Oracle documentation or blogs on the subject, but it transpires after checking with Oracle that this is indeed the case – Essbase and DV need to be on separate OAC instances.
Essbase
Looking purely at Essbase, my initial reaction is very positive…whilst the interface is different (I am sure tears will be shed for EAS & Studio in the foreseeable future…although given the way some stalwarts are still clinging on the last surviving copies of the Excel Add In, maybe not too imminently), once the surface of the new interface is scratched more...ahem…’seasoned’ developers will take comfort from being able to do a lot of the same things as they currently can. I am also confident it will fulfil one of the stated objectives in making it easier for non-experts to be able quickly and easily deploy cubes for analysis purposes.
Whilst the manual application and cube maintenance tools through the OAC front-end seem resilient and work effectively, I think some aspects will be difficult to use as the primary maintenance method in a production system - the ‘breadcrumb’ method afforded to dimension maintenance in particular will start to get fiddly to use with a dimension of any sort of volume. The application and cube Import (from a formatted Excel spreadsheet) facility is great - to my mind, a bit like a supercharged and easier-to-use Outline Load Utility in Hyperion Planning - and the ability to refresh the spreadsheet from a deployed cube is a good feature that shouldn’t have been taken for granted. I know Excel is regarded as the Devil’s work in some BI quarters…I personally don’t feel that way until it is being used as a database (or as some form of primary data storage)…but in this context, it is quick & easy to use, on most people’s desktops straightway, and is intuitive.
Still in the Excel corner, on the Smartview side, the addition of the Cube Designer extension (requiring Smartview 11.1.2.5.700) to be able to consider & change the more generic aspects (not members) of the ‘cube maintenance’ spreadsheets is a nice touch that makes this more straightforward and removes the need to pay strict attention to the spreadsheet layout. The ‘treeview’ style hierarchy viewer also helps make sense of the parent-child members that need to be detailed on the individual dimension tabs.
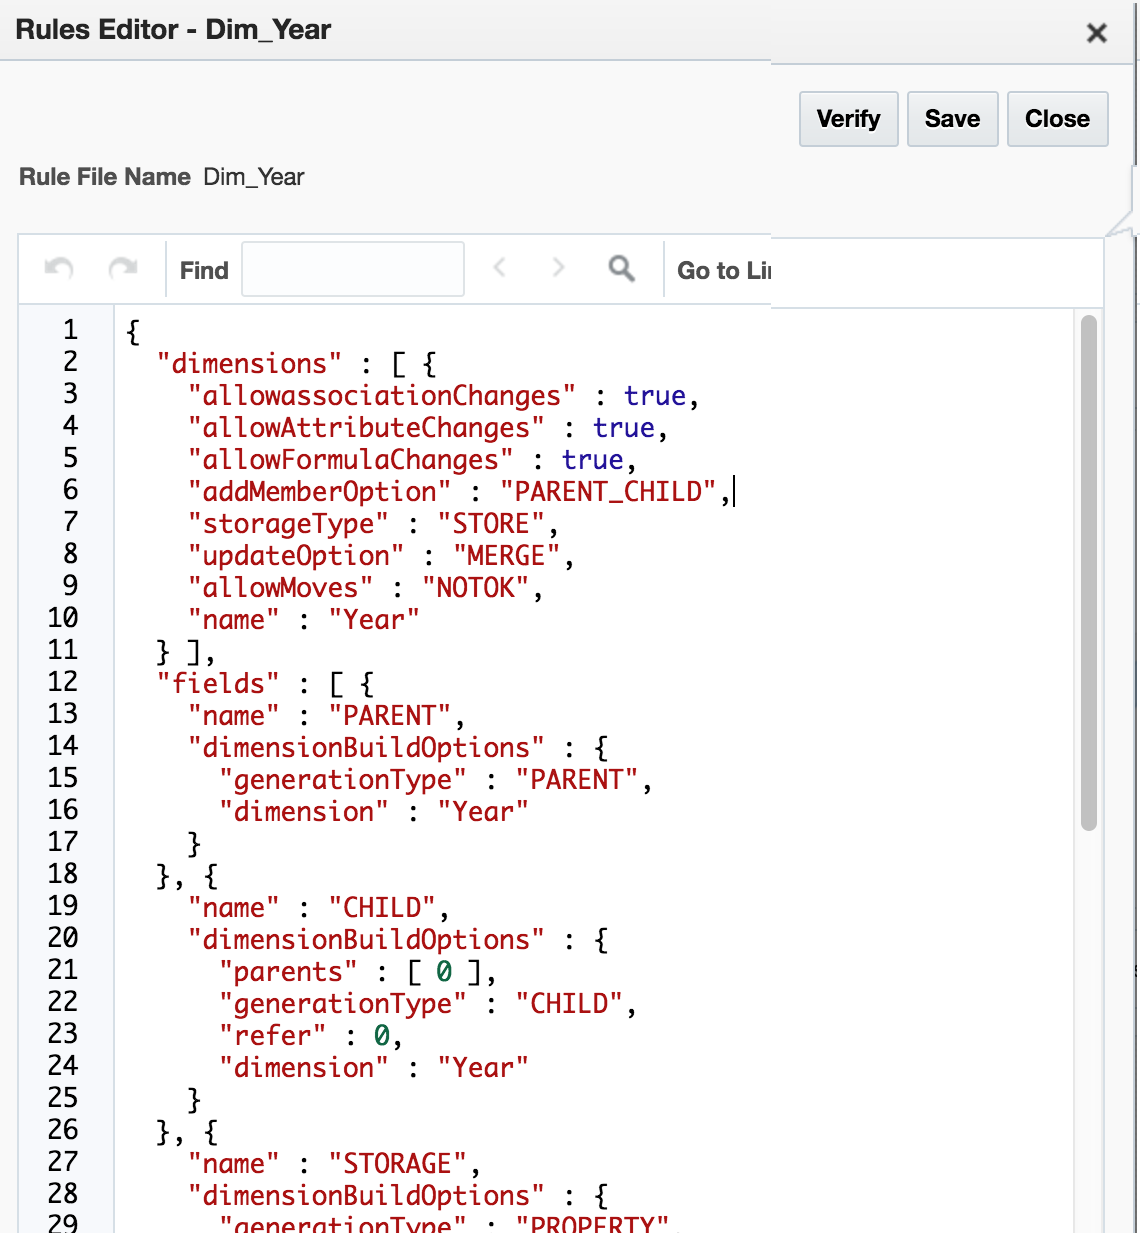
One issue that has flitted across my mind at this early stage is that of rules files. Whilst the Import facility creates these for you (as with creating a cube from Essbase Studio) which is welcome, and rules files created in an on-prem system can be uploaded (again, welcome), the on-board rules file editor is text based:
I’m not too sure how many people have created or edited rules files like this before (although I’d hazard a guess), but whilst the presence of any means to create, amend, or even tweak a file is good, it remains to be seen how usable this approach is. The alternative is to resubmit from the maintenance spreadsheet thus getting it created / amended for you or to maintain in on-prem system…but seeing as this platform is an alternative to (rather than an augmentation of) on prem for a lot of people, I’m not sure how practical this is.
Whilst the existing tools look really promising, I can’t help but think there will be occasions going forwards where it might be advantageous to be able to create a rules file to run an uploaded file outside of them: time will tell.
The Command Line Tool (downloadable from OAC-Essbase / Utilities) is a little limited at the moment, but goes some way towards filling the potential gap left by the absence of client-side EssMsh and can only grow with further releases: from the Oracle OAC documentation...
In conclusion, first impressions are very favourable. There are changes (eg Security), new features (eg Sandboxing), and I am sure there will be gaps for those considering moving from existing on-prem applications - for example, as I have seen someone else reference, there does not seem to be any reference to partitions in the front end or the import spreadsheet layout - so whilst there is a lot with which we will quite quickly feel familiar, there are also going to be new areas and new practices for us to get into step with: as above, we will look to explore some of these in future posts.
First Steps with Oracle Analytics Cloud
Preface
Not long ago Oracle added a new offer to their Cloud - an OBIEE in a Cloud with full access. Francesco Tisiot made an overview of it and now it's time to go a bit deeper and see how you can poke it with a sharp stick by yourself. In this blog, I'll show how to get your own OAC instance as fast and easy as possible.
Before you start
The very first step is to register a cloud account. Oracle gives a trial which allows testing of all features. I won't show it here as it is more or less a standard registration process. I just want highlight a few things:
- You will need to verify your phone number by receiving an SMS. It seems that this mechanism may be a bit overloaded and I had to make more than one attempts. I press the Request code button but nothing happens. I wait and press it again, and again. And eventually, I got the code. I can't say for sure and possible it was just my bad luck but if you face the same problem just keep pushing (but not too much, requesting a code every second won't help you).
- Even for trial you'll be asked for a credit card details. I haven't found a good diagnostics on how much was already spent and the documentation is not really helpful here.
Architecture
OAC instances are not self-containing and require some additional services. The absolute minimum configuration is the following:
- Oracle Cloud Storage (OCS) - is used for backups, log files, etc.
- Oracle Cloud Database Instance (DBC) - is used for RCU schemas.
- Oracle Analytics Cloud Instance (OAC) - is our ultimate target.
From the Cloud services point of view, architecture is the following. This picture doesn't show virtual disks mounted to instances. These disks consume Cloud Storage quota but they aren't created separately as services.
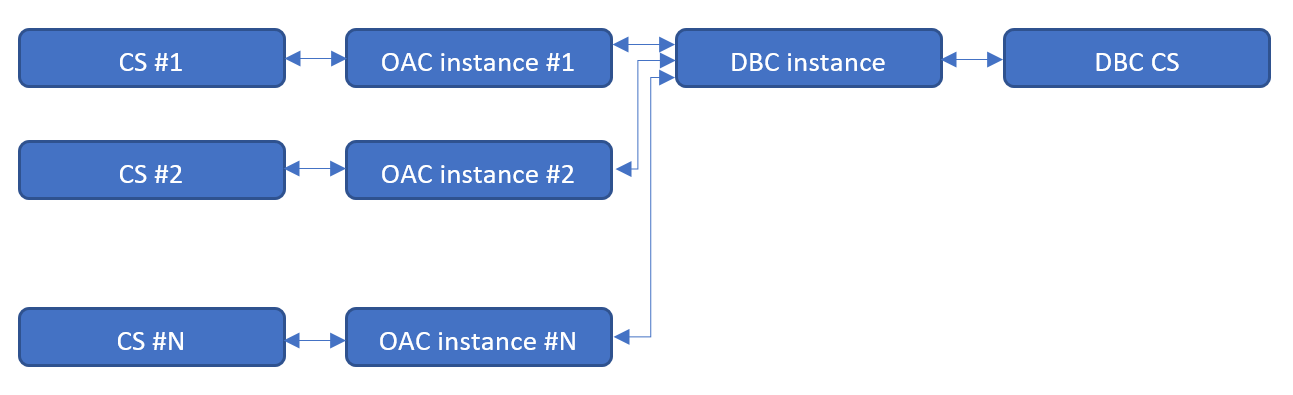
We need at least one Oracle Database Cloud instance to store RCU schemas. This database may or may not have a separate Cloud Storage area for backups. Every OAC instance requires Cloud storage area for logs. Multiple OAC instances may share one Cloud storage area but I can't find any advantage of this approach over a separate area for every instance.
Create Resources
We create these resource in the order they are listed earlier. Start with Storage, then DB and the last one is OAC. Actually, we don't have to create Cloud Storage containers separately as they may be created automatically. But I show it here to make things more clear without too much "it works by itself" magic.
Create Cloud Storage
The easiest part of all is the Oracle Cloud Storage container. We don't need to specify its size or lots of parameters. All parameters are just a name, storage class (Standard/Archive) and encryption.
I spent some time here trying to figure out how to reference this storage later. There is a hint saying that "Use the format: <storage service>-<identity domain>/<container>. For example: mystorage1-myid999/mybackupcontainer." And if identity domain and container are pretty obvious, storage service puzzled me for some time. The answer is "storage service=Storage". You can see this in the top of the page.
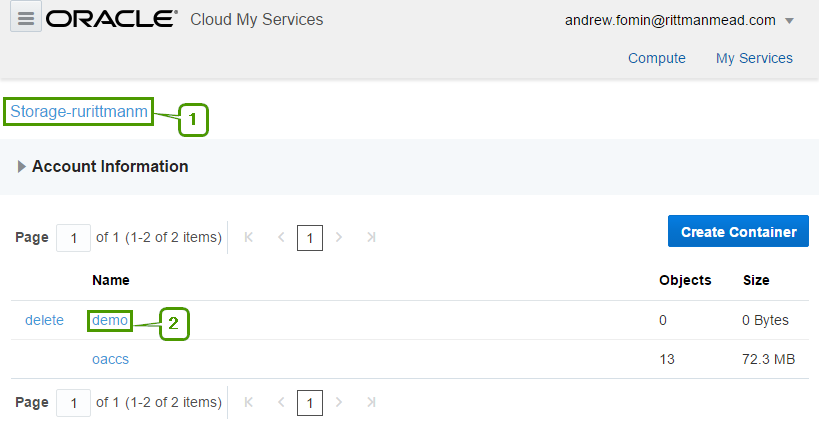
It seems that Storage is a fixed keyword, rurittmanm is the domain name created during the registration process and demo is the actual container name. So in this sample when I need to reference my demo OCS I should write Storage-rurittmanm/demo.
Create Cloud DB
Now when we are somewhat experienced in Oracle Cloud we may move to a more complicated task and create a Cloud DB Instance. It is harder than Cloud Storage container but not too much. If you ever created an on-premise database service using DBCA, cloud DB should be a piece of cake to you.
At the first step, we set the name of the instance and select the most general options. These options are:
Service Level. Specifies how this instance will be managed. Options are:
- Oracle Database Cloud Service: Oracle Database software pre-installed on Oracle Cloud Virtual Machine. Database instances are created for you using configuration options provided in this wizard. Additional cloud tooling is available for backup, recovery and patching.
- Oracle Database Cloud Service - Virtual Image: Oracle Database software pre-installed on an Oracle Cloud Virtual Machine. Database instances are created by you manually or using DBCA. No additional cloud tooling is available.
Metering Frequency - defines how this instance will be paid: by months or by hours.
Software Release - if the Service Level is Oracle Database Cloud Service, we may choose 11.2, 12.1 and 12.2, for Virtual Image only 11.2 and 12.1 are available. Note that even cloud does no magic and with DB 12.2 you may expect the same problems as on-premise.
Software Edition - Values are:
- Standard Edition
- Enterprise Edition
- Enterprise Edition - High Performance
- Enterprise Edition - Extreme Performance
Database Type - defines High Availability and Disaster Recovery options:
- Single Instance
- Database Clustering with RAC
- Single Instance with Data Guard Standby
- Database Clustering with RAC and Data Gard Standby
Database Clustering with RAC and Database Clustering with RAC and Data Gard Standby types are available only for Enterprise Edition - Extreme Performance edition.
The second step is also quite intuitive. It has a lot of options but they should be pretty simple and well-known for anyone working with Oracle Database.
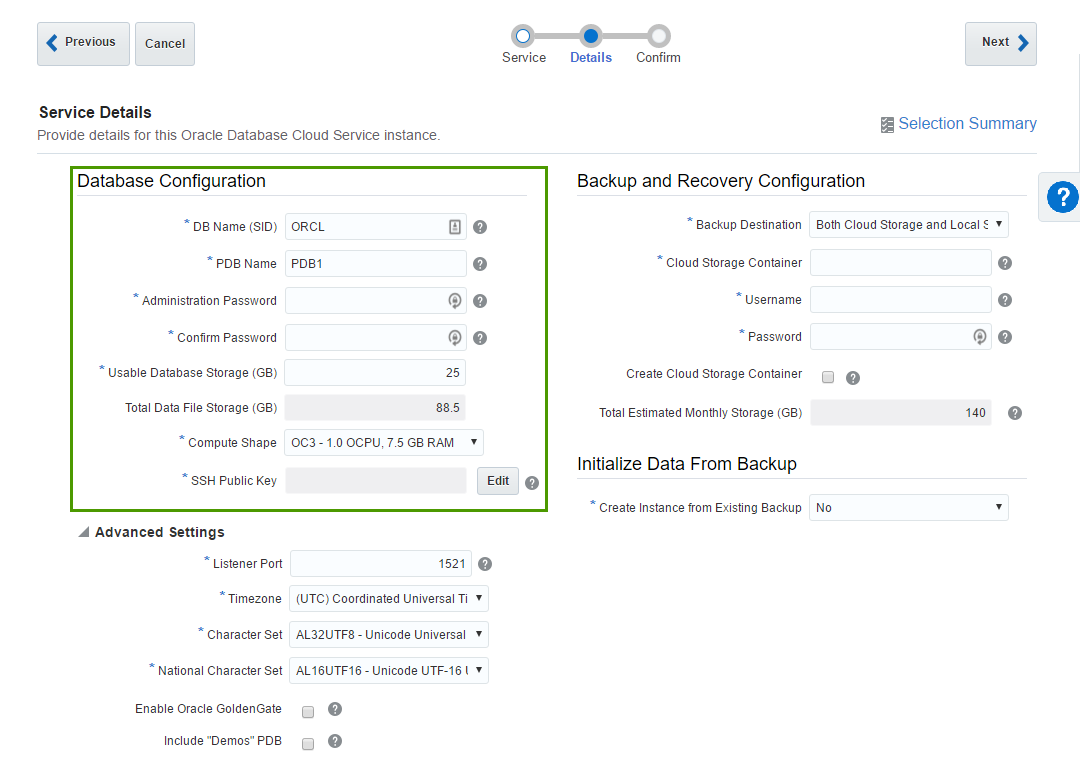
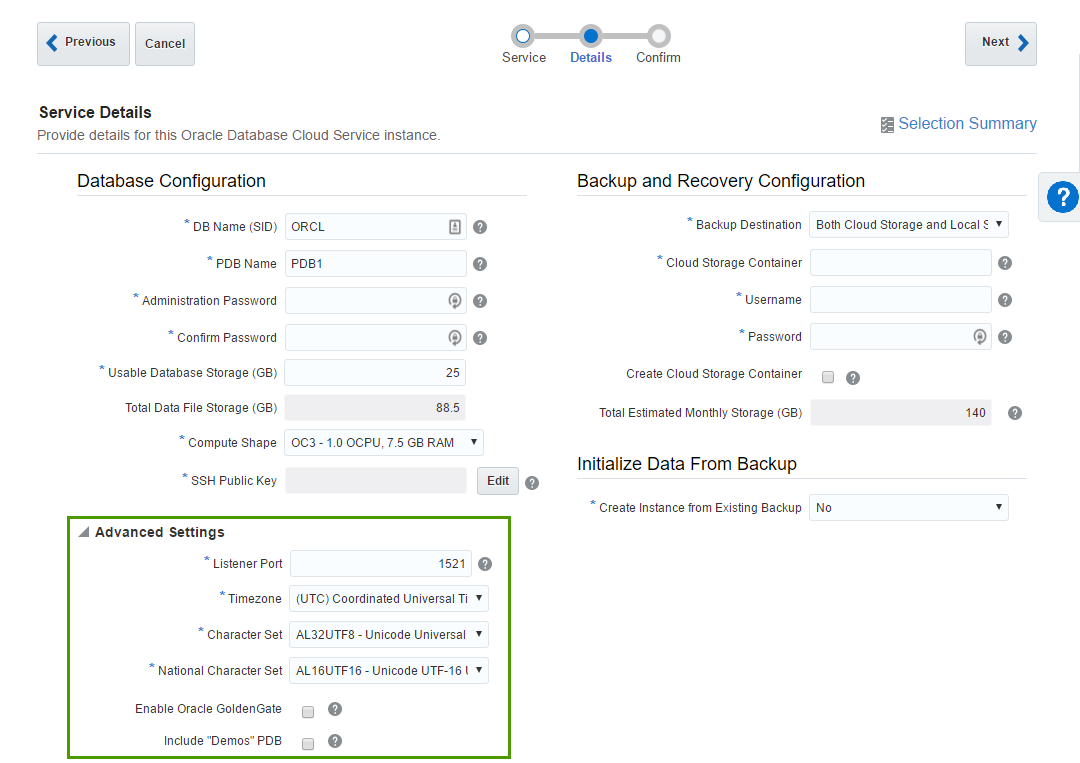
The first block of parameters is about basic database configuration. Parameters like DB name (sid) or Administration Password are obvious.
Usable DataFile Storage (GB) is less obvious. Actually, in the beginning, it puzzled me completely. In this sample, I ask for 25 Gb of space. But this doesn't mean that my instance will take 25 Gb of my disk quota. In fact, this particular instance took 150 Gb of disk space. Here we specify only a guaranteed user disk space, but an instance needs some space for OS, and DB software, and temp, and swap, and so on.
A trial account is limited with 500 Gb quota and that means that we can create only 3 Oracle DB Cloud instances at max. Every instance will use around 125 Gb of let's say "technical" disk space we can't reduce. From the practical point of view, it means that it may be preferable to have one "big" instance (in terms of the disk space) rather than multiple "small".
- Compute shape specifies how powerful our VM should be. Options are the following:
- OC3 - 1.0 OCPU, 7.5 GB RAM
- OC4 - 2.0 OCPU, 15.0 GB RAM
- OC5 - 4.0 OCPU, 30.0 GB RAM
- OC6 - 8.0 OCPU, 60.0 GB RAM
- OC7 - 16.0 OCPU, 120.0 GB RAM
- OC1m - 1.0 OCPU, 15.0 GB RAM
- OC2m - 2.0 OCPU, 30.0 GB RAM
- OC3m - 4.0 OCPU, 60.0 GB RAM
- OC4m - 8.0 OCPU, 120.0 GB RAM
- OC5m - 16.0 OCPU, 240.0 GB RAM
We may increase or decrease this value later.
- SSH Public Key - Oracle gives us an ability to connect directly to the instance and authentication is made by
user+private keypair. Here we specify a public key which will be added to the instance. Obviously, we should have a private key for this public one. Possible options are either we provide a key we generated by ourselves or let Oracle create keys for us. The most non-obvious thing here is what is the username for the SSH. You can't change it and it isn't shown anywhere in the interface (at least I haven't found it). But you can find it in the documentation and it isopc.
The second block of parameters is about backup and restore. The meaning of these options is obvious, but exact values aren't (at least in the beginning).

Cloud Storage Container - that's the Cloud Storage container I described earlier. Value for this field will be something like
Storage-rurittmanm/demo. In fact, I may do not create this Container in advance. It's possible to specify any inexistent container here (but still in the form ofStorage-<domain>/<name>) and tickCreate Cloud Storage Containercheck-box. This will create a new container for us.Username and Password are credentials of a user who can access this container.
The last block is Advanced settings and I believe it's quite simple and obvious. Most of the time we don't need to change anything in this block.
When we fill all parameters and press the Next button we get a Summary screen and the actual process starts. It takes about 25-30 minutes to finish.
When I just started my experiments I was constantly getting a message saying that no sites available and my request may not be completed.

It is possible that it was again the same "luck" as with the phone number verification but the problem solved by itself a few hours later.
Create OAC Instance
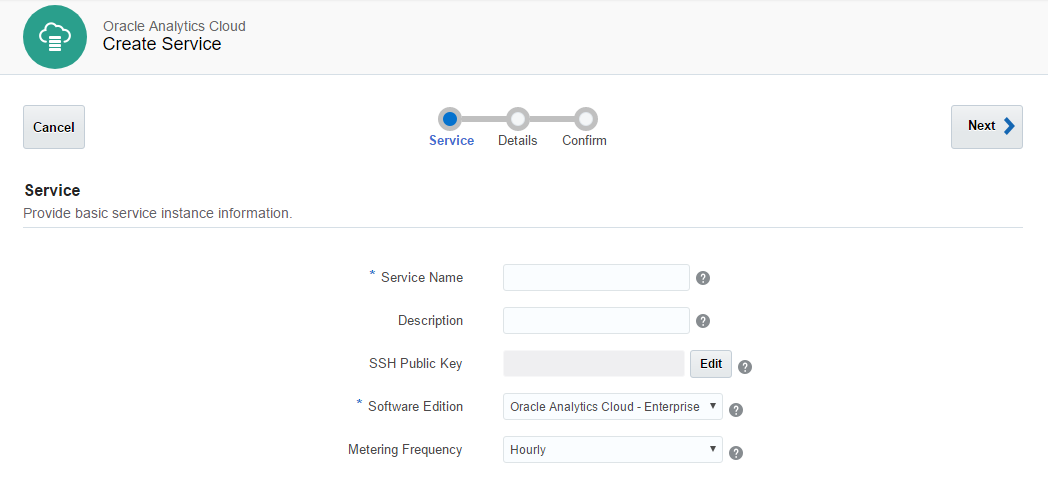
At last, we have all we need for our very first OAC instance. The process of an OAC instance setup is almost the same as for an Oracle DB Cloud Instance. We start the process, define some parameters and wait for the result.
At the first step, we give a name to our instance, provide an SSH public key, and select an edition of our instance. We have two options here Enterprise Edition or Standard Edition and later we will select more additional options. Standard edition will allow us to specify either Data Visualisation or Essbase instances and Enterprise Edition adds to this list a classical Business Intelligence feature. The rest of the parameters here are exactly the same as for Database Instance.
At the second step, we have four blocks of parameters.
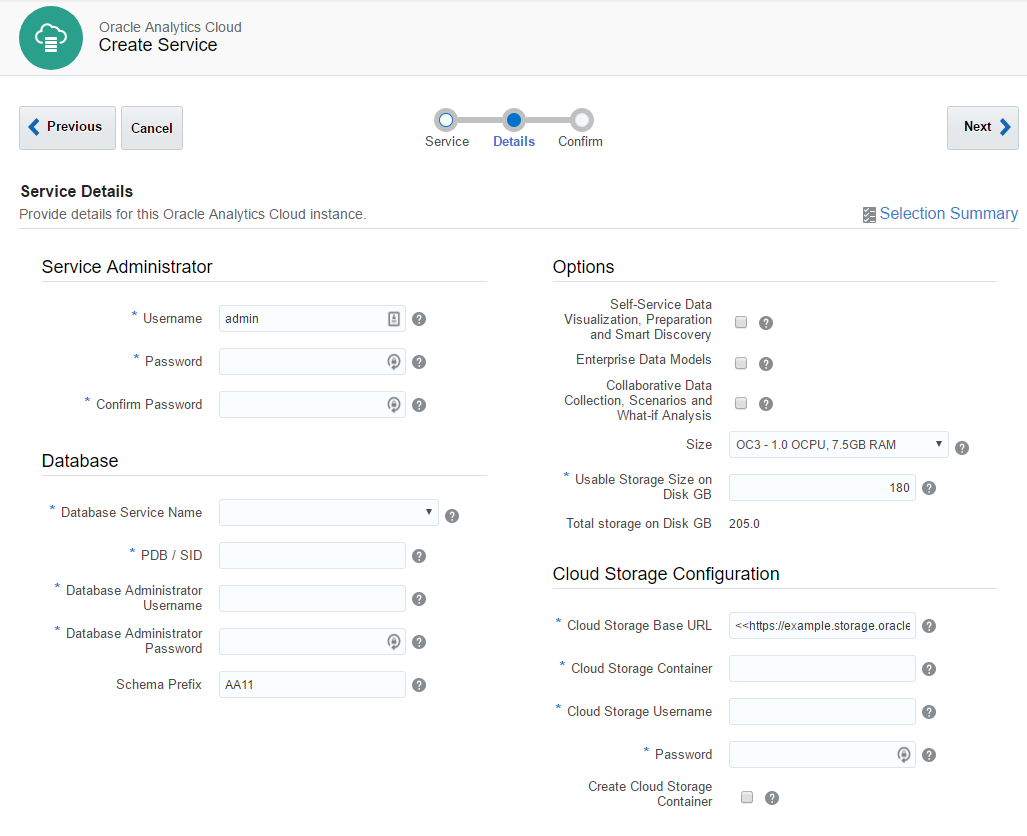
Service Administrator - the most obvious one. Here we specify an administrator user. This user will be a system administrator.
Database - select a database for RCU schemas. That's why we needed a database.
Options - specify which options our instance will have.
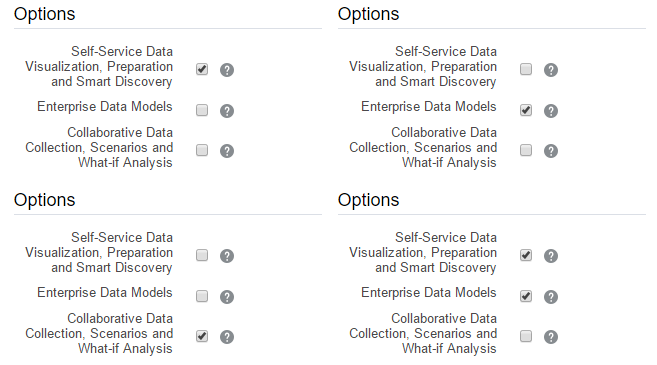
- Self-Service Data Visualisation, Preparation and Smart Discovery - this option means Oracle Data Visualisation and it is available for both Standard and Enterprise Editions.
- Enterprise Data Models - this option gives us classical BI and available only for Enterprise Edition. Also, this option may be combined with the first one giving us both classical BI and modern Data discovery on one instance.
- Collaborative Data Collection, Scenarios and What-if Analysis - this one stands for Essbase and available for Standard and Enterprise Editions. It can't be combined with other options.
- Size is the same thing that is called Compute Shape for the Database. Options are exactly the same.
- Usable Storage Size on Disk GB also has the same meaning as for the DB. The minimum size we may specify here is 25 Gb what gives us total 170 Gb of used disk space.
Here is a picture showing all possible combinations of services:
And here virtual disks configuration. data disk is the one we specify.
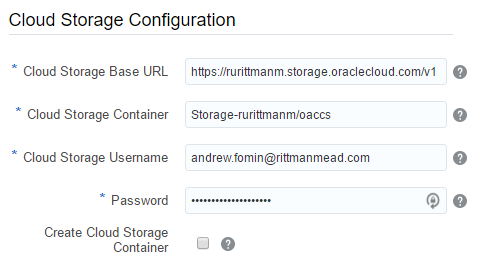
The last block - Cloud Storage Configuration was the hardest one. Especially the first field - Cloud Storage Base URL. The documentation says "Use the format: https://example.storage.oraclecloud.com/v1" and nothing more. When you know the answer it may be easy, but when I saw it for the first time it was hard. Should I place here any unique URL just like an identifier? Should it end with v1? And what is the value for the second instance? V2? Maybe I should place here the URL of my current datacenter (https://dbcs.emea.oraclecloud.com). The answer is https://<domain>.storage.oraclecloud.com/v1 in my case it is https://rurittmanm.storage.oraclecloud.com/v1. It stays the same for all instances.
All other parameters are the same as they were for DBCS instance. We either specify an existing Cloud Storage container or create it here.
The rest of the process is obvious. We get a Summary and then wait. It takes about 40 minutes to create a new instance.
Note: diagnostics here is a bit poor and when it says that the instance start process is completed it may not be true. Sometimes it makes sense to wait some time before starting to panic.
Now we may access our instance as a usual. The only difference is that the port is 80 not 9502 (or 443 for SSL). For Data Visualisation the link is http(s)://<ip address>/va, for BIEE - http(s)://<ip address>/analytics and for Essbase http(s)://<ip address>/essbase. Enterprise Manager and Weblogic Server Console are availabale at port 7001 which is blocked by default.
What is bad that https uses a self-signed certificate. Depending on browser settings it may give an error or even prevent access to https.
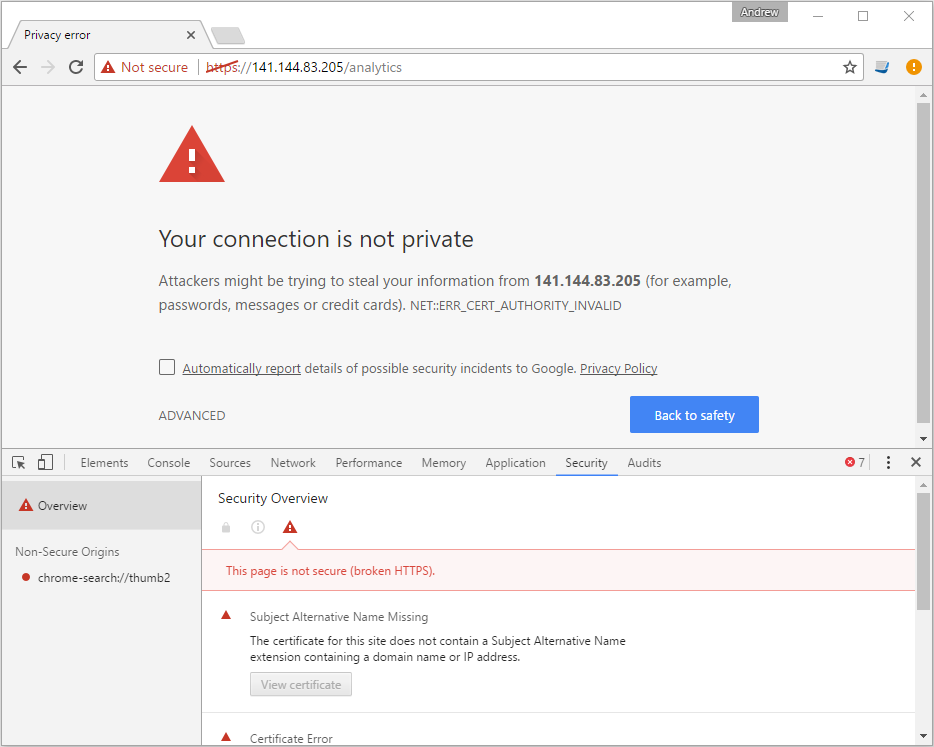
Options here either use HTTP rather than HTTPS or add this certificate to your local computer. But these aren't the options for a production server. Luckily Oracle provides a way to use own SSL certificates.
Typical Management Tasks
SSH to Instances
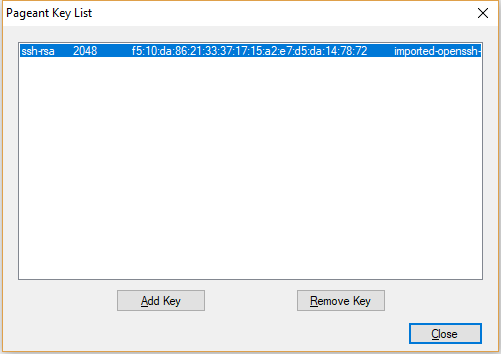
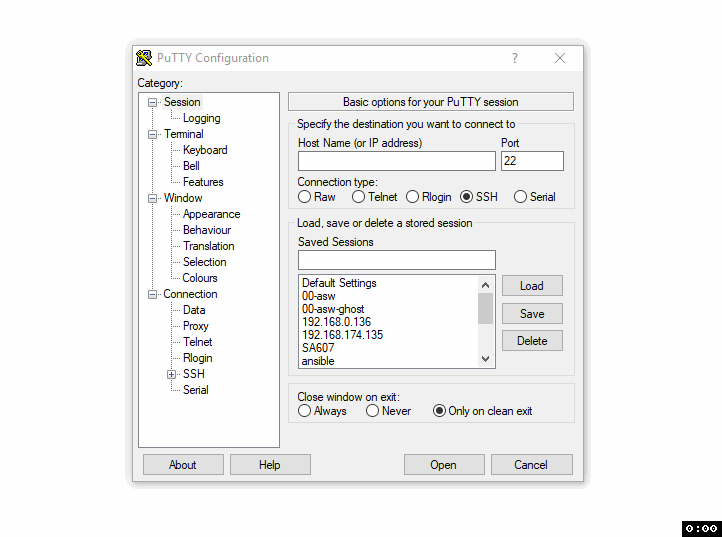
During the setup process, we provide Oracle with a public key which is used to get an SSH access to instances. Cloud does nothing special to this. In the case of Windows, we may use Putty. Just add the private key to Pageant and connect to the instance using user opc.
Opening Ports
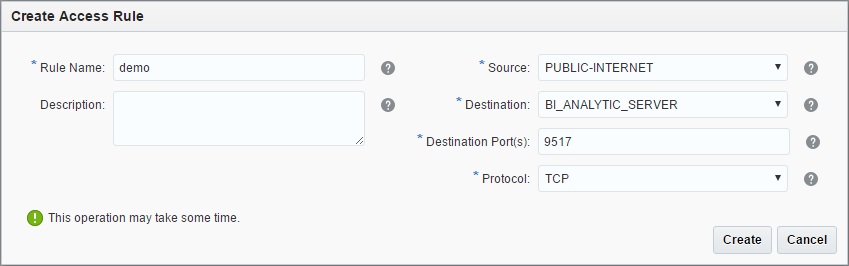
By default only the absolute minimum of the ports is open and we can't connect to the OAC instance using BI Admin tool or to the DB with SQLDeveloper. In order to do this, we should create an access rule which allows access to this particular ports.
In order to get to the Access Rules interface, we must use instance menu and select the Access Rules option.
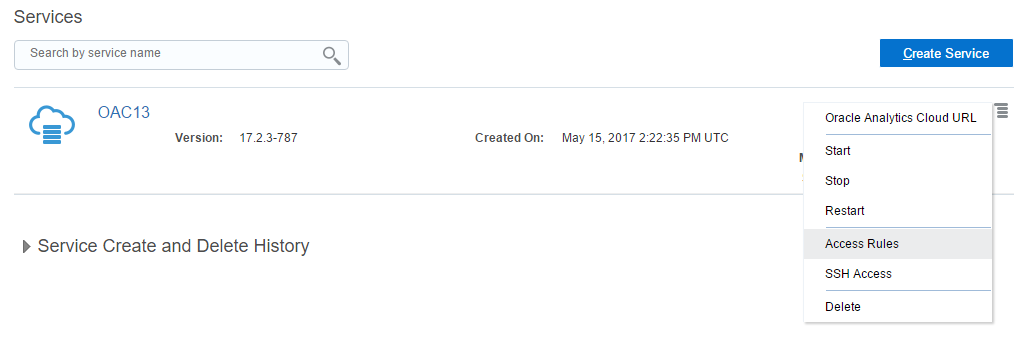
This will open the Access Rules list. What I don't like about it is that it opens the full list of all rules but we can create only a rule for this particular instance.
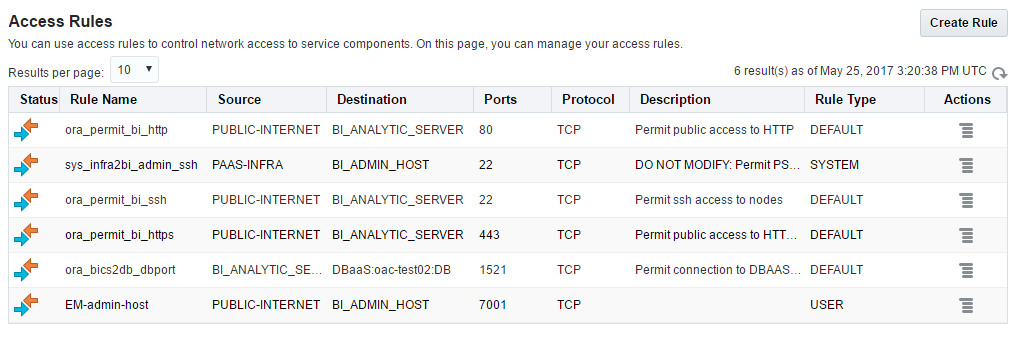
New rule creation form is simple and should cause no issues. But be careful here and not open too much for a wild Internet.
Add More Users
The user who registered a Cloud Account becomes its administrator and can invite more users and manage privileges.

Here we can add and modify users.
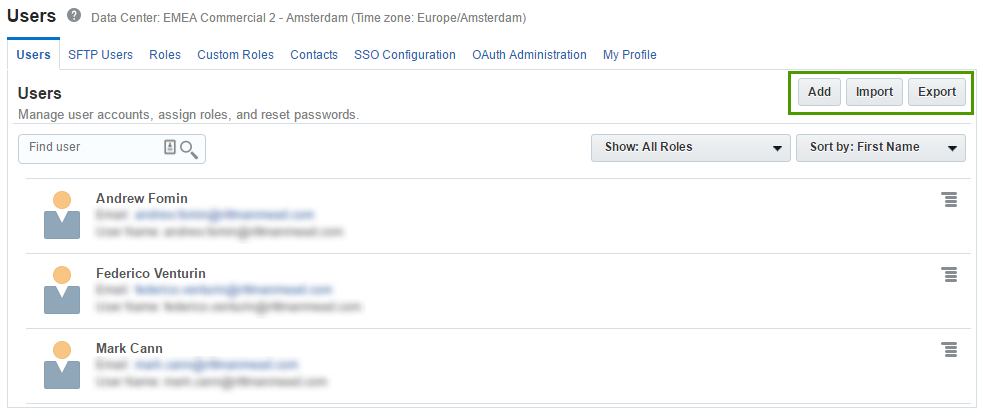
When we add a user we specify a name, email and login. Also here we set roles for the user. The user will get an email with these details, and link to register.
Obviously, the user won't be asked about a credit card. He just starts working and that's all.
Summary
My first steps with Oracle Analytics Cloud were not very easy, but I think it was worth it. Now I can create a new OBIEE instance just in a few minutes and one hour later it will be up and running. And I think that's pretty fast compared to a normal process of creating a new server in a typical organisation. We don't need to think about OS installation, or licenses, or whatever else. Just try it.