Tag Archives: Oracle
Rittman Mead at OUG Norway 2018

This week I am very pleased to represent Rittman Mead by presenting at the Oracle User Group Norway Spring Seminar 2018 delivering two sessions about Oracle Analytics, Kafka, Apache Drill and Data Visualization both on-premises and cloud. The OUGN conference it's unique due to both the really high level of presentations (see related agenda) and the fascinating location being the Color Fantasy Cruiseferry going from Oslo to Kiev and back.

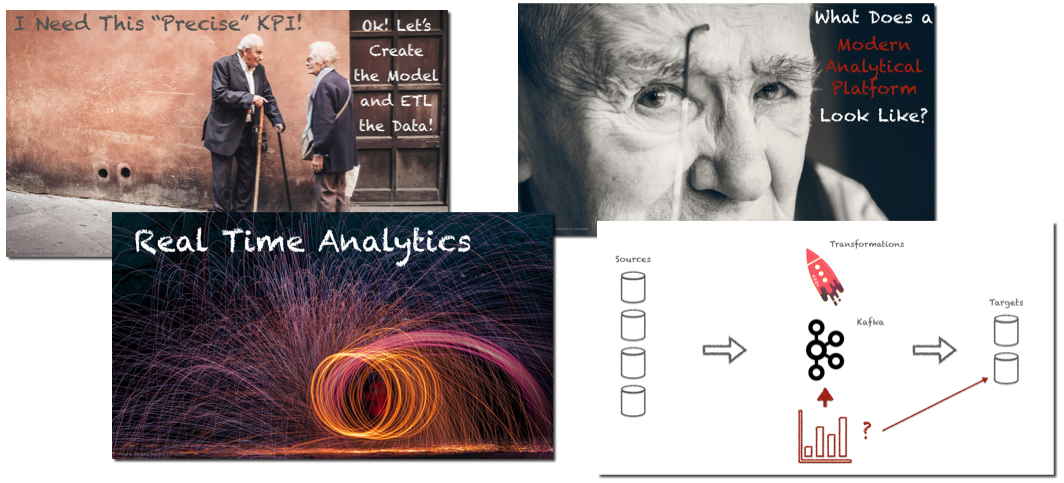
I'll be speaking on Friday 9th at 9:30AM in Auditorium 2 about Visualizing Streams on how the world of Business Analytics has changed in recent years and how to successfully build a Modern Analytical Platform including Apache Kafka, Confluent's recently announced KSQL and Oracle's Data Visualization.
On the same day at 5PM, always in Auditorium 2, I'll be delivering the session OBIEE: Going Down the Rabbit Hole: providing details, built on experience, on how diagnostic tools, non standard configuration and well defined processes can enhance, secure and accelerate any analytical project.
If you’re at the event and you see me in sessions, around the conference or during my talks, I’d be pleased to speak with you about your projects and answer any questions you might have.
Oracle and the MQ for BI & Analytics 2018
Call for Papers nlOUG Tech Experience 2018
Oracle Data Visualization Desktop for Mac is now available for download
Analyzing Wimbledon Twitter Feeds in Real Time with Kafka, Presto and Oracle DVD v3
Last week there was Wimbledon, if you are a fan of Federer, Nadal or Djokovic then it was one of the events not to be missed. I deliberately excluded Andy Murray from the list above since he kicked out my favourite player: Dustin Brown.

Two weeks ago I was at Kscope17 and one of the common themes, which reflected where the industry is going, was the usage of Kafka as central hub for all data pipelines. I wont go in detail on what's the specific role of Kafka and how it accomplishes, You can grab the idea from two slides taken from a recent presentation by Confluent.
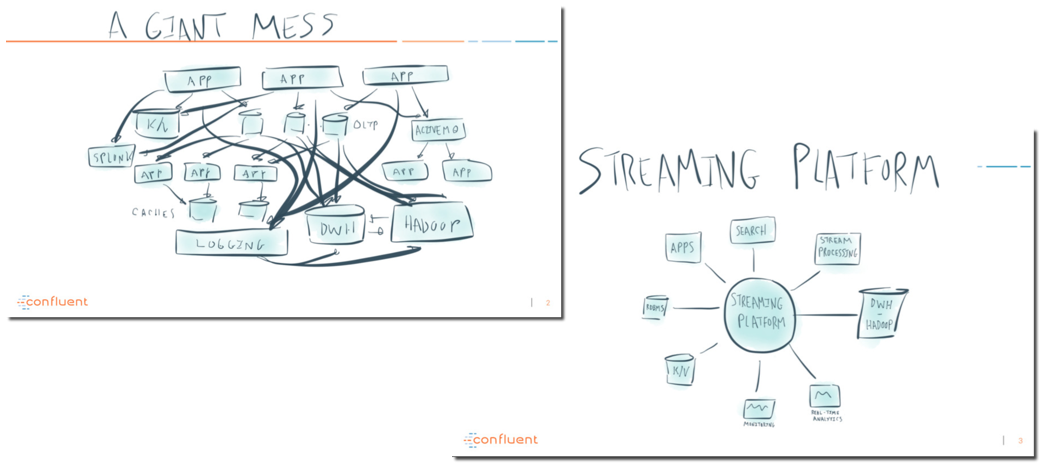
One of the key points of all Kafka-related discussions at Kscope was that Kafka is widely used to take data from providers and push it to specific data-stores (like HDFS) that are then queried by analytical tools. However the "parking to data-store" step can sometimes be omitted with analytical tools querying directly Kafka for real-time analytics.

We wrote at the beginning of the year a blog post about doing it with Spark Streaming and Python however that setup was more data-scientist oriented and didn't provide a simple ANSI SQL familiar to the beloved end-users.
As usual, Oracle annouced a new release during Kscope. This year it was Oracle Data Visualization Desktop 12.2.3.0.0 with a bunch of new features covered in my previous blog post.
The enhancement, amongst others, that made my day was the support for JDBC and ODBC drivers. It opened a whole bundle of opportunities to query tools not officially supported by DVD but that expose those type of connectors.
One of the tools that fits in this category is Presto, a distributed query engine belonging to the same family of Impala and Drill commonly referred as sql-on-Hadoop. A big plus of this tool, compared to the other two mentioned above, is that it queries natively Kafka via a dedicated connector.
I found then a way of fitting the two of the main Kscope17 topics, a new sql-on-Hadoop tool and one of my favourite sports (Tennis) in the same blog post: analysing real time Twitter Feeds with Kafka, Presto and Oracle DVD v3. Not bad as idea.... let's check if it works...
Analysing Twitter Feeds
Let's start from the actual fun: analysing the tweets! We can navigate to the Oracle Analytics Store and download some interesting add-ins we'll use: the Auto Refresh plugin that enables the refresh of the DV project, the Heat Map and Circle Pack visualizations and the Term Frequency advanced analytics pack.
Importing the plugin and new visualizations can be done directly in the console as explained in my previous post. In order to be able to use the advanced analytics function we need to unzip the related file and move the .xml file contained in the %INSTALL_DIR%\OracleBI1\bifoundation\advanced_analytics\script_repository. In the Advanced Analytics zip file there is also a .dva project that we can import into DVD (password Admin123) which gives us a hint on how to use the function.
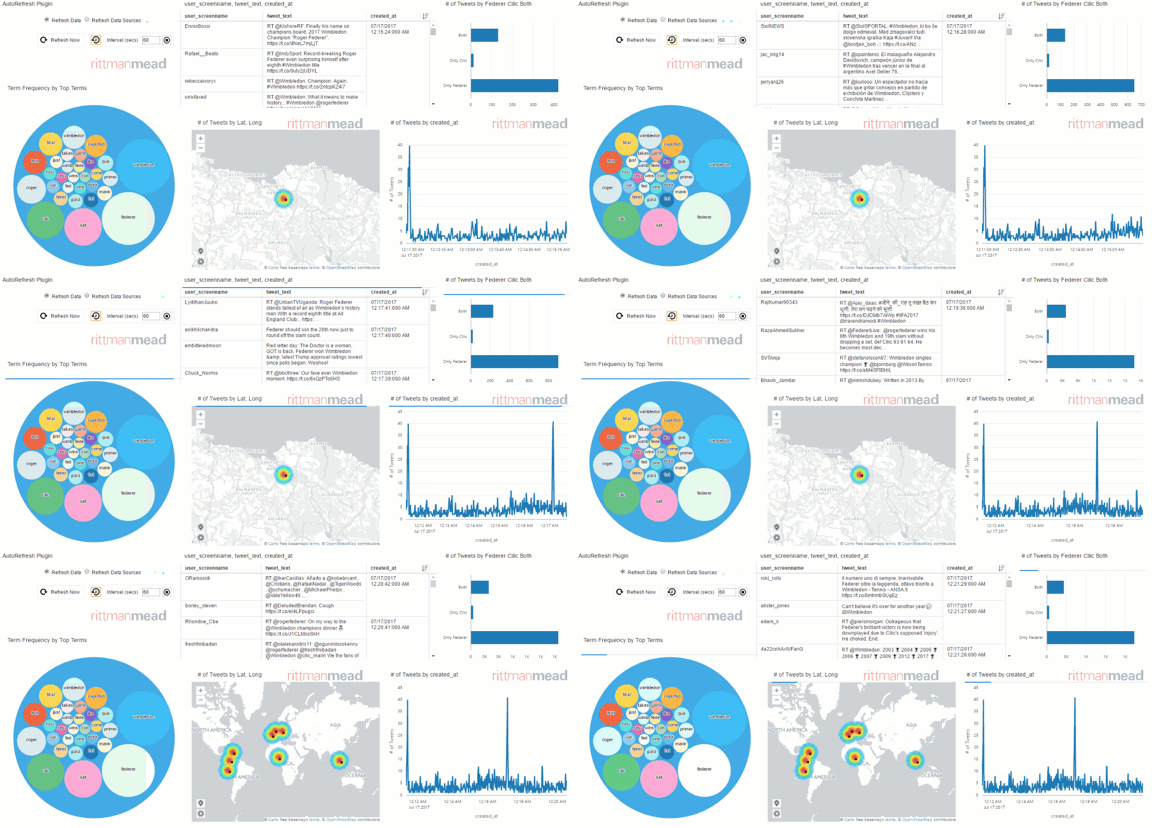
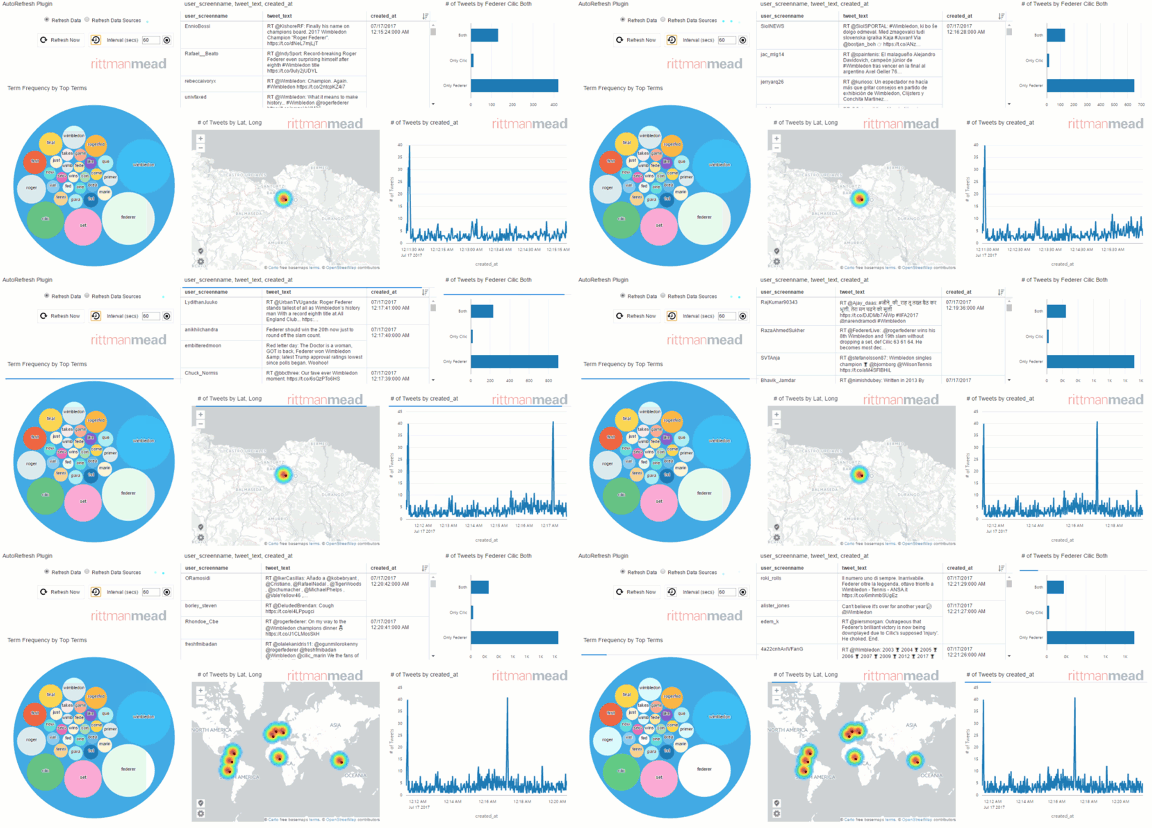
We can now build a DVD Project about the Wimbledon gentleman singular final containing:
- A table view showing the latest tweets
- A horizontal bar chart showing the number of tweets containing mentions to Federer, Cilic or Both
- A circle view showing the most tweeted terms
- A heatmap showing tweet locations (only for tweets with an activated localization)
- A line chart showing the number of tweets over time
The project is automatically refreshed using the auto-refresh plugin mentioned above. A quick view of the result is provided by the following image.
So far all good and simple! Now it's time to go back and check how the data is collected and queried. Let's start from Step #1: pushing Twitter data to Kafka!
Kafka
We covered Kafka installation and setup in previous blog post, so I'll not repeat this part.
The only piece I want to mention, since gave me troubles, is the advertised.host.name setting: it's a configuration line in /opt/kafka*/config/server.properties that tells Kafka which is the host where it's listening.
If you leave the default localhost and try to push content to a topic from an external machine it will not show up, so as pre-requisite change it to a hostname/IP that can be resolved externally.
The rest of the Kafka setup is the creation of a Twitter producer, I took this Java project as example and changed it to use the latest Kafka release available in Maven. It allowed me to create a Kafka topic named rm.wimbledon storing tweets containing the word Wimbledon.
The same output could be achieved using Kafka Connect and its sink and source for twitter. Kafka Connect has also the benefit of being able to transform the data before landing it in Kafka making the data parsing easier and the storage faster to retrieve. I'll cover the usage of Kafka Connect in a future post, for more informations about it, check this presentation from Robin Moffatt of Confluent.
One final note about Kafka: I run a command to limit the retention to few minutes
bin/kafka-topics.sh --zookeeper localhost:2181 --alter --topic rm.wimbledon --config retention.ms=300000
This limits the amount of data that is kept in Kafka, providing better performances during query time. This is not always possible in Kafka due to data collection needs and there are other ways of optimizing the query if necessary.
At this point of our project we have a dataflow from Twitter to Kafka, but no known way of querying it with DVD. It's time to introduce the query engine: Presto!
Presto
Presto was developed at Facebook, is in the family of sql-on-Hadoop tools. However, as per Apache Drill, it could be called sql-on-everything since data don't need to reside on an Hadoop system. Presto can query local file systems, MongoDB, Hive, and a big variety of datasources.
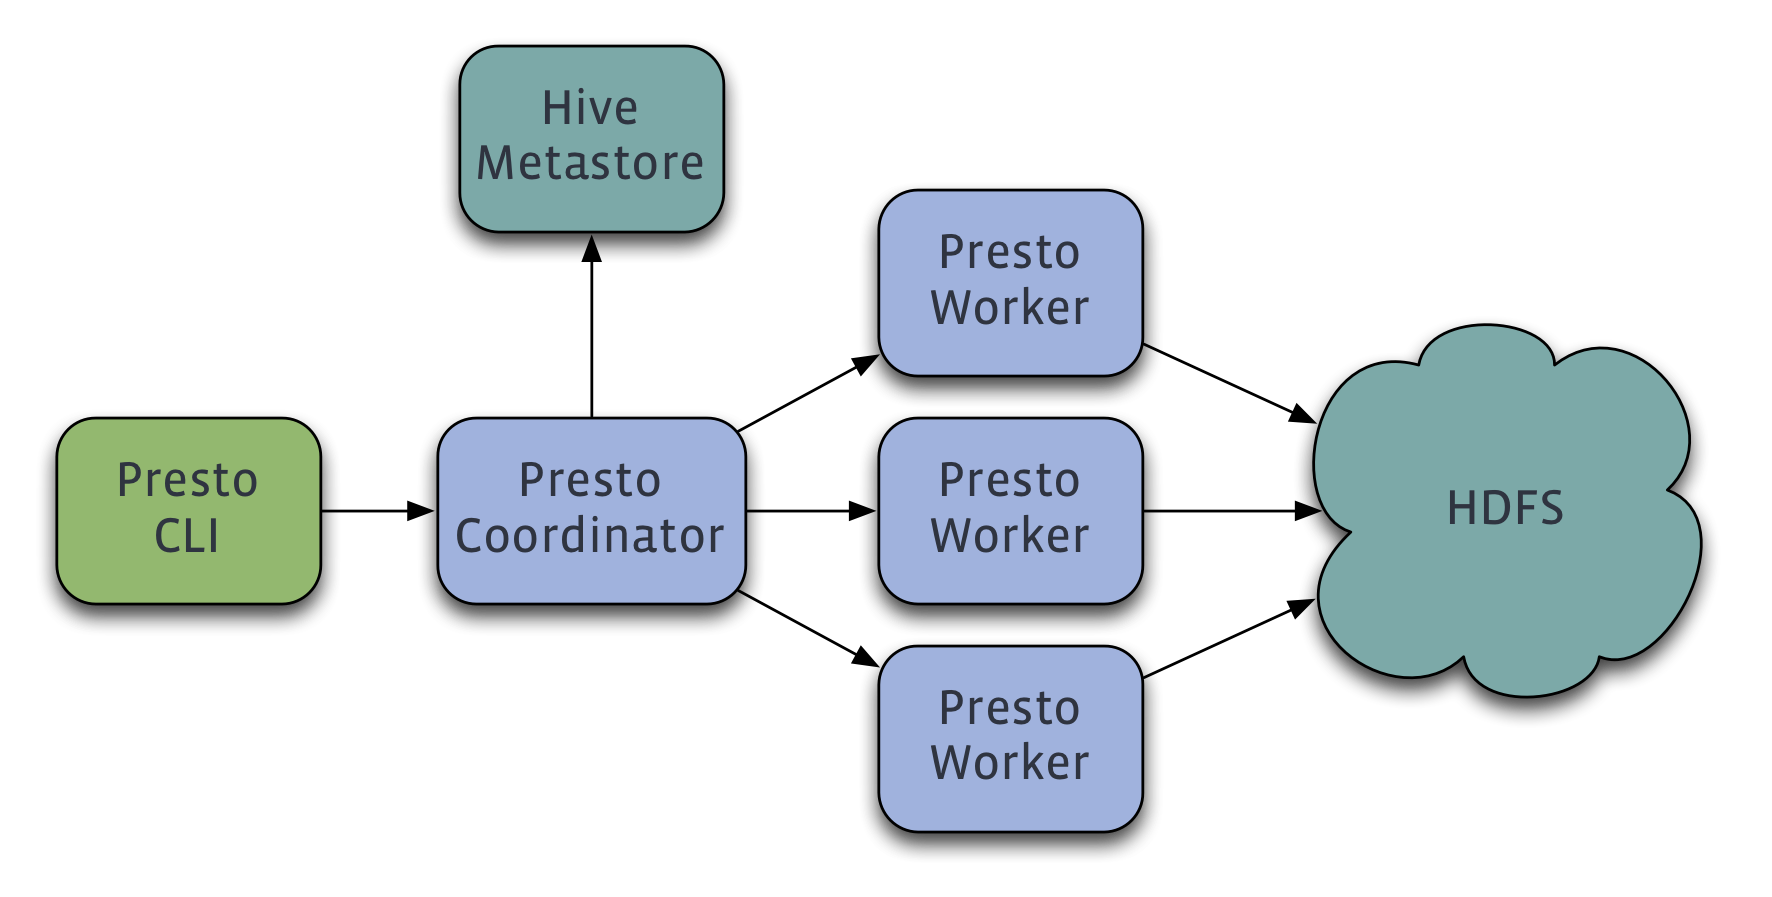
As the other sql-on-Hadoop technologies it works with always-on daemons which avoid the latency proper of Hive in starting a MapReduce job. Presto, differently from the others, divides the daemons in two types: the Coordinator and the Worker. A Coordinator is a node that receives the query from the clients, it analyses and plans the execution which is then passed on to Workers to carry out.
In other tools like Impala and Drill every node by default could add as both worker and receiver. The same can also happen in Presto but is not the default and the documentation suggest to dedicate a single machine to only perform coordination tasks for best performance in large cluster (reference to the doc).
The following image, taken from Presto website, explains the flow in case of usage of the Hive metastore as datasource.
Installation
The default Presto installation procedure is pretty simple and can be found in the official documentation. We just need to download the presto-server-0.180.tar.gz tarball and unpack it.
tar -xvf presto-server-0.180.tar.gz
This creates a folder named presto-server-0.180 which is the installation directory, the next step is to create a subfolder named etc which contains the configuration settings.
Then we need to create five configuration files and a folder within the etc folder:
node.environment: configuration specific to each node, enables the configuration of a clusterjvm.config: options for the Java Virtual Machineconfig.properties: specific coordinator/worker settingslog.properties: specifies log levelscatalog: a folder that will contain the data source definition
For a the basic functionality we need the following are the configurations:
node.environment
node.environment=production
node.id=ffffffff-ffff-ffff-ffff-ffffffffffff
node.data-dir=/var/presto/data
With the environment parameter being shared across all the nodes in the cluster, the id being a unique identifier of the node and the data-dir the location where Presto will store logs and data.
jvm.config
-server
-Xmx4G
-XX:+UseG1GC
-XX:G1HeapRegionSize=32M
-XX:+UseGCOverheadLimit
-XX:+ExplicitGCInvokesConcurrent
-XX:+HeapDumpOnOutOfMemoryError
-XX:+ExitOnOutOfMemoryError
I reduced the -Xmx parameter to 4GB as I'm running in a test VM. The parameters can of course be changed as needed.
config.properties
Since we want to keep it simple we'll create a unique node acting both as coordinator and as worker, the related config file is:
coordinator=true
node-scheduler.include-coordinator=true
http-server.http.port=8080
query.max-memory=5GB
query.max-memory-per-node=1GB
discovery-server.enabled=true
discovery.uri=http://linuxsrv.local.com:8080
Where the coordinator=true tells Presto to function as coordinator, http-server.http.port defines the ports, and discovery.uri is the URI to the Discovery server (in this case the same process).
log.properties
com.facebook.presto=INFO
We can keep the default INFO level, other levels are DEBUG, WARN and ERROR.
catalog
The last step in the configuration is the datasource setting: we need to create a folder named catalog within etc and create a file for each connection we intend to use.
For the purpose of this post we want to connect to the Kafka topic named rm.wimbledon. We need to create a file named kafka.properties within the catalog folder created above. The file contains the following lines
connector.name=kafka
kafka.nodes=linuxsrv.local.com:9092
kafka.table-names=rm.wimbledon
kafka.hide-internal-columns=false
where kafka.nodes points to the Kafka brokers and kafka.table-names defines the list of topics delimited by a ,.
The last bit needed is to start the Presto server by executing
bin/launcher start
We can append the --verbose parameter to debug the installation with logs that can be found in the var/log folder.
Presto Command Line Client
In order to query Presto via command line interface we just need to download the associated client (see official doc) which is in the form of a presto-cli-0.180-executable.jar file. We can now rename the file to presto and make it executable.
mv presto-cli-0.180-executable.jar presto
chmod +x presto
Then we can start the client by executing
./presto --server linuxsrv.local.com:8080 --catalog kafka --schema rm
Remember that the client has a JDK 1.8 as prerequisite, otherwise you will face an error. Once the client is successfully setup, we can start querying Kafka
You could notice that the schema (rm) we're connecting is just the prefix of the rm.wimbledon topic used in kafka. In this way I could potentially store other topics using the same rm prefix and being able to query them all together.
We can check which schemas can be used in Kafka with
presto:rm> show schemas;
       Schema
--------------------
 information_schema
 rm
(2 rows)
We can also check which topics are contained in rm schema by executing
presto:rm> show tables;
   Table
-----------
 wimbledon
(1 row)
or change schema by executing
use information_schema;
Going back to the Wimbledon example we can describe the content of the topic by executing
presto:rm> describe wimbledon;
      Column       |  Type   | Extra |                   Comment
-------------------+---------+-------+---------------------------------------------
 _partition_id     | bigint  |       | Partition Id
 _partition_offset | bigint  |       | Offset for the message within the partition
 _segment_start    | bigint  |       | Segment start offset
 _segment_end      | bigint  |       | Segment end offset
 _segment_count    | bigint  |       | Running message count per segment
 _key              | varchar |       | Key text
 _key_corrupt      | boolean |       | Key data is corrupt
 _key_length       | bigint  |       | Total number of key bytes
 _message          | varchar |       | Message text
 _message_corrupt  | boolean |       | Message data is corrupt
 _message_length   | bigint  |       | Total number of message bytes
(11 rows)
We can immediately start querying it like
presto:rm> select count(*) from wimbledon;
 _col0
-------
 42295
(1 row)

Query 20170713_102300_00023_5achx, FINISHED, 1 node
Splits: 18 total, 18 done (100.00%)
0:00 [27 rows, 195KB] [157 rows/s, 1.11MB/s]
Remember all the queries are going against Kafka in real time, so the more messages we push, the more results we'll have available. Let's now check what the messages looks like
presto:rm> SELECT _message FROM wimbledon LIMIT 5;

-----------------------------------------------------------------------------------------------------------------------------------------------------------------
 {"created_at":"Thu Jul 13 10:22:46 +0000 2017","id":885444381767081984,"id_str":"885444381767081984","text":"RT @paganrunes: Ian McKellen e Maggie Smith a Wimbl

 {"created_at":"Thu Jul 13 10:22:46 +0000 2017","id":885444381913882626,"id_str":"885444381913882626","text":"@tomasberdych spricht vor dem @Wimbledon-Halbfinal

 {"created_at":"Thu Jul 13 10:22:47 +0000 2017","id":885444388645740548,"id_str":"885444388645740548","text":"RT @_JamieMac_: Sir Andrew Murray is NOT amused wit

 {"created_at":"Thu Jul 13 10:22:49 +0000 2017","id":885444394404503553,"id_str":"885444394404503553","text":"RT @IBM_UK_news: What does it take to be a #Wimbled

 {"created_at":"Thu Jul 13 10:22:50 +0000 2017","id":885444398929989632,"id_str":"885444398929989632","text":"RT @PakkaTollywood: Roger Federer Into Semifinals \

(5 rows)
As expected tweets are stored in JSON format, We can now use the Presto JSON functions to extract the relevant informations from it. In the following we're extracting the user.name part of every tweet. Node the LIMIT 10 (common among all the SQL-on-Hadoop technologies) to limit the number of rows returned.
presto:rm> SELECT json_extract_scalar(_message, '$.user.name') FROM wimbledon LIMIT 10;
        _col0
---------------------
 pietre --
 BLICK Sport
 Neens
 Hugh Leonard
 ••••Teju KaLion••••
 Charlie Murray
 Alex
 The Daft Duck.
 Hotstar
 Raj Singh Chandel
(10 rows)
We can also create summaries like the top 10 users by number of tweets.
presto:rm> SELECT json_extract_scalar(_message, '$.user.name') as screen_name, count(json_extract_scalar(_message, '$.id')) as nr FROM wimbledon GROUP BY json_extract_scalar(_message, '$.user.name') ORDER BY count(json_extract_scalar(_message, '$.id')) desc LIMIT 10;
     screen_name     | nr
---------------------+-----
 Evarie Balan        | 125
 The Master Mind     | 104
 Oracle Betting      |  98
 Nichole             |  85
 The K - Man         |  75
 Kaciekulasekran     |  73
 vientrainera        |  72
 Deporte Esp         |  66
 Lucas Mc Corquodale |  64
 Amal                |  60
(10 rows)
Adding a Description file
We saw above that it's possible to query with ANSI SQL statements using the Presto JSON function. The next step will be to define a structure on top of the data stored in the Kafka topic to turn raw data in a table format. We can achieve this by writing a topic description file. The file must be in json format and stored under the etc/kafka folder; it is recommended, but not necessary, that the name of the file matches the kafka topic (in our case rm.wimbledon). The file in our case would be the following
{
    "tableName": "wimbledon",
    "schemaName": "rm",
    "topicName": "rm.wimbledon",
    "key": {
        "dataFormat": "raw",
        "fields": [
            {
                "name": "kafka_key",
                "dataFormat": "LONG",
                "type": "BIGINT",
                "hidden": "false"
            }
        ]
    },
    "message": {
        "dataFormat": "json",
        "fields": [
            {
                "name": "created_at",
                "mapping": "created_at",
                "type": "TIMESTAMP",
                "dataFormat": "rfc2822"
            },
            {
                "name": "tweet_id",
                "mapping": "id",
                "type": "BIGINT"
            },
            {
                "name": "tweet_text",
                "mapping": "text",
                "type": "VARCHAR"
            },
            {
                "name": "user_id",
                "mapping": "user/id",
                "type": "VARCHAR"
            },
            {
                "name": "user_name",
                "mapping": "user/name",
                "type": "VARCHAR"
            },
            [...]
        ]
    }
}
After restarting Presto when we execute the DESCRIBE operation we can see all the fields available.
presto:rm> describe wimbledon;
      Column       |   Type    | Extra |                   Comment
-------------------+-----------+-------+---------------------------------------------
 kafka_key         | bigint    |       |
 created_at        | timestamp |       |
 tweet_id          | bigint    |       |
 tweet_text        | varchar   |       |
 user_id           | varchar   |       |
 user_name         | varchar   |       |
 user_screenname   | varchar   |       |
 user_location     | varchar   |       |
 user_followers    | bigint    |       |
 user_time_zone    | varchar   |       |
 _partition_id     | bigint    |       | Partition Id
 _partition_offset | bigint    |       | Offset for the message within the partition
 _segment_start    | bigint    |       | Segment start offset
 _segment_end      | bigint    |       | Segment end offset
 _segment_count    | bigint    |       | Running message count per segment
 _key              | varchar   |       | Key text
 _key_corrupt      | boolean   |       | Key data is corrupt
 _key_length       | bigint    |       | Total number of key bytes
 _message          | varchar   |       | Message text
 _message_corrupt  | boolean   |       | Message data is corrupt
 _message_length   | bigint    |       | Total number of message bytes
(21 rows)
Now I can use the newly defined columns in my query
presto:rm> select created_at, user_name, tweet_text from wimbledon LIMIT 10;
and the related results

We can always mix defined columns with custom JSON parsing Presto syntax if we need to extract some other fields.
select created_at, user_name, json_extract_scalar(_message, '$.user.default_profile') from wimbledon LIMIT 10;
Oracle Data Visualization Desktop
As mentioned at the beginning of the article, the overall goal was to analyse Wimbledon twitter feed in real time with Oracle Data Visualization Desktop via JDBC, so let's complete the picture!
JDBC drivers
First step is to download the Presto JDBC drivers version 0.175, I found them in the Maven website. I tried also the 0.180 version downloadable directly from Presto website but I had several errors in the connection.
After downloading we need to copy the driver presto-jdbc-0.175.jar under the %INSTALL_DIR%\lib folder where %INSTALL_DIR% is the Oracle DVD installation folder and start DVD. Then I just need to create a new connection like the following
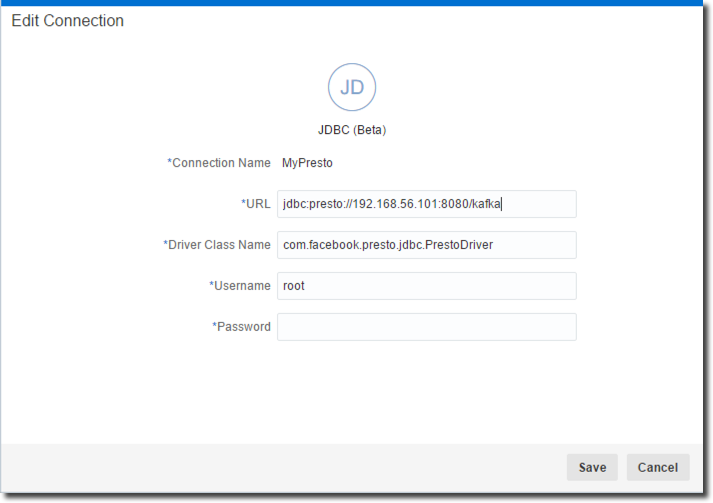
Note that:
- URL: includes also the
/kafkapostfix, this tells Presto which storage I want to query - Driver Class Name: this setting puzzled me a little bit, I was able to discover the string (with the help of Gianni Ceresa) by concatenating the folder name and the driver class name after unpacking the jar file
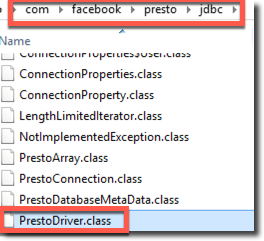
** Username/password: those strings can be anything since for the basic test we didn't setup any security on Presto.
The whole JDBC process setting is described in this youtube video provided by Oracle.
We can then define the source by just selecting the columns we want to import and create few additional ones like the Lat and Long parsing from the coordinates column which is in the form [Lat, Long]. The dataset is now ready to be analysed as we saw at the beginning of the article, with the final result being:

Conclusions
As we can see from the above picture the whole process works (phew....), however it has some limitations: there is no pushdown of functions to the source so most of the queries we see against Presto are in the form of
select tweet_text, tweet_id, user_name, created_at from (
select coordinates,
 coordinates_lat_long,
 created_at,
 tweet_id,
 tweet_text,
 user_followers,
 user_id,
 user_location,
 user_name,
 user_screenname,
 user_time_zone
from rm.wimbledon)
This means that the whole dataset is retrieved every time making this solution far from optimal for big volumes of data. In those cases probably the "parking" to datastore step would be necessary. Another limitation is related to the transformations, the Lat and Long extractions from coordinates field along with other columns transformations are done directly in DVD, meaning that the formula is applied directly in the visualization phase. In the second post we'll see how the source parsing phase and query performances can be enhanced using Kafka Connect, the framework allowing an easy integration between Kafka and other sources or sinks.
One last word: winning Wimbledon eight times, fourteen years after the first victory and five years after the last one it's something impressive! Chapeau mr Federer!


