Category Archives: Art of BI
Building a SQL Server Virtual Lab in Windows: Test the Virtual Lab
In this final blog post of the series, we will test the virtual lab by registering all the SQL Server instances and then running a multi-server query to query all SQL Server instances. Then, we will wrap-up the testing by creating a shared folder in DV-SQL01 and then access it in both DV-SQL02 and DV-SQL03.
Registering all the SQL Server instances in DV-SQL01
Like creating an account with a website which stores your user account details so that you won’t have to key them in again the next time, registering a server in SSMS stores the server connection details for future connections so that you don’t need to type them in again.
In this section, we will create a server group and then register all the SQL Servers in the virtual lab.
To register all the SQL Servers in DV-SQL01:
- Logoff the current logged on local administrator user.
- Logon to DV-SQL01 using the DV-SQLNET\JBauer domain user account.
- Open SSMS.
- Type DV-SQL01 in the Server name text box.
- Click Connect.
This will connect you to the DV-SQL01 default instance. - Click the View menu on SSMS.
- Click Registered Servers on the drop-down menu.
- Expand Database Engine.
- Right-click Local Server Groups.
- Click New Server Group… on the drop-down menu.
- Type Virtual Lab SQL Servers in the Group name text box.
- Click OK.
- Right-click the Virtual Lab SQL Servers folder.
- Click New Server Registration… on the drop-down menu.
- Type DV-SQL01 in the Server name text box.
- Click SAVE.
- Repeat steps 13 to 16 to register DV-SQL02 to the Virtual Lab SQL Servers server group.
- Repeat steps 13 to 16 to register DV-SQL03 to the Virtual Lab SQL Servers server group.
As shown in Figure 2-41 Creating a New Server Group and Registering SQL Servers, you will find the three instances of SQL Servers registered under the Virtual Lab SQL Servers server group.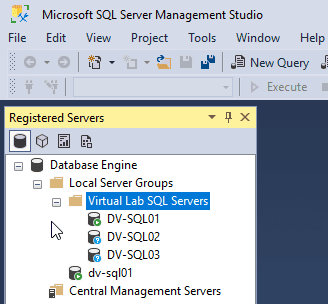
Figure 2-41 Creating a New Server Group and Registering SQL Servers
This completes creating the Virtual Lab SQL Servers server group and registering DV-SQL01, DV-SQL02, and DV-SQL03. Next, we will run a multi-server query to query all the SQL Server instance in the Virtual Lab SQL Servers server group.
Running a Multi-Server Query to Query all SQL Server Instances
If you have a script and you need to run it against multiple SQL Servers, would you rather run it once again all servers or choose to run it one at a time for each of the SQL Servers? Most likely, you would like the former option. Multi-server query allows you to do just that and the results returned by the query can be combined into a single results pane. The results set will include one additional column identifying the server name for each server.
To run a multi-server query to query all the instances in the Virtual Lab SQL Servers server group:
- Right-click on the Virtual Lab SQL Servers server group.
- Click New Query on the pop-up menu.
Notice the SSMS status bar turns into pink color indicating that it is a multi-server query. - Run the following Querying the Server Properties.sql script to query the server properties for all the registered SQL Servers in the Virtual Lab SQL Servers server group:
01  -- Querying the Server Properties

02  SELECT

03  SERVERPROPERTY('ServerName') AS [Instance Name],

04  SERVERPROPERTY('ProductVersion') AS [Version Build],

05  SERVERPROPERTY ('Edition') AS [Edition],

06  SERVERPROPERTY('ProductLevel') AS [Service Pack],

07  CASE SERVERPROPERTY('IsIntegratedSecurityOnly')

08      WHEN 0 THEN 'SQL Server and Windows Authentication mode'

09      WHEN 1 THEN 'Windows Authentication mode'

10  END AS [Server Authentication],

11  CASE SERVERPROPERTY('IsClustered')

12      WHEN 0 THEN 'False'

13      WHEN 1 THEN 'True'

14  END AS [Is Clustered?],

15  [cpu_count] AS [CPUs],

16  [physical_memory_kb]/1024 AS [RAM (MB)]

17     FROM [sys].[dm_os_sys_info]
Script 2-4 Querying the Server Properties
- Notice the output of Figure 2-42 Output of the Multi-Server Query shows all the server properties for the three SQL Server instances registered in the Virtual Lab SQL Servers server group:

Figure 2-42 Output of the Multi-Server Query
Creating a Share Folder and Accessing It from All Servers
Creating a share folder allows you to share and transfer files between servers. In this section, we will create a folder in DV-SQL01 and then test accessing it in DV-SQL02 and DV-SQL03.
Note: In a Production environment, as part of the change control process, you will need to make a service request for the Windows Administrators to create the share folder and grant the permissions to the specific user accounts.
To create a folder and share it in DV-SQL01 then test accessing in DV-SQL02 and DV-SQL03:
- Logon to DV-SQL01 as JBauer.
- Press Win+E on your keyboard.
- Click This PC on the left pane.
- Click Local Disk C:\.
- Create a folder and name it 24x7.
- Right-click on the 24x7 folder.
- Click Properties on the pop-up menu.
- Click the Sharing tab as shown in Figure 2-43 Sharing a Folder.
- Click Share…
You can add the domain users or groups you wish to grant access to this folder and the permission level. - Click Share.
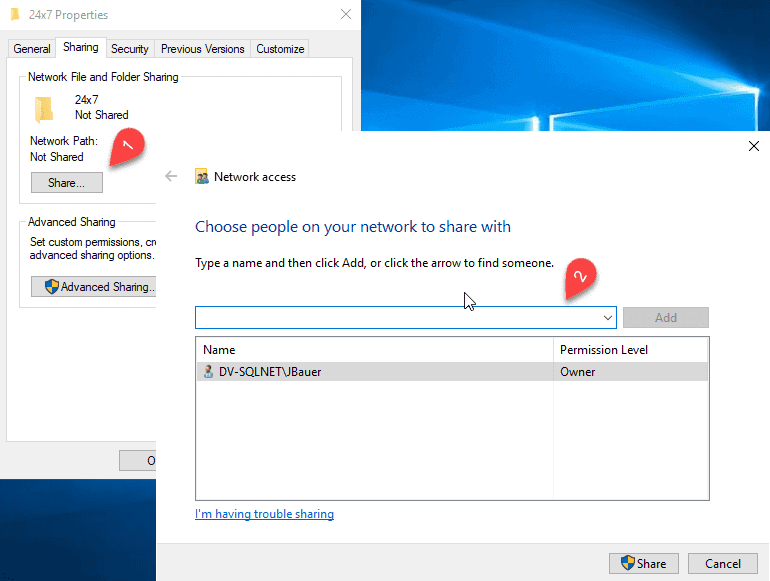
Figure 2-43 Sharing a Folder - Type Administrator in the User name text box.
- Press Tab on your keyboard.
- Type Password$ in the Password text box.
- Press Enter on your keyboard.
You will see the Network access message box notifying you that the folder \\DV-SQL01\24x7 is shared. - Click Done.
- Click Close.
- Logon to DV-SQL02 with the JBauer domain user.
- Press Win+R on your keyboard.
- Type \\dv-sql01\24x7 in the Open text box.
- Press Enter on your keyboard.
- Create a text file and name it DV-SQL02.
You can create this file because you are logged on as JBauer and you have Owner permission. - Logon to DV-SQL03 with the JBauer domain user.
- Press Win+R on your keyboard.
- Type \\dv-sql01\24x7 in the Open text box.
- Create a text file and name it DV-SQL03.
- Go back to DV-SQL01.
- Open the 24x7 As shown in Figure 2-44 Checking the 24x7 Folder, you will notice the text files created in DV-SQL02 and DV-SQL03.

Figure 2-44 Checking the 24x7 Folder
This completes the testing of the virtual lab.
You have now completed setting up the virtual lab for SQL Server 2019 HADR testing. You can repeat these steps in later days when you need to re-create the virtual lab for further testing. Thanks for tuning in for my blog series. You can find all of the blog posts below if you missed anything.
If you’re looking for SQL Server support, please reach out.
Virtual Network for the Virtual Lab
Software & Hardware Requirements
Installing Oracle VM VirtualBox and Creating a Virtual Network
Creating the Domain Controller (DC) VM
The post Building a SQL Server Virtual Lab in Windows: Test the Virtual Lab appeared first on Datavail.
10 Best Practices to Secure PostgreSQL AWS RDS/Aurora
AWS supports PostgreSQL versions 9.4 through 12 on RDS and 9.6 through 11 on Aurora. Many organizations are migrating to PostgreSQL RDS or Aurora in order to take advantage of availability, scalability, performance, etc. and are doing it as either a heterogeneous or a homogeneous migration.
Security and Compliance is a shared responsibility between AWS and the customer:
- AWS is responsible for security “OF” the cloud
- Customer is responsible for security “IN” the cloud.
When it comes to dealing with data in the cloud, security is a key aspect. Data breaches or data privacy is not surprising topics in today’s world, in the first six months of 2019 alone 4.1 billion records were exposed in data breaches. When thinking of securing PostgreSQL RDS or Aurora in AWS, below are the top 10 points that come to mind as a priority. Let’s go walk through them one at a time.
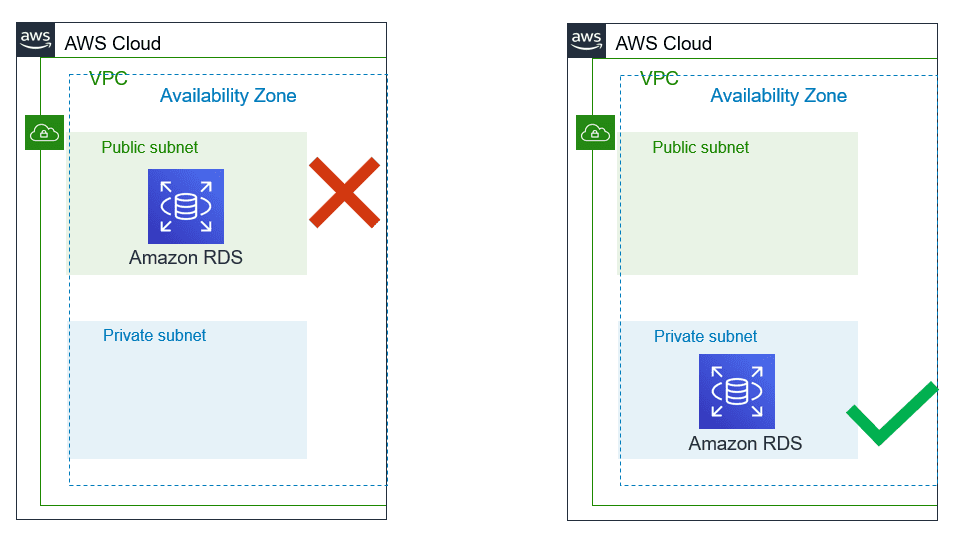
1. DB Subnet Group with Private Subnets:
DB Subnet group is mandatory configuration while creating RDS and each DB subnet group should have subnets in at least two Availability Zones in each AWS Region. Make sure these subnets are private until there is an explicit need of accessing RDS database from the public network based on use-case.
Quick validation way is:
- Internet gateway is not associated with VPC/subnets/routes.
- Public IP is not assigned to RDS instances.
2. Managing Security Groups:
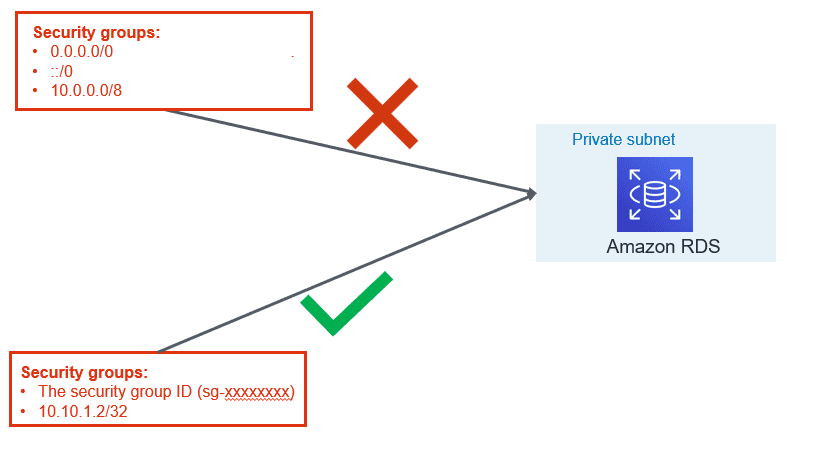
VPC security group are like firewall at the subnet level which controls access to DB instances in VPC. It plays a significant part in managing who all can access RDS instance.
- Use application servers’ security group names instead of an individual IP addresses or range of IP addresses. This will allow inbound traffic ONLY from network interfaces (and their associated
- instances) that are assigned to that security group.
- If there is a specific need for giving access for a specific server, include only that IP in the security group instead of range of that IP.
- Avoid giving access for desktop, it is recommended that Baston server is used for RDS access. Tools like PSQL client or pgAdmin should be installed on bastion hosts for Administrative needs for the database administrators.
- Within PostgreSQL it is best practice to use least privileged defined roles for specific purpose (i.e. read role, data modification role, monitoring role, etc.)
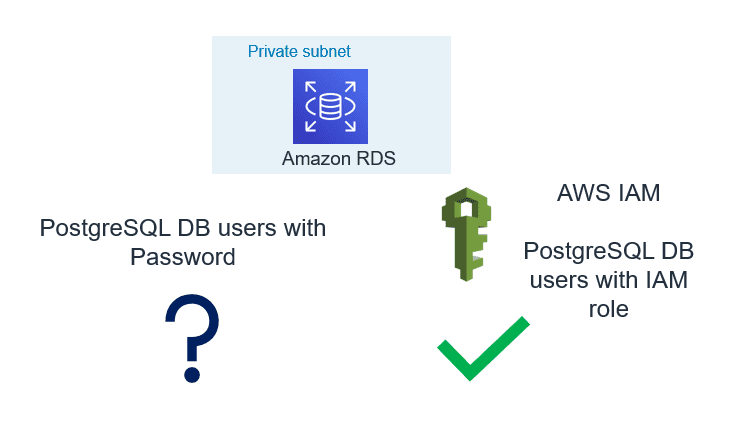
3. Use IAM Database Authentication:
AWS RDS and Aurora support authentication to the database using IAM user or role credential. IAM authentication is secure than the traditional method of authentication because:
- No need to generate a password while creating a database user.
- SSL is must while using IAM authentication and that make sure in-transit data is encrypted
- Automatic rotation of token since the token is valid only for 15 minutes
Please refer to our blog “AWS IAM to Authenticate Against RDS Instances & Aurora Clusters” for more information.
4. Enable Encryption and Force SSL:
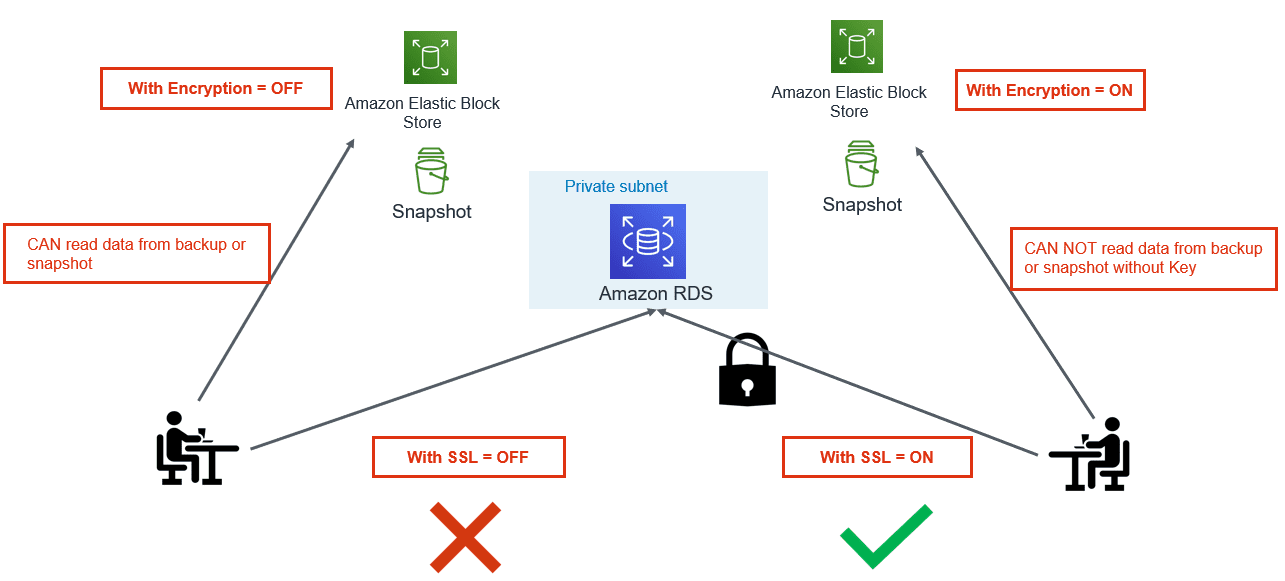
While Data breaches and Cybersecurity breaches a growing concern, using cloud native encryption options can be savior. AWS provides various options to encrypt data at rest and in-transit.
- Encryption at Rest: Use AWS KMS to encrypt RDS and Aurora databases. Once the database is configured with encryption, data stored in the storage layer gets encrypted. Automated-backups, read-replicas and snapshots also get encrypted if you are using encrypted storage.
- Encryption in Transit: PostgreSQL natively supports SSL connections to encrypt client-server communications. Check the DB instance configuration for the value of the force_ssl parameter. By default, the rds.force_ssl parameter is set to 0 (off). If the rds.force_ssl parameter is set to 1, clients are required to use SSL/TLS for connections. If you are using pgBouncer, you can use various authentication methods including TLS/SSL client certificate authentication.
5. Export PostgreSQL Logs to CloudWatch:
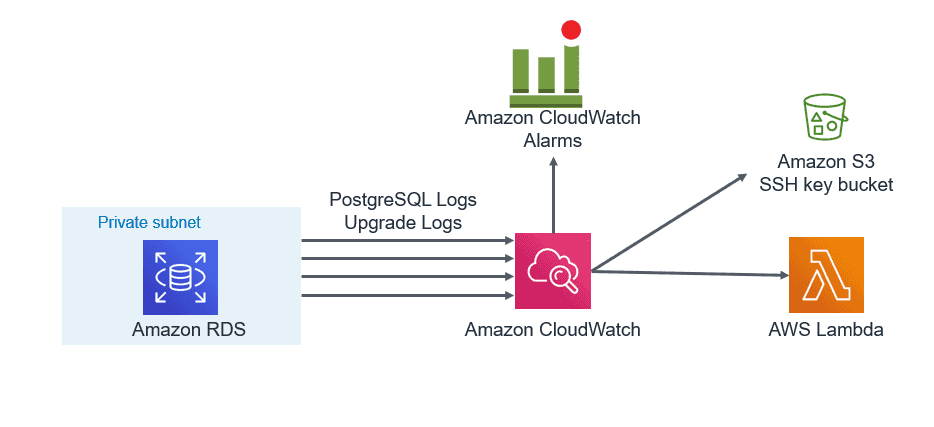
You can now publish your Amazon RDS for PostgreSQL logs to CloudWatch Logs. Supported logs include both upgrade logs and PostgreSQL logs. Publishing these logs to CloudWatch allows you to maintain continuous visibility into database errors and activity.
- A database administrator can set up CloudWatch alarms to notify them of frequent restarts, failed login attempts that are recorded in the error log.
- One can create alarms for errors or warnings recorded in PostgreSQL logs. These logs can be stored in to S3 bucket for longer retention.
6. Enable Auditing:
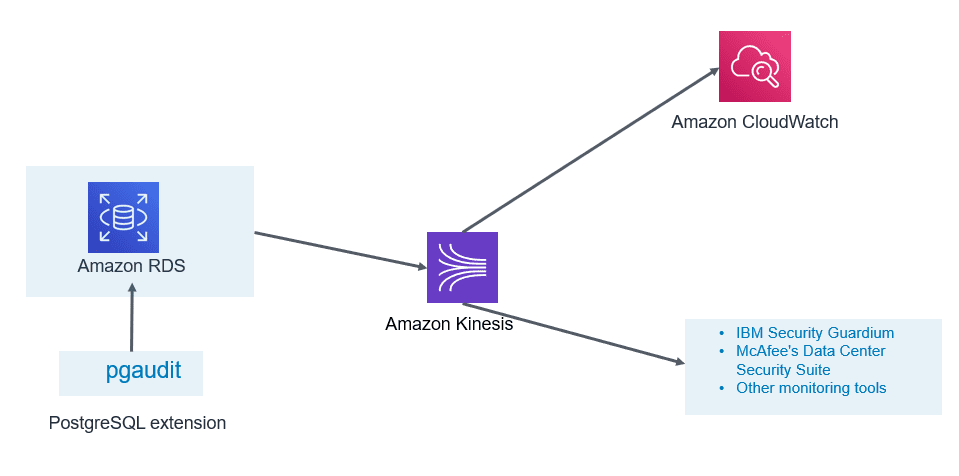
- PostgreSQL Aurora supports Database Activity Streams and pgAduit extension.
- Database activity streams can be integrated with monitoring tools for real time monitoring and notifications.
- This can help in identifying unwanted occurrences and take corrective action as soon as such occurrences are identified.
- These features can help you to meet compliance and regulatory requirements.
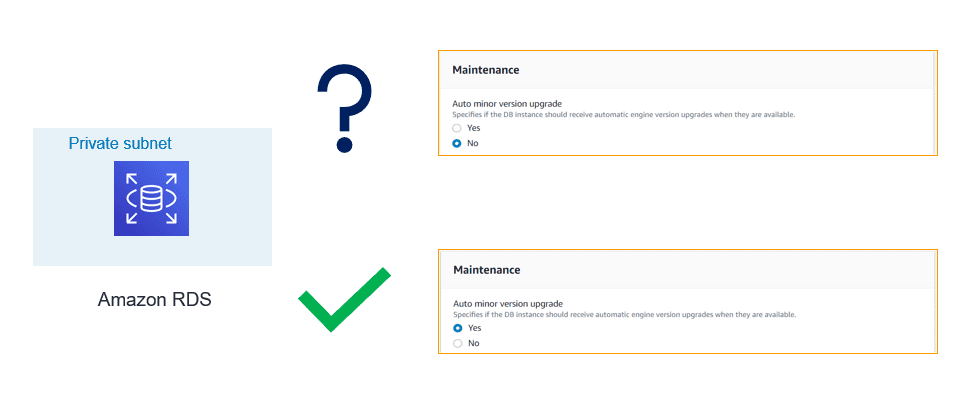
7. Timely Patching:
If the database can sustain outage for a few minutes during the maintenance window, you should enable automatic patching of PostgreSQL minor release. If database cannot afford outage, in that case, plan for the scheduled outage but make sure minor patches are applied regularly.
- Major releases usually bring new functionalities and features
- Minor releases fix frequently encountered bugs, security issues, and data corruption problems to reduce the security risk.
Make sure you keep a tab on the latest venerability announced by various organizations.
8. Enable Deletion Protection:
- If delete protection is enabled and you tried deleting the RDS instance, your request will fail. To continue with your request, you need to first modify the instance and disable deletion protection. This configuration is a helpful if this delete request is accidental.
- If you are using tools like Terraform or CloudFormation to support infrastructure as code and automation. You can configure respective flags to enable delete protection.
- For the production environment, it is highly recommended to enable this flag.

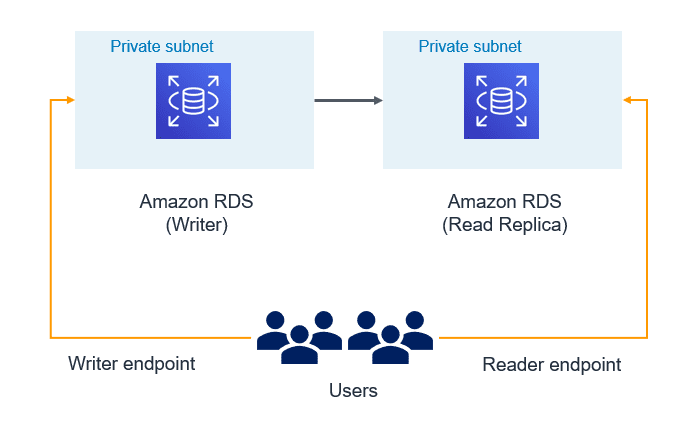
9. Use Database Endpoints:
- If read replica is configured and application is intended for read-only workload then make sure reader endpoint is used at application configuration. This would make sure data modifications (DML) don’t get performed by the unintended or accidental operations.
- Use writer/cluster endpoint only for those applications which need data modifications. If there is need, you may even create custom endpoint for specific application or use case.
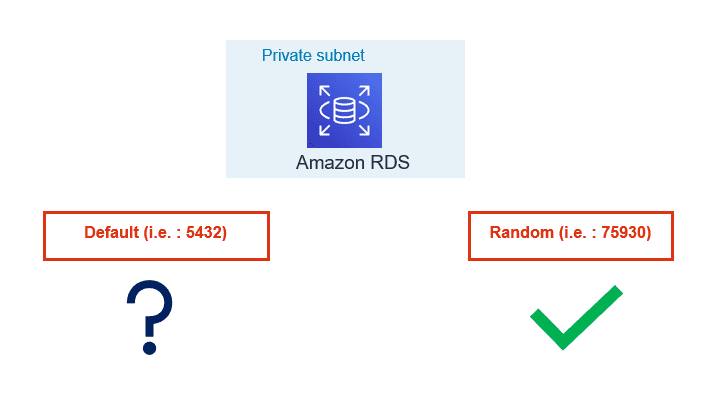
10. Use custom port:
- By default, Oracle listens on 1521, SQL Server on 1433, and MySQL on 3306. In a similar way PostgreSQL by default gets configured with 5432 TCPIP port. Historically as part of security best practice, it has been recommended not to use the default ports for connections to any DB Server.
- Automated attacks are configured to try finding services running on default ports and you can be lucky if your DB services are running on a non-default port. AWS RDS/Aurora allows you to configure the database with a non-default port.
- Many organizations have the enterprise-level practice to use non-default ports as security guidelines. If your organization is using Cloud formation or Terraform, modifying default port can be an easy way to standardize on those templates.
AWS provides various features and integration to harden security along with auditing and real time monitoring of PostgreSQL RDS/Aurora.
Following the best security practices discussed allows only authorized users and applications have access to the database. If you have inquiries or need assistance on analyzing PostgreSQL RDS/Aurora clusters from a security perspective, contact us. Datavail provides 24x7 support for your database environments.
The post 10 Best Practices to Secure PostgreSQL AWS RDS/Aurora appeared first on Datavail.
Create an Empty OBIEE 12c Web Catalog – Easy as 1,2,3
In this blog I have used the sample app v511 to demonstrate how straight forward it is to create a blank Web Catalog.
The post Create an Empty OBIEE 12c Web Catalog – Easy as 1,2,3 appeared first on artofbi Blog.
Turn your OBIEE Sample App VM into a Development Environment
you should always have your own development environment where you can test your implementation and Proof of Concepts on before the client development team has access to it. Our development team has initially installed the Sample App v511 for OBIEE 12C on their windows machines in order to implement all Proof of Concepts, including OBIEE 12C new features, to fulfill our client requirements.
The post Turn your OBIEE Sample App VM into a Development Environment appeared first on artofbi Blog.
BITeamwork 3.8.6 Released – Certified for Oracle BI 12c
Users of BITeamwork can now rejoice! BITeamwork for Oracle BI 12c is now GA.
This comes on the heels of now having dozens of OBIEE customers now using the Oracle BI BITeamwork collaboration tool for commenting on OBIEE Dashboards, annotating Oracle BI reports, and justifying their data from Hyperion or other data stores with commentary that can be exported, or published in to templates.
The post BITeamwork 3.8.6 Released – Certified for Oracle BI 12c appeared first on artofbi Blog.


